
DIY Axle Nut TSB
 01-21-2012, 02:22 PM
#1

Thread Starter
Not sure if my MY01 ever had it's axle nuts re-torqued to the higher torque range so I decided I would do it anyway.
Things you'll need
1) 36mm socket http://www.amazon.com/OEM-25206-Sock.../dp/B000CMHKPY
2) 4 ft 1" pipe http://www.homedepot.com/h_d1/N-5yc1...atalogId=10053
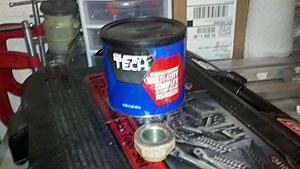
3) Grease http://www.walmart.com/ip/Super-Tech...14-oz/16928004
Now park the car and chock the rear wheels. I put my car in reverse gear and pulled the e-brake.
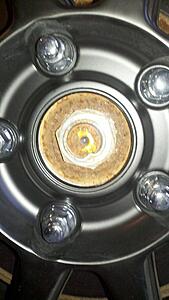
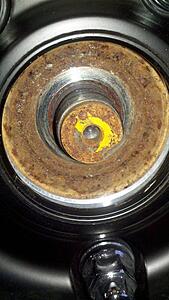
Remove your wheels center cap and you should see this:
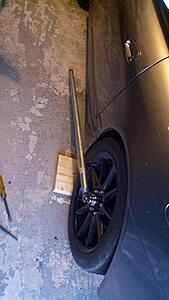
I didn't bother to unstake the axle nut. So get your socket firmly against the nut and put your pipe over the wrench like so:
The nut broke free with little effort, I am only 160lb guy so the 4 feet of leverage really are a great force multiplier.
Now wipe the face of the nut clean and apply a thin layer of grease on the face. Do not apply any grease to the threads.
Its also a good idea to wipe the area where the nut is going to be against.
Put the nut back on with your hand until its tight then use your wrench to get it as far as you can. It should be close to the original staked location.
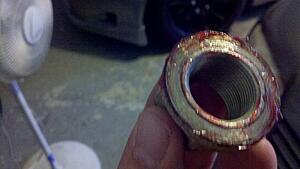
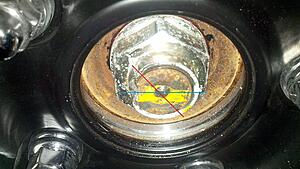
Now put your pipe back over your wrench and give it a good turn. Careful not to snap your wrench. The original stake location should move from 12 o'clock to 2 o'clock. As you can see the red line is the old stake point the blue is the new stake point.
Repeat the other side.
Things you'll need
1) 36mm socket http://www.amazon.com/OEM-25206-Sock.../dp/B000CMHKPY
2) 4 ft 1" pipe http://www.homedepot.com/h_d1/N-5yc1...atalogId=10053
3) Grease http://www.walmart.com/ip/Super-Tech...14-oz/16928004
Now park the car and chock the rear wheels. I put my car in reverse gear and pulled the e-brake.
Remove your wheels center cap and you should see this:

I didn't bother to unstake the axle nut. So get your socket firmly against the nut and put your pipe over the wrench like so:

The nut broke free with little effort, I am only 160lb guy so the 4 feet of leverage really are a great force multiplier.

Now wipe the face of the nut clean and apply a thin layer of grease on the face. Do not apply any grease to the threads.

Its also a good idea to wipe the area where the nut is going to be against.

Put the nut back on with your hand until its tight then use your wrench to get it as far as you can. It should be close to the original staked location.
Now put your pipe back over your wrench and give it a good turn. Careful not to snap your wrench. The original stake location should move from 12 o'clock to 2 o'clock. As you can see the red line is the old stake point the blue is the new stake point.

Repeat the other side.


 01-21-2012, 02:31 PM
#4
Thread Starter
Good point, the stake positions will move from 12 to 2 o'clock if they have never been done before.
01-21-2012, 02:33 PM
#5
Thread Starter
 01-21-2012, 02:58 PM
#7
Thread Starter
Stake the nut means to put a deformation in it so that it can't work itself loose. If you notice in the first or last picture the nut has a section dented in. That is the stake.
Trending Topics
01-21-2012, 07:34 PM
#9


Join Date: Apr 2004
Location: Davis
Posts: 481
Likes: 0
Received 0 Likes
on
0 Posts
so you have to remove the nuts? you can't just tighten it an additional 2'oclock? if it hasn't been done before. Or do you have to remove the nut?
by the way, thank you for the picture, very helpful
by the way, thank you for the picture, very helpful
01-21-2012, 07:49 PM
#10
Registered User

Nope, you do have to remove the nuts completely, to put grease on the face. Without the grease, you won't be able to torque the nut to the 2 o'clock position.
-Connor