
Repairing soft top rip
 01-30-2012, 10:00 AM
#1
Registered User

Thread Starter

Join Date: Mar 2011
Posts: 222
Likes: 0
Received 0 Likes
on
0 Posts
Evening chaps,
Before you tell me to look in the search, I have and I have read most threads.
Well I have the standard rip on the shoulder and have tried repairing it a couple times. At first I sourced a bit of the material and tried patching it up with a fabric glue, this didn't hold for even 1 roof down action.
I then bought myself a pack of tear aid. This was ok to begin with, however it's too stretchy. I have it on at the moment and it's keeping me dry, however it doesn't hold the rip together at all. I have had the roof down a couple times recently and have left the car in the sun for 10mins before putting the roof down, but still I think the split has got bigger.
So, does anyone have anymore ideas or something which has worked well and stopped further damage.
Cheers.


 01-31-2012, 01:21 PM
#4

Join Date: Oct 2010
Location: Kent
Posts: 128
Likes: 0
Received 0 Likes
on
0 Posts
Have a look at this repair I did back in May last year, its still as good as day 1, and looks a lot better than the photos.
Firstly thankyou to everyone who gave advice. After looking at the price of a new hood £765 I decided I just couldnt justify it just yet. So set about a repair. A temporary patch applied with Bostic is supporting the repair.
Pre repair, not looking pretty.
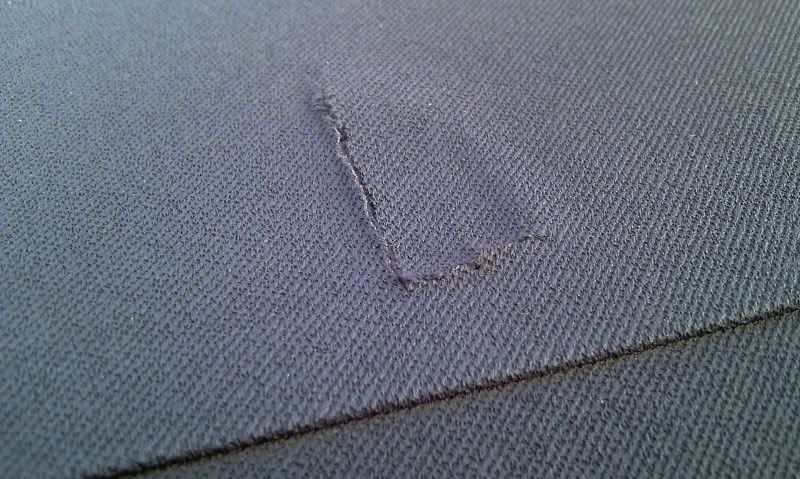
Post Repair, a little excess that needs trimming, colour match not that bad, in real light.
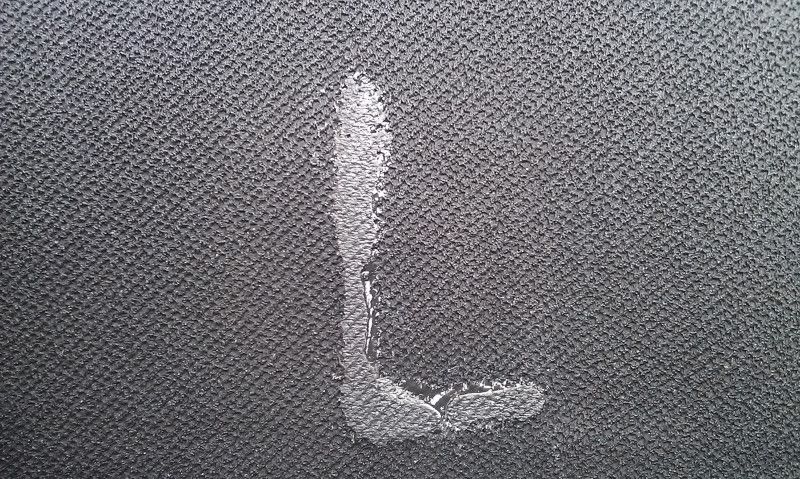
I could have made a better job, but was looking to make it water tight, i may use a very sharp stanley blade to trim flush and reapply the vinyl repair product. I used

Came with a variety of colours, that you mix, sets in about 20 minutes, and seems to be very well adhered, so fingers crossed, it will last till the spring next year.
Thanks again
Roger
Pre repair, not looking pretty.
Post Repair, a little excess that needs trimming, colour match not that bad, in real light.
I could have made a better job, but was looking to make it water tight, i may use a very sharp stanley blade to trim flush and reapply the vinyl repair product. I used
Came with a variety of colours, that you mix, sets in about 20 minutes, and seems to be very well adhered, so fingers crossed, it will last till the spring next year.
Thanks again
Roger
01-31-2012, 02:30 PM
#6

I used wetsuit glue on mine along with bicycle repair kit patches on the inside. It's not worked :\ (granted, I may have not used it properly)
Rogc's repair looks the ticket. I've been looking at how to fix mine too.
Rogc's repair looks the ticket. I've been looking at how to fix mine too.
01-31-2012, 03:24 PM
#7
Also, on a what to stitch it up with note, I watched a YouTube vid of a lady repairing her soft top on BMW. She used fishing gut and a curved needle to sew the tear up. (well, more the huge slash left by thugs) She then used a sealant, like wet suit glue etc.
Trending Topics
01-31-2012, 09:38 PM
#8
Registered User

Join Date: Jan 2005
Location: Bristol
Posts: 131
Likes: 0
Received 0 Likes
on
0 Posts
Have a look at this repair I did back in May last year, its still as good as day 1, and looks a lot better than the photos.
Originally Posted by Rogc' timestamp='1305668199' post='20585899
Firstly thankyou to everyone who gave advice. After looking at the price of a new hood £765 I decided I just couldnt justify it just yet. So set about a repair. A temporary patch applied with Bostic is supporting the repair.
Pre repair, not looking pretty.
Post Repair, a little excess that needs trimming, colour match not that bad, in real light.
I could have made a better job, but was looking to make it water tight, i may use a very sharp stanley blade to trim flush and reapply the vinyl repair product. I used
Came with a variety of colours, that you mix, sets in about 20 minutes, and seems to be very well adhered, so fingers crossed, it will last till the spring next year.
Thanks again
Roger
Are there any details on how to remove the sealant. It looks like this is how the previous owner of my car repaired a rip, but it has cracked and needs redoing. To make a tidy job, it want to remove the previous repair first.
Roger H
02-01-2012, 04:15 AM
#9
Join Date: Oct 2010
Location: Kent
Posts: 128
Likes: 0
Received 0 Likes
on
0 Posts
Originally Posted by Rogc' timestamp='1328048509' post='21370912
Have a look at this repair I did back in May last year, its still as good as day 1, and looks a lot better than the photos.
[quote name='Rogc' timestamp='1305668199' post='20585899']
Firstly thankyou to everyone who gave advice. After looking at the price of a new hood £765 I decided I just couldnt justify it just yet. So set about a repair. A temporary patch applied with Bostic is supporting the repair.
Pre repair, not looking pretty.
Post Repair, a little excess that needs trimming, colour match not that bad, in real light.
I could have made a better job, but was looking to make it water tight, i may use a very sharp stanley blade to trim flush and reapply the vinyl repair product. I used
Came with a variety of colours, that you mix, sets in about 20 minutes, and seems to be very well adhered, so fingers crossed, it will last till the spring next year.
Thanks again
Roger
Are there any details on how to remove the sealant. It looks like this is how the previous owner of my car repaired a rip, but it has cracked and needs redoing. To make a tidy job, it want to remove the previous repair first.
Roger H
[/quote]
I would have thought trimming flat with a stanley knife blade was best. To be honest ive left it as it is in the pictures. This product is extremely flexible and i doubt that it will crack. I applied a little to much, and didnt clamp is sufficiently so ended up with a small ridge. I would have thought that a stanley knife blade held flat to the roof would remove it.
TBH i really rate this product, it's designed for the repair of vinyl / leather and therefore has to stretch and flex.
02-01-2012, 06:54 AM
#10
Registered User
Thread Starter
Join Date: Mar 2011
Posts: 222
Likes: 0
Received 0 Likes
on
0 Posts
Ok so you have a patch on the inside holding it together, then you applied this product to the outside the seal the rip.
Having tried something similar with "stormsure" I'm a bit reluctant. I'm half tempted to just stitch it as neatly as I can and then seal the stitches so it's water tight.
I'd love to see a pic of this repair from a bigger distance. Maybe with the camera 2ft from the roof, as in the pic it looks quite pronounced.

Thread
Thread Starter
Forum
Replies
Last Post