
Infinity 6520cs speakers installed
 03-31-2010, 12:13 PM
#1
Registered User
Thread Starter
Join Date: Aug 2008
Location: Stamford
Posts: 2,520
Likes: 0
Received 0 Likes
on
0 Posts
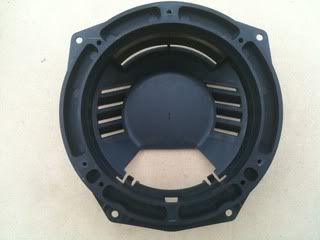
I finished installing my new Infinity Reference 6520cs speakers today, and in doing so I had to fabricate some speaker spacers. I took some pics as I was doing it as I thought it may be useful if you decide to make some yourself. Once you have removed the door card and speaker, remove the speaker from the basket, and use it as a template to trace the outline on to some 3/4" MDF.

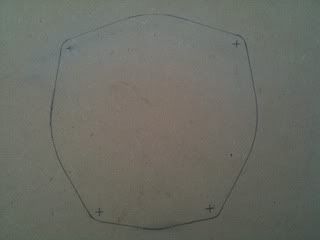
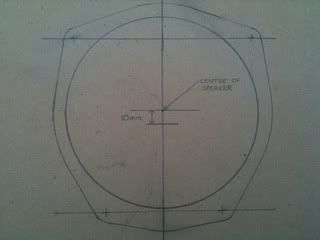
To work out the centre point of the spacer, join the top and bottom mounting holes together with a straight line.
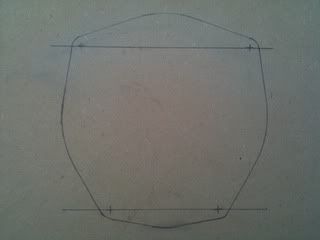
Calculate the mid point of these two lines.
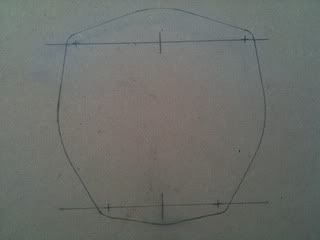
Join these two lines together vertically, and calculate the mid point.
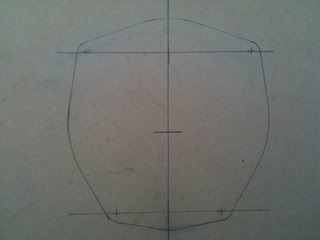
In the next picture you can see that the speaker isn't located exactly in the middle of the basket, I worked out that it is approx 10mm higher than this mid point.
Mark a point 10mm higher that the centre point.

In the instuctions that come with your new speakers will be a cutting guide, using the new centre point and a compass, draw the outline for the speaker.
Using a jigsaw, cut out the spacer. I found it easier to remove the centre first, then cut out the spacer. Drill out the mounting holes and countersink, sand and paint.
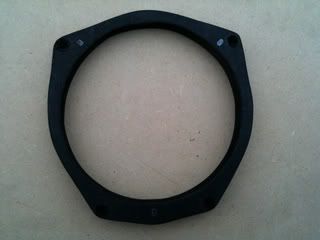
Mount the spacer to the car. You can see in this pic why I had to raise the centre point of the speaker by 10mm to centre the cutout in the door panel.
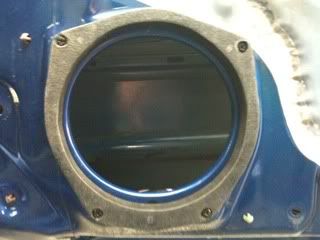
Mount your new shiny speaker to the spacer and admire your handiwork.
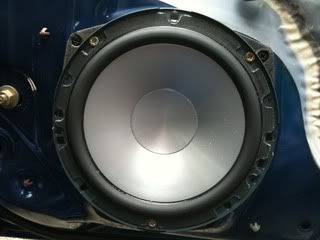
Depending on your choice of speaker, you may be able to re-use the basket to protect the back of the speaker from any drips. If I were to do this again, I would add 10mm to the outline of the speaker to make it slightly larger. There is plenty of space behind the door panel, so clearance isn't an issue.
The new speakers sound great with my Alpine 103BT, and a definite improvement over stock. It isn't a difficult install, but it is time consuming; I would allow a full day including the fabrication of the speaker spacers.
To work out the centre point of the spacer, join the top and bottom mounting holes together with a straight line.
Calculate the mid point of these two lines.
Join these two lines together vertically, and calculate the mid point.
In the next picture you can see that the speaker isn't located exactly in the middle of the basket, I worked out that it is approx 10mm higher than this mid point.
Mark a point 10mm higher that the centre point.
In the instuctions that come with your new speakers will be a cutting guide, using the new centre point and a compass, draw the outline for the speaker.
Using a jigsaw, cut out the spacer. I found it easier to remove the centre first, then cut out the spacer. Drill out the mounting holes and countersink, sand and paint.
Mount the spacer to the car. You can see in this pic why I had to raise the centre point of the speaker by 10mm to centre the cutout in the door panel.
Mount your new shiny speaker to the spacer and admire your handiwork.
Depending on your choice of speaker, you may be able to re-use the basket to protect the back of the speaker from any drips. If I were to do this again, I would add 10mm to the outline of the speaker to make it slightly larger. There is plenty of space behind the door panel, so clearance isn't an issue.
The new speakers sound great with my Alpine 103BT, and a definite improvement over stock. It isn't a difficult install, but it is time consuming; I would allow a full day including the fabrication of the speaker spacers.


 03-31-2010, 12:28 PM
#3

I installed similar speakers but just cut off most of the back of the basket with a Dremel and used that as a mounting spacer for the new speakers.
I left the top third intact as a water deflector.
I left the top third intact as a water deflector.
03-31-2010, 12:33 PM
#4
Originally Posted by Shopman,Mar 31 2010, 09:28 PM
I installed similar speakers but just cut off most of the back of the basket with a Dremel and used that as a mounting spacer for the new speakers.
I left the top third intact as a water deflector.
I left the top third intact as a water deflector.


Trending Topics
04-04-2010, 06:08 AM
#8
I will get round to this at some point.


Thread
Thread Starter
Forum
Replies
Last Post