
DIY: Polishing Headlights
 09-22-2010, 11:09 AM
#1
Registered User
Thread Starter

Join Date: Aug 2008
Location: Miramar, FL
Posts: 256
Likes: 0
Received 0 Likes
on
0 Posts
*Disclaimer: Do this at your own risk, I'm not responsible if you mess up and ruin your headlights* 
Ok, so my GF recently bought some OEM headlights for her RSX off Craigslist. They were yellow and hazy so as I polished them I chose to write up a little DIY for those that were interested in trying it out on their own headlights but had no clue what they were doing . Anyways, here goes.
What you'll need:
800, 1000, and 1500 grit wet sandpaper
A porter cable or rotary buffer w/ pads (I used a Porter Cable 7424 with an orange and white pad)
Polishing compound (I used Menzerna SIP and PO 85)

1. Clean the headlight, as well as mask off the paint around the headlight if you choose to do this with the headlight on the car.
*Before you begin sanding* Make sure that throughout the sanding process the sandpaper is ALWAYS wet, dip it in water every minute or more, keep it wet!!
2. Take your 800 grit sandpaper and dip it in water. Now sand the headlights horizontally, side to side, for a few minutes. Now, sand vertically, up and down for a few minutes. Take your time on this step, the longer you sand, the better they will come out. As you sand you'll see yellow, dirty water coming off the headlight, sand until the water is a white milky color. The amount of time you sand will vary with how bad your headlights were, for example on these, I sanded side to side for about 5 minutes, and then up and down for another 5.
3. Repeat the above step with the 1000 grit paper, remember to make sure its always completely wet, and go horizontally for a few minutes, then vertically for a few minutes and then after you finish, repeat the process again with 1500 grit.
*Should look something like this*

4. After I was finished sanding, I took my porter cable and orange pad and went over the headlight three times with Menzerna SIP (a medium strength polish). I then passed over it another two times with Menzerna PO85 (a light finishing polish) and a white pad. After that last pass you're done! You can substitute these polishes with similar ones made by Meguiars, Adams, etc. (How to use a porter cable or equivalent: http://www.autogeek.net/dual-action-polisher.html)
Now for the before and after shots!
Hazy and yellow.
Before:
Nice and clear.
After: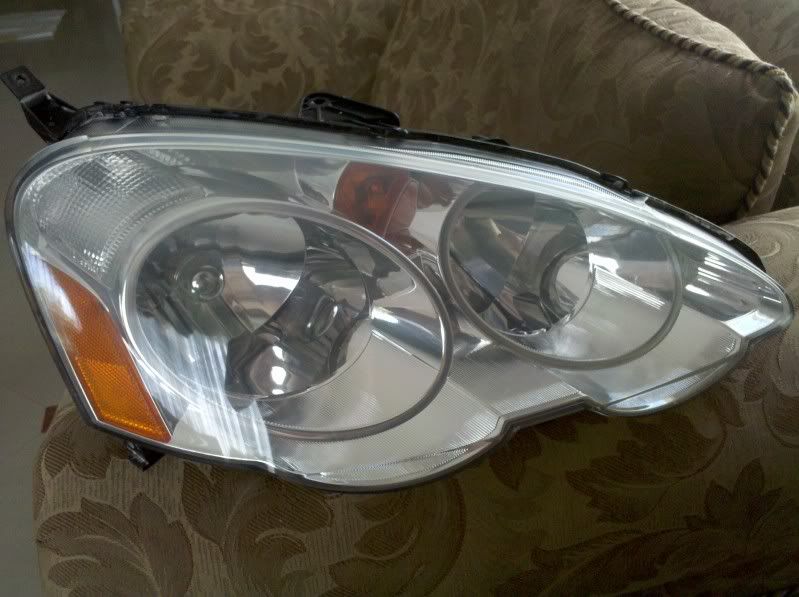
That's all that was to it, very simple once you get the hang of it. Now, put a porter cable 7424 on your Christmas list.
Ok, so my GF recently bought some OEM headlights for her RSX off Craigslist. They were yellow and hazy so as I polished them I chose to write up a little DIY for those that were interested in trying it out on their own headlights but had no clue what they were doing
. Anyways, here goes.What you'll need:
800, 1000, and 1500 grit wet sandpaper
A porter cable or rotary buffer w/ pads (I used a Porter Cable 7424 with an orange and white pad)
Polishing compound (I used Menzerna SIP and PO 85)
1. Clean the headlight, as well as mask off the paint around the headlight if you choose to do this with the headlight on the car.
*Before you begin sanding* Make sure that throughout the sanding process the sandpaper is ALWAYS wet, dip it in water every minute or more, keep it wet!!
2. Take your 800 grit sandpaper and dip it in water. Now sand the headlights horizontally, side to side, for a few minutes. Now, sand vertically, up and down for a few minutes. Take your time on this step, the longer you sand, the better they will come out. As you sand you'll see yellow, dirty water coming off the headlight, sand until the water is a white milky color. The amount of time you sand will vary with how bad your headlights were, for example on these, I sanded side to side for about 5 minutes, and then up and down for another 5.
3. Repeat the above step with the 1000 grit paper, remember to make sure its always completely wet, and go horizontally for a few minutes, then vertically for a few minutes and then after you finish, repeat the process again with 1500 grit.
*Should look something like this*
4. After I was finished sanding, I took my porter cable and orange pad and went over the headlight three times with Menzerna SIP (a medium strength polish). I then passed over it another two times with Menzerna PO85 (a light finishing polish) and a white pad. After that last pass you're done! You can substitute these polishes with similar ones made by Meguiars, Adams, etc. (How to use a porter cable or equivalent: http://www.autogeek.net/dual-action-polisher.html)
Now for the before and after shots!
Hazy and yellow.
Before:
Nice and clear.
After:
That's all that was to it, very simple once you get the hang of it. Now, put a porter cable 7424 on your Christmas list.
 09-22-2010, 11:32 AM
#2
Registered User

Join Date: Feb 2010
Location: South Florida
Posts: 199
Likes: 0
Received 0 Likes
on
0 Posts
Ive been planning on doing this for my headlights for a couple of weeks now. Im not so handy with a rotary/buffer though. I'll still probably tackle it within the next two weeks or so, but if anyone else wants to get together and knock out theirs as well at the same time, let me know


 09-22-2010, 10:52 PM
#6
Registered User

Originally Posted by ShawnM,Sep 22 2010, 03:32 PM
Ive been planning on doing this for my headlights for a couple of weeks now. Im not so handy with a rotary/buffer though. I'll still probably tackle it within the next two weeks or so, but if anyone else wants to get together and knock out theirs as well at the same time, let me know
09-23-2010, 06:23 AM
#7
Registered User
Join Date: Feb 2010
Location: South Florida
Posts: 199
Likes: 0
Received 0 Likes
on
0 Posts
I know, and I;ve got the power drill, I'm just not that experienced with it.
Is it pretty much idiot proof? I'm mostly concerned about using too much pressure and fubar-ing up the headlights
Is it pretty much idiot proof? I'm mostly concerned about using too much pressure and fubar-ing up the headlights
