
Karl's take on engine bay detailing
 02-23-2010, 03:01 PM
#1
Registered User
Thread Starter

Shortly after posting this in Carolinas, one of the guys there suggested I post it here, too. This is how I detail an S2000 engine bay.
Products:
- Majestic Solutions Super Green Stuff all-purpose cleaner (APC), 4:1 water:concentrate
- Meguiar's Hyperdressing, 4:1 water:concentrate
- Various brushes
- Sacrificial microfiber towels, such as the ones from Costco or Sam's
- Wenol metal polish
- Black Wow trim dressing for your wiper cowling, or whatever dressing you prefer
- Disposable rubber gloves
The first I saw this technique was on Detailing Bliss, where a friend of mine named JL introduced it. Ever since, I've done it this way every time.
1. Cold engine. Open the hood. Cover the electrical components if you must, but that's largely unnecessary. All you need to do is use some judgement and not spray water directly into them for long periods of time.
2. Rinse the engine bay. Cold, low pressure water, straight from a garden hose on the "mist" or "shower" setting is fine. Some people use a power washer, and that's usually okay, it's just not necessary, so I avoid it. Better safe than sorry.
3. Spray down the entire engine bay with an all purpose cleaner (APC) that's safe on this kind of thing. I use a cleaner called "Super Green Stuff" that Majestic Solutions in Raleigh, NC makes. It's wonderful stuff, and cheap too, at $12/gallon. I mix it 4 parts water.
4. Once the engine bay is good and wet with APC, use brushes and sacrificial microfiber towels to clean up the really nasty bits. I say "sacrificial" because if your engine is really nasty, you might not want to reuse these towels on anything but engines, wheels, door jambs, etc. The Costco yellow microfiber towels are great here.
5. Rinse off the all-purpose cleaner with water just like you did in step 2. As before, no need for super high water pressure.
6. Satisfied that it's clean and sparkly, dry it off, with an electric leaf blower. This works great. Much less tedious than using towels, and often much more thorough.
7. With the engine dry, I liberally spray the Meguiar's Hyperdressing (4:1 water:concentrate) all over everything. Everything.
8. Close the hood. Start the engine and let it run for at least 10 minutes. This gets the dressing to set up, and dries off a lot of the excess. Hyperdressing is water based, so a lot of the excess will simply evaporate with heat.
9. Re-open your hood. With more clean towels, wipe down any remaining excess. You'll probably still find some in low spots, that's okay. If you have covered anything to avoid it getting wet, uncover it. By now, the job is pretty much complete. Nice, clean, sparkly looking engine bay, without leaving everything super slick with solvent-based dressings.
I use this process for every engine bay I do. Here's a BMW 323i I did a long time ago, same process:
Before:

After:

Now, for some "extra credit" S2000 techniques. To be done on a clean engine.
1a. You all know those hard lines for the A/C system, right? These lines are made of aluminum, and polish up nicely. Use whatever metal polish you like, the same kind of stuff you'd use on an exhaust tip for example. Mother's is a perfectly fine over the counter metal polish. Other, more esoteric metal polishes like Wenol, Autosol, Simichrome, Flitz, and countless others are good too. Wenol can actually be purchased at the kitchen store Williams-Sonoma, by the polished stainless All-Clad cookware. You can also find great metal polishing products at Harley dealers. After all, who knows how to make metal shiny better than Harley owners?
OK, follow the directions on the polish to polish the metal hard lines. This takes mere minutes and really looks great. The one against the firewall is the only one that's tricky to get to, so be careful, and wear gloves. You can cut yourself on some hidden edges back there. Among the lines that I do are:
- Over by the heat shield attached to the exhaust manifold
- Same side of the car (same line actually), closer to the pass. side headlight
- Another line near the driver side headlight
- The one that runs along the top of the firewall
By the passenger side headlight:

Near the exhaust manifold heat shield and along the firewall:
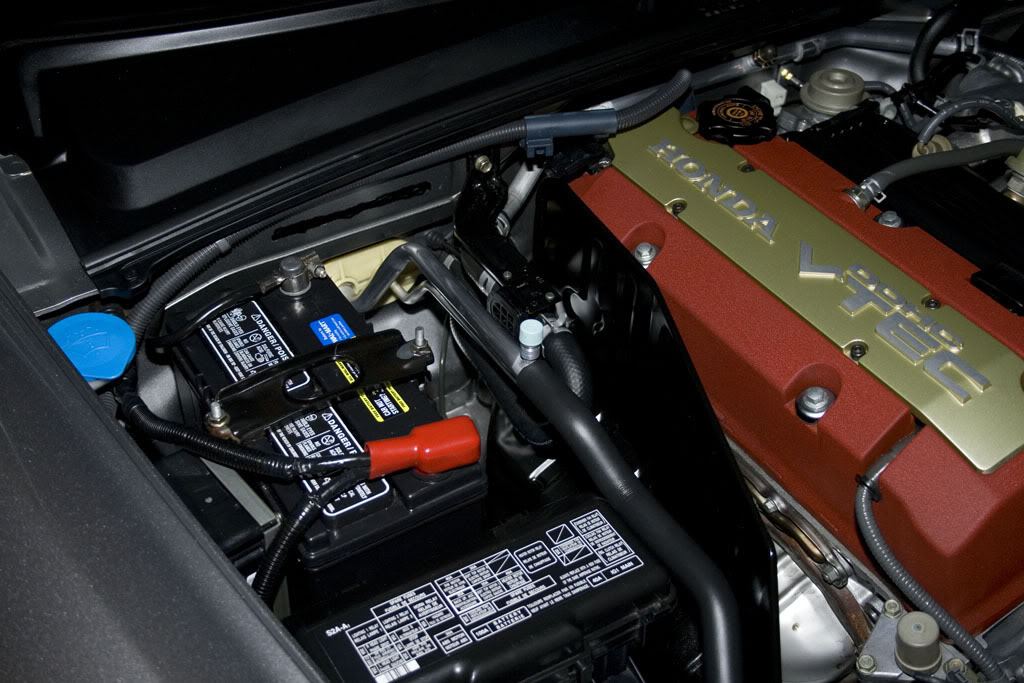
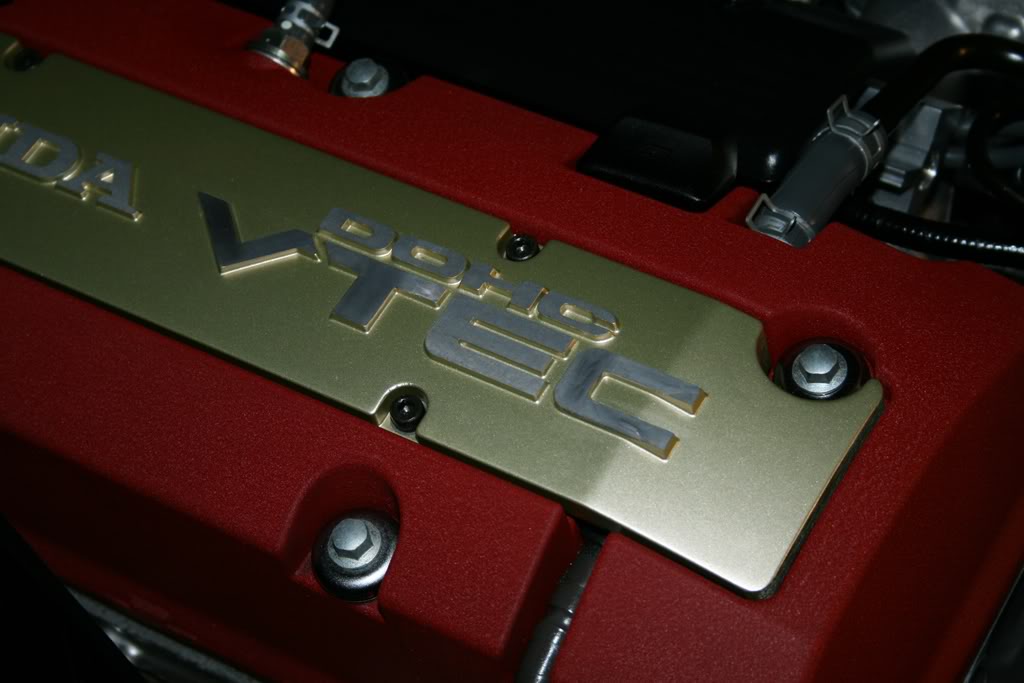
1b. You can also polish the raised lettering on your spark plug cover. I used a dremel with a cloth polishing wheel and some Wenol metal polish.
Before:
After:
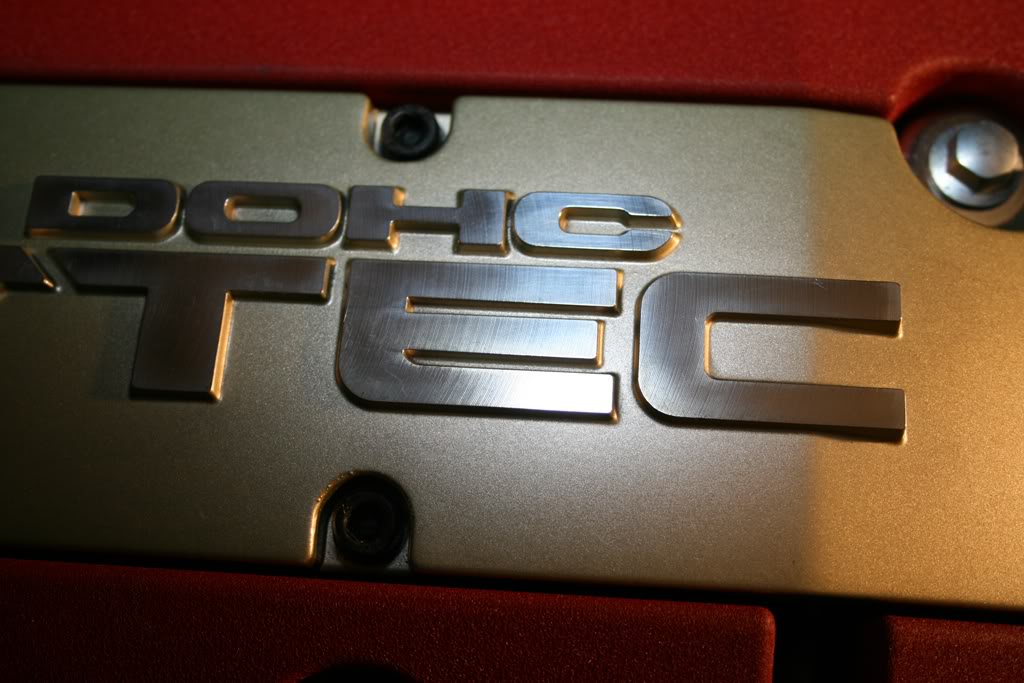
By the way - Wenol is a particularly nice metal polish to use under the hood because it leaves a protective coating behind on the metal. Stuff stays nicer looking for longer when you use this stuff.
2. Cleaning up the painted surfaces. After cleaning, a lot of areas like the shock towers and the shut line where the hood comes down should look pretty good. If there are heavy deposits from water spotting or something, try a clay bar, or a water spot remover, to get rid of them. Just cut a small piece of an old clay bar off and use the clay as normal. That way, if you drop the clay, you're not out the whole bar.
To make them pop a little bit more, use some kind of wax or sealant. No need for anything exotic here in my opinion, I just use a spray sealant. My favorite is made by Duragloss, called Aquawax. Every detailer should have a bottle of this stuff, seriously. It's wonderful. Anyway, apply this to the underside of the hood where you can, the shock towers, the exhaust heat shield, all the painted surfaces you can get to easily. I don't bother with sealant on stuff like frame rails and cross braces. Areas like these don't get shot with clear from the factory, so you're not going to get them to come up shiny anyway.
3. The black plastic by the wipers can really let down the look of a vehicle, and this is easy to fix too. You can use any dressing you like here. Hyperdressing works, but since it's water based, it's a bit less durable. I prefer a solvent-based dressing here, something like Stoner's Trim Shine, or Meguiar's Trim Detailer, both can be bought at auto parts stores. Black Wow is even better and even longer lasting. Make sure and follow the directions, and wipe up any excess when you're done. Excess dressing attracts dust and looks ratty.
That's it! Hope it's useful.
Products:
- Majestic Solutions Super Green Stuff all-purpose cleaner (APC), 4:1 water:concentrate
- Meguiar's Hyperdressing, 4:1 water:concentrate
- Various brushes
- Sacrificial microfiber towels, such as the ones from Costco or Sam's
- Wenol metal polish
- Black Wow trim dressing for your wiper cowling, or whatever dressing you prefer
- Disposable rubber gloves
The first I saw this technique was on Detailing Bliss, where a friend of mine named JL introduced it. Ever since, I've done it this way every time.
1. Cold engine. Open the hood. Cover the electrical components if you must, but that's largely unnecessary. All you need to do is use some judgement and not spray water directly into them for long periods of time.
2. Rinse the engine bay. Cold, low pressure water, straight from a garden hose on the "mist" or "shower" setting is fine. Some people use a power washer, and that's usually okay, it's just not necessary, so I avoid it. Better safe than sorry.
3. Spray down the entire engine bay with an all purpose cleaner (APC) that's safe on this kind of thing. I use a cleaner called "Super Green Stuff" that Majestic Solutions in Raleigh, NC makes. It's wonderful stuff, and cheap too, at $12/gallon. I mix it 4 parts water.
4. Once the engine bay is good and wet with APC, use brushes and sacrificial microfiber towels to clean up the really nasty bits. I say "sacrificial" because if your engine is really nasty, you might not want to reuse these towels on anything but engines, wheels, door jambs, etc. The Costco yellow microfiber towels are great here.
5. Rinse off the all-purpose cleaner with water just like you did in step 2. As before, no need for super high water pressure.
6. Satisfied that it's clean and sparkly, dry it off, with an electric leaf blower. This works great. Much less tedious than using towels, and often much more thorough.
7. With the engine dry, I liberally spray the Meguiar's Hyperdressing (4:1 water:concentrate) all over everything. Everything.
8. Close the hood. Start the engine and let it run for at least 10 minutes. This gets the dressing to set up, and dries off a lot of the excess. Hyperdressing is water based, so a lot of the excess will simply evaporate with heat.
9. Re-open your hood. With more clean towels, wipe down any remaining excess. You'll probably still find some in low spots, that's okay. If you have covered anything to avoid it getting wet, uncover it. By now, the job is pretty much complete. Nice, clean, sparkly looking engine bay, without leaving everything super slick with solvent-based dressings.
I use this process for every engine bay I do. Here's a BMW 323i I did a long time ago, same process:
Before:
After:
Now, for some "extra credit" S2000 techniques.
To be done on a clean engine.1a. You all know those hard lines for the A/C system, right? These lines are made of aluminum, and polish up nicely. Use whatever metal polish you like, the same kind of stuff you'd use on an exhaust tip for example. Mother's is a perfectly fine over the counter metal polish. Other, more esoteric metal polishes like Wenol, Autosol, Simichrome, Flitz, and countless others are good too. Wenol can actually be purchased at the kitchen store Williams-Sonoma, by the polished stainless All-Clad cookware. You can also find great metal polishing products at Harley dealers. After all, who knows how to make metal shiny better than Harley owners?
OK, follow the directions on the polish to polish the metal hard lines. This takes mere minutes and really looks great. The one against the firewall is the only one that's tricky to get to, so be careful, and wear gloves. You can cut yourself on some hidden edges back there. Among the lines that I do are:
- Over by the heat shield attached to the exhaust manifold
- Same side of the car (same line actually), closer to the pass. side headlight
- Another line near the driver side headlight
- The one that runs along the top of the firewall
By the passenger side headlight:
Near the exhaust manifold heat shield and along the firewall:
1b. You can also polish the raised lettering on your spark plug cover. I used a dremel with a cloth polishing wheel and some Wenol metal polish.
Before:
After:
By the way - Wenol is a particularly nice metal polish to use under the hood because it leaves a protective coating behind on the metal. Stuff stays nicer looking for longer when you use this stuff.
2. Cleaning up the painted surfaces. After cleaning, a lot of areas like the shock towers and the shut line where the hood comes down should look pretty good. If there are heavy deposits from water spotting or something, try a clay bar, or a water spot remover, to get rid of them. Just cut a small piece of an old clay bar off and use the clay as normal. That way, if you drop the clay, you're not out the whole bar.
To make them pop a little bit more, use some kind of wax or sealant. No need for anything exotic here in my opinion, I just use a spray sealant. My favorite is made by Duragloss, called Aquawax. Every detailer should have a bottle of this stuff, seriously. It's wonderful. Anyway, apply this to the underside of the hood where you can, the shock towers, the exhaust heat shield, all the painted surfaces you can get to easily. I don't bother with sealant on stuff like frame rails and cross braces. Areas like these don't get shot with clear from the factory, so you're not going to get them to come up shiny anyway.
3. The black plastic by the wipers can really let down the look of a vehicle, and this is easy to fix too. You can use any dressing you like here. Hyperdressing works, but since it's water based, it's a bit less durable. I prefer a solvent-based dressing here, something like Stoner's Trim Shine, or Meguiar's Trim Detailer, both can be bought at auto parts stores. Black Wow is even better and even longer lasting. Make sure and follow the directions, and wipe up any excess when you're done. Excess dressing attracts dust and looks ratty.
That's it! Hope it's useful.


 I've been meaning to do this for a while.


 outstanding tips and tricks for all members!
02-23-2010, 05:49 PM
outstanding tips and tricks for all members!
02-23-2010, 05:49 PM
#6
Registered User
Thread Starter
Originally Posted by wanabe,Feb 23 2010, 09:24 PM
and i will suggest that...
(prob one of the best under the hood detail write ups i have ever seen- way to go !!)
(prob one of the best under the hood detail write ups i have ever seen- way to go !!)

Trending Topics
02-23-2010, 06:22 PM
#9
Registered User
Thread Starter
Originally Posted by cheehee,Feb 23 2010, 10:11 PM
great writeup! between steps #4 & #5, do you rinse with clean water before drying with the leaf blower or do you just wipe up as best you can?
Thanks for the catch!
