
does ne1 have auto bodywork experience?
 10-04-2006, 03:09 PM
#1
Registered User
Thread Starter

Join Date: Jun 2004
Location: ny
Posts: 1,435
Likes: 0
Received 0 Likes
on
0 Posts
i want to tackle a DIY rust repair & repaint project. after i sand down the loose rust and sand everything down, do i apply bondo filler first and then do primer? or do i primer first and then fill with teh filler. the surface to be repainted on is very uneven and f-ed up from rust damage.

 10-04-2006, 04:21 PM
#3
Registered User


Join Date: Mar 2005
Location: Newton, MA
Posts: 3,672
Likes: 0
Received 0 Likes
on
0 Posts
Originally Posted by ProV1,Oct 4 2006, 07:09 PM
i want to tackle a DIY rust repair & repaint project. after i sand down the loose rust and sand everything down, do i apply bondo filler first and then do primer? or do i primer first and then fill with teh filler. the surface to be repainted on is very uneven and f-ed up from rust damage.
10-05-2006, 01:25 PM
#4
Registered User

Join Date: May 2006
Posts: 394
Likes: 0
Received 0 Likes
on
0 Posts
Filler goes on bare metal that has been roughed up to promote adhesion. 36-60 grit is best. That said there are some considerations when using filler over rusted areas. Filler is designed to cover small imperfections of 1/8" to 1/4" max, If there is a rust through section you might be better off using fiberglass and resin. I have seen screen that can be used with filler to cover holes but don't really care for it. If this is a temp fix it might be OK.
The other thing to consider, rust takes metal, and moisture. If you don't completely seal the metal from moisture then it will rust again. Find away to coat the backside of your project as well as filling the front side. Products like POR15 are great for this. Also remember that filler is porous, all of the cars you see driving around with bare filler are promoting rust under it every time it gets wet. Seal the filler off with a good grade primer/sealer if you can't finish the project in one setting. Sanding primer is porous as well.
If you are interested in doing the project yourself you might look at your local Vo-Tech Schools. The one in my area offers several auto body classes. You get alot of hands on, and in most cases get to work with their tools on your project.
BTW, I have seen alot of "professional" work that is pretty amateur. I have some first hand experience with some of this work.
10-05-2006, 02:11 PM
#5
Registered User
Join Date: Mar 2005
Location: Newton, MA
Posts: 3,672
Likes: 0
Received 0 Likes
on
0 Posts
Originally Posted by steve summers,Oct 5 2006, 05:25 PM
BTW, I have seen alot of "professional" work that is pretty amateur. I have some first hand experience with some of this work.
 10-05-2006, 03:40 PM
#6
Registered User
Join Date: May 2006
Posts: 394
Likes: 0
Received 0 Likes
on
0 Posts
I recently encontered one of these "professional" shops.
This shop has an extraordinary reputation in my area, they fix alot of high end cars, MB, Prosche, BMW, etc. It is amazing to me to see what passes with 99% of the car owners out there.
They had my car for 6 weeks total, and 6 times trying to get it right. It still isn't, but they wore me down...
This shop has an extraordinary reputation in my area, they fix alot of high end cars, MB, Prosche, BMW, etc. It is amazing to me to see what passes with 99% of the car owners out there.
They had my car for 6 weeks total, and 6 times trying to get it right. It still isn't, but they wore me down...
Trending Topics
10-06-2006, 01:59 PM
#8
Registered User


hello! whats this? i'm an amateur too, i just learned lots of stuff from the paintshop downtown
i happen to be working on body works stuff right now, if your doing rust, theres something that you can get at your local autozone or kragen thats a rust converter, it'll chemically change the rust into primer. thats to get rid of the rust.
then you can use fine putty... which is kinda like bondo, but its finer and less porus... you get less holes in it. and then sand that down with some wet to dry sand paper... 220 grit, till you get the nice even surface that you want.
spray that with some general purpose gray, black or white primer. 2 coats, make sure the spray is nice and even.
mix your paint with the activator/thinner that your local automotive paint shop will sell to you and spray away. put about 2-3 coats of color. make sure your paint is evenly spread SPECIALLY if its metallic (metallic particles can concentrate on one spot and may look like a dark spot) if you mess up and this happens, sand it down with 800 grit sand paper till most of it is gone and reapply your paint. do not sand till you see the primer.
this is the tricky part. mix your clearcoat. spray an even spread all throughout the area you painted. make sure your coats are thick but not thick enough that it'll run. do NOT touch the whole area once you have started spraying clearcoat since it takes forever for clearcoat to dry (unlike the color paint above that will take only 5-10 minutes) spray in a well lit area so that you can see if you're doing a good job. make sure the paint looks very smooth before you put away your stuff.
allow about 72 hours for the clearcoat to cure. if you have any runs, buy some 200 grit sand paper, and get the sanding block (dont use just your hands to hold the paper) and then sand the runs until they go away, be sure to occasionally check the area you are sanding because if you sand thru your clearcoat, you'll have to sand everything down and repaint.
after all this, buy some rubbing compound (i recommend 3M since its what i used) and then apply it and buff.
* all this is based on my experience from what i did to my car. dont take my word as if its a professional's.
but also in my experience all this stuff worked for me. here's a pic of me with just my bumper and raw paint (no clearcoat on it)
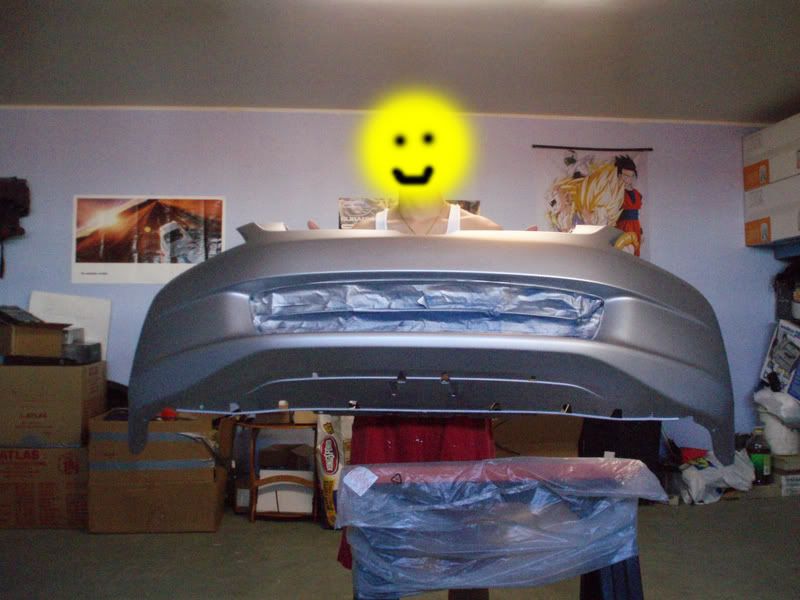
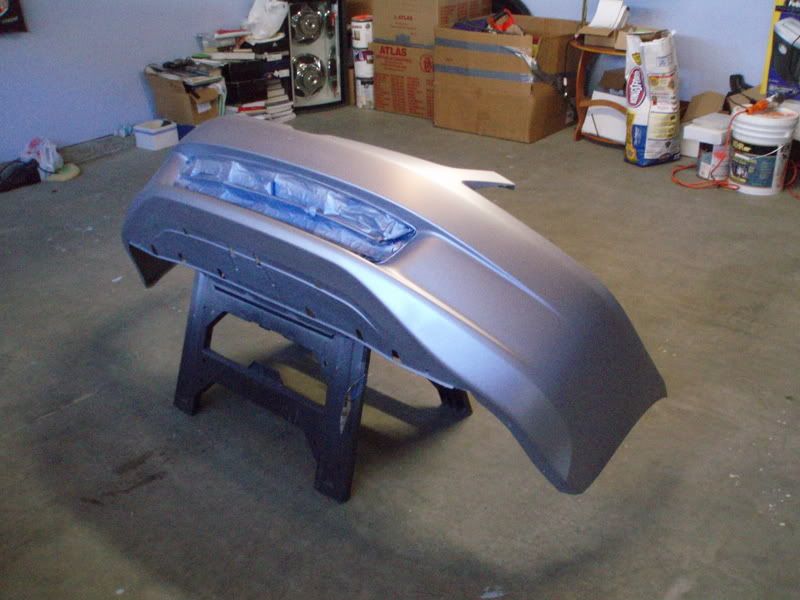
this is my bumper curing
it works best if you practice with small parts first. i've had to redo the bumper 2 times before i got it right... its a trial and error thing.
but i've used this process on my side skirts and mudguards (minus the rust removal part)
good luck with your experiment.
i happen to be working on body works stuff right now, if your doing rust, theres something that you can get at your local autozone or kragen thats a rust converter, it'll chemically change the rust into primer. thats to get rid of the rust.
then you can use fine putty... which is kinda like bondo, but its finer and less porus... you get less holes in it. and then sand that down with some wet to dry sand paper... 220 grit, till you get the nice even surface that you want.
spray that with some general purpose gray, black or white primer. 2 coats, make sure the spray is nice and even.
mix your paint with the activator/thinner that your local automotive paint shop will sell to you and spray away. put about 2-3 coats of color. make sure your paint is evenly spread SPECIALLY if its metallic (metallic particles can concentrate on one spot and may look like a dark spot) if you mess up and this happens, sand it down with 800 grit sand paper till most of it is gone and reapply your paint. do not sand till you see the primer.
this is the tricky part. mix your clearcoat. spray an even spread all throughout the area you painted. make sure your coats are thick but not thick enough that it'll run. do NOT touch the whole area once you have started spraying clearcoat since it takes forever for clearcoat to dry (unlike the color paint above that will take only 5-10 minutes) spray in a well lit area so that you can see if you're doing a good job. make sure the paint looks very smooth before you put away your stuff.
allow about 72 hours for the clearcoat to cure. if you have any runs, buy some 200 grit sand paper, and get the sanding block (dont use just your hands to hold the paper) and then sand the runs until they go away, be sure to occasionally check the area you are sanding because if you sand thru your clearcoat, you'll have to sand everything down and repaint.
after all this, buy some rubbing compound (i recommend 3M since its what i used) and then apply it and buff.
* all this is based on my experience from what i did to my car. dont take my word as if its a professional's.
but also in my experience all this stuff worked for me. here's a pic of me with just my bumper and raw paint (no clearcoat on it)
this is my bumper curing
it works best if you practice with small parts first. i've had to redo the bumper 2 times before i got it right... its a trial and error thing.
but i've used this process on my side skirts and mudguards (minus the rust removal part)
good luck with your experiment.
10-06-2006, 03:34 PM
#10
Registered User
Join Date: May 2006
Posts: 394
Likes: 0
Received 0 Likes
on
0 Posts
btw, the activator is a known to cause cancer, like all materials wear a good mask. Not just a paper cheapy but a full blown filter spray mask. The hardener/activator will harden the paint in your airways as well....