
DIY: T1R 70R Sparrow exhaust system installation
 04-16-2007, 10:16 PM
#1
Registered User
Thread Starter

Join Date: Apr 2006
Location: San Jo F'sho
Posts: 1,811
Likes: 0
Received 0 Likes
on
0 Posts
Hello fellow do it yourselfers, the following guide will walk you through my install of a shiny new T1R 70R Sparrow exhaust system. This is my first write up so any suggestions will be appreciated. Because this product does not come with any instructions i'll show you how i went about it, although I suggest you have a basic knowledge of working on cars before attempting this DIY.
Firstly the tools you will need for this job are as follows.
A decent metric ratchet set including:
14mm attachment
10mm attachment
ratched extention (recommended but not required)
14mm wrench
a can of Liquid Wrench, PB, WD-40 or a Silicon spray lubricant if you prefer.
A prying tool, (long screw driver, even a long wrench, or 18" wooden dowel to protect from scratching the under carriage)
5/32" alan wrench (for removing silencers)
a tarp or something to lay on, the tarp makes it easy to wiggle back and forth though.
The whole project from taking off the stock exhaust system to putting this one on took me a leisurely 6-7 hours by myself. If you have a partner this will go much quicker and easier! Also note that I did not install the test pipe that was included. If you wish to, before step one, remove the catalytic convertor and install the test pipe.
I'm starting from the point of having the stock system already removed since there is already a great write up provided by Legal Bill in the DIY section. So lets get started.
These are the goodies included in the box, (3) gaskets, (7) - 14mm nuts, (7) 14mm bolts

Here is what your T1R system will look like all laid out, the numbers reflect the order we'll install the respective pieces. (if installing test pipe, install that first)
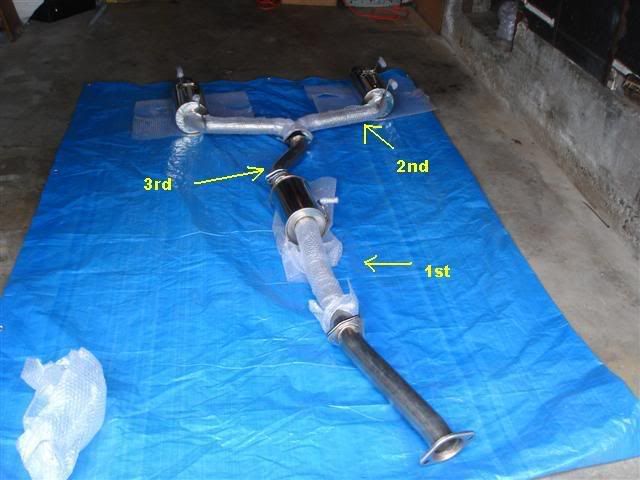
some side shot action

Now before you start removing all the bubble wrap if you haven't already, I recommend leaving it on the exhaust canisters and exhaust tips until you have secured the pieces to the car. this will help prevent dents and scratches if you happen to drop a piece during installation. You can go ahead and remove all the wrap from the unfinished pipe sections, flange ends, and the hangers though.
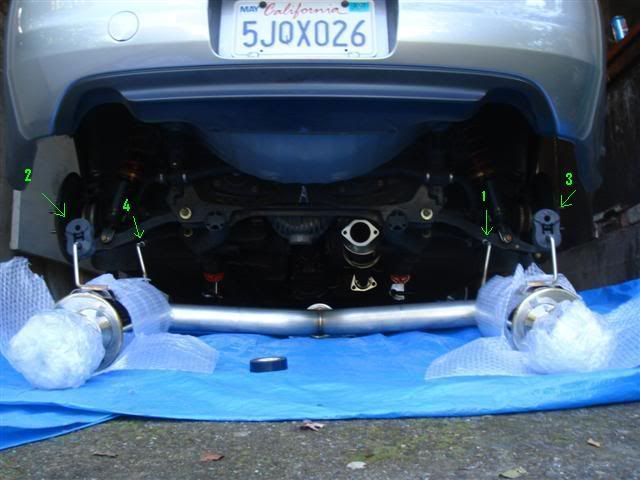
So from under the car first take the provided 3 hole gasket and place it on the end of the cat. it will only fit one way. (Note the first rubber hanger at the top left of the picture.)
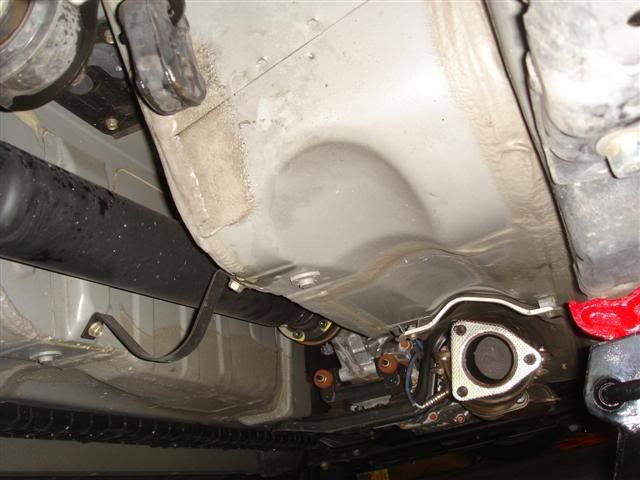
Next we'll be installing the following piece, the long pipe end connects to the cat. This section has one hook that will connect from right to left on the rubber hanger, the rest of the hooks/hangers install front to back. At this point you'll want to lubricate that rubber exhaust hanger in the previous pic w/ liquid wrench.
First rest the long end of the pipe on the bolts of the cat, this way you'll have more leverage while you connect the exhaust hook at the other end of the pipe.
With that end supported, lift the canister end with one hand and guide the hook into the rubber hanger with your other hand. if you need both hands to get the hook secured you can try resting the canister end on your knee\leg while you work the rubber hanger. This is where your prying tool may come in handy, you can use it to push the rubber hanger onto the hook by pressing one end against the car for leverage. Once you have the hook secured attach the three nuts to the bolts on the cat and torque them down. (sorry i don't have the torque specs)
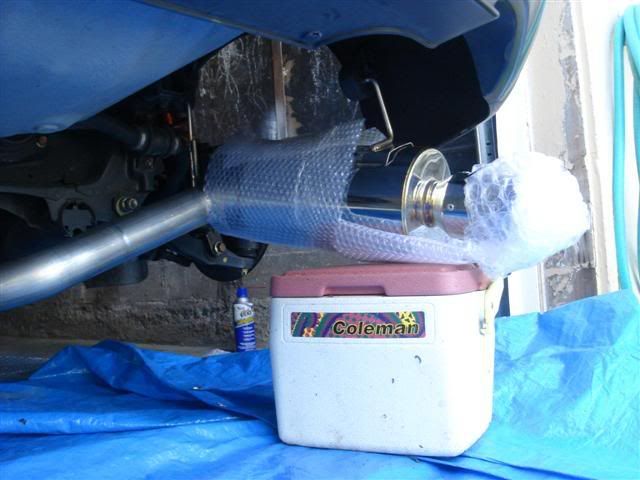
Next we'll attach the dual exhaust canisters leaving the small middle pipe for last. this allows you space to move the exhaust canisters back and forth to get them attached to the four rubber hangers. The numbers represent the order I attached the hooks to their respective rubber hangers. Make sure to lubricate all four rubber hangers. Also note I have removed the two rear rubber hangers from under the car and attached them to the rear hooks prior to making the first connection. If installing by yourself i recommend getting a cooler (as pictured below) or something of equal height to rest one side of the exhaust on while you lift the other side into place. Otherwise your helper can hold up the opposite side. Don't forget your prying tool, this part is tricky! use plenty of lube
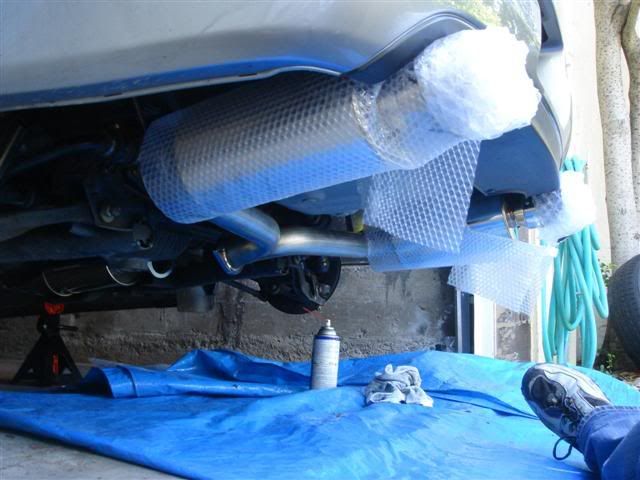
With all four hooks secured it should look like this. You can remove all that wrap now though
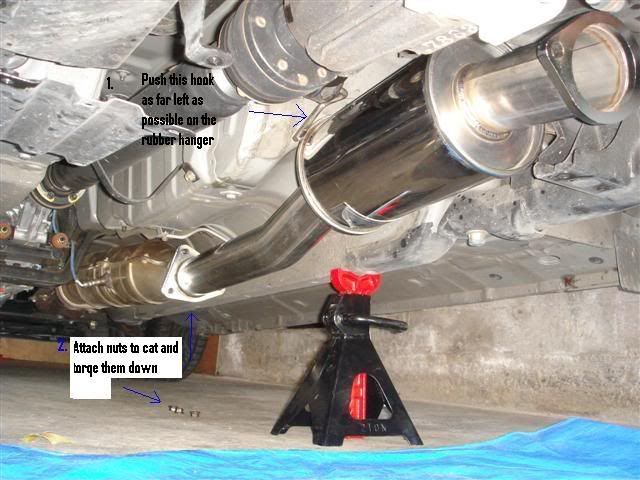
Now to the last piece, of the provided parts you will need those (2) 2-hole gaskets, (4) 14mm nuts, and (4) 14mm bolts.
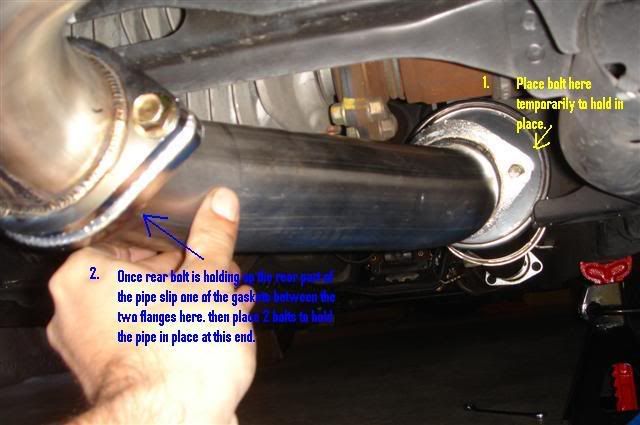
Getting this last piece in place was a pain in my @$$holes. Situate yourself under the car with the bolts, nuts, & gaskets close by and ready to grab. Hold the pipe in place with one hand and with the other place a bolt through the rear right flange hole with the 14mm end of the bolt facing the front of the car. Next take one of the gaskets and slip it between the dual canister exhaust flange and the middle pipe. Try and clamp that gasket in place with the hand that's holding that end of the pipe up. Now take a second bolt and place it through the front right flange hole. Quickly grab the third bolt and place it through the front left flange hole. At this point the pipe should be somewhat supported by the bolts.
Take 2 of the 14mm nuts and secure them to the dual canister flange bolts with your 14mm ratched on one side and your 14mm wrench on the other side. You'll have to swap the ratch and wrench roles on the right side of the flange.

Once those bolts are secured remove the rear right bolt that we first put in, slip the second gasket in between the flanges and repeat the last step. (2 nuts, 2 bolts). Torque your nuts and bolts down and go over each flange connection to make sure they are air tight.
Now you'll want to remove any plastic protective film or bubble wrap that you may not have previously removed. There is plastic film on each of the three T1R logo plates and on the exhaust tips. Make sure you remove the alan wrench nuts that secure the silencers so you may remove the plastic film underneath the nuts. You don't want that film to melt to your exhaust.
You may now start the car and listen for air leaks at the flange connections. Be careful not to touch the exhaust with your head or hands.
During my test I didn't hear any leaks, but i did notice moisture drips from each flange connection. Turn off the car and torque the bolts accordingly. If no air or moisture leaks
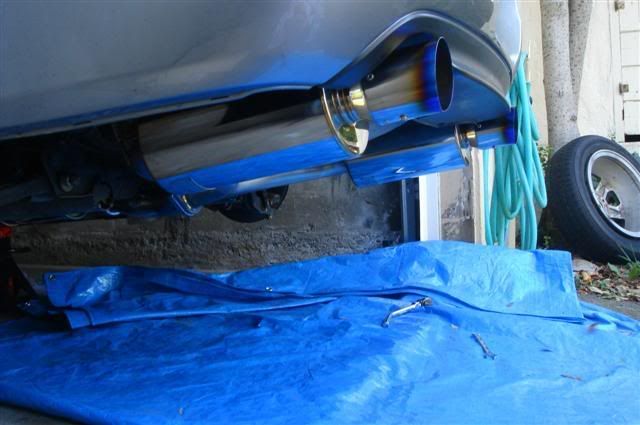
Lastly reinstall your rear support bar, attach wheels, lower your ride and admire all your hard work & new exhaust!
(If you're experiencing a rattle, see my post below for a solution)
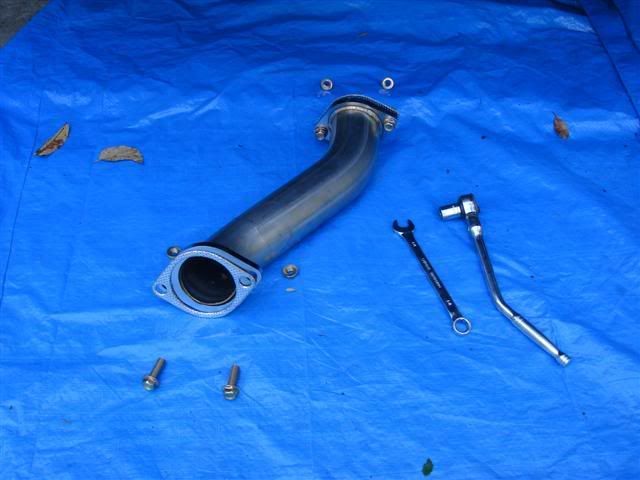
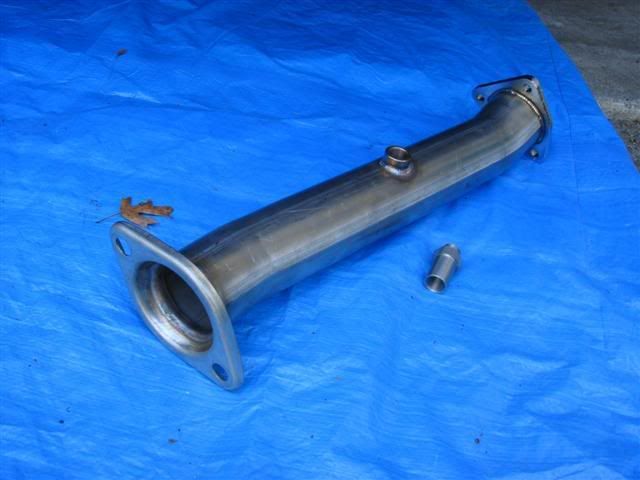
Here is a picture of the test pipe & CEL fix that I'll install in the future.
My initial impression of this system is "Wow that's still f'n loud!". I'm coming from the T1R 70mm single w/ test pipe. When the silencers are out on the sparrow it sounds just a little less loud than my 70mm single. Although the single had the test pipe on and the Sparrow is running at catback. When I have the silencers in, the sound is almost comparable to stock, a little deeper though.
Video/Sound clips
here's a short clip with the silencers in on the freeway (cat is on)
Freeway clip, silencers in.
Another clip and i'm sure it's the one everyone wants to hear.
Test Pipe on, silencers out, vtec mania
More clips to come, including my vtec tunnel run
you can check out the other two tunnel clips from my youtube profile. -Spence
-----------------------------------------
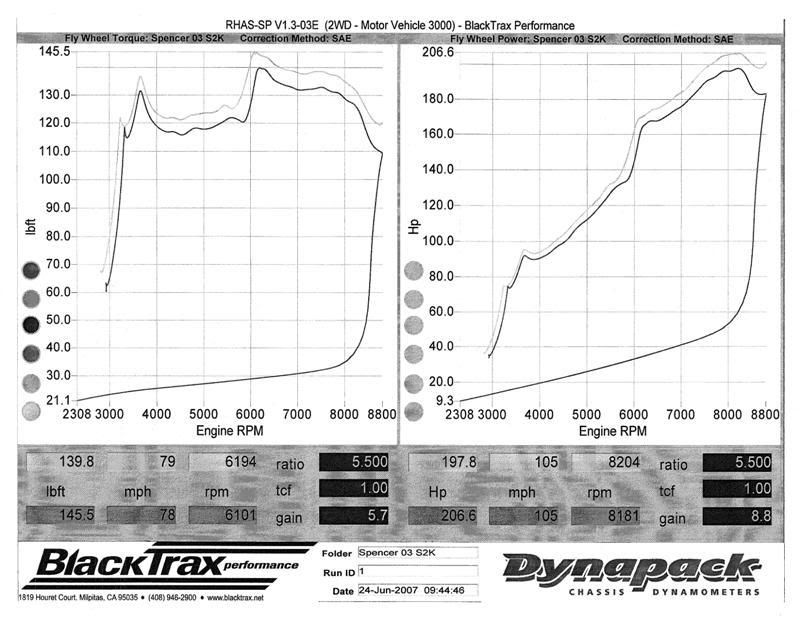
Finally, for those who'd like to know. Here is my dyno read out from blacktrax performance. the dark bottom line was my base line, the mods included in that run are
the T1R 70R sparrow exhaust, AEM CAI, and my comptech LW flywheel.
the higher grey line is with all the above and a tuned AFC Neo.
so i hear AP1's usually put down around 190 WHP stock. so if you have just a CAI and this exhaust i'd imagine you gain around 8 WHP. Although i never did a stock baseline so i couldn't tell you the true gains of the exhaust.
Firstly the tools you will need for this job are as follows.
A decent metric ratchet set including:
14mm attachment
10mm attachment
ratched extention (recommended but not required)
14mm wrench
a can of Liquid Wrench, PB, WD-40 or a Silicon spray lubricant if you prefer.
A prying tool, (long screw driver, even a long wrench, or 18" wooden dowel to protect from scratching the under carriage)
5/32" alan wrench (for removing silencers)
a tarp or something to lay on, the tarp makes it easy to wiggle back and forth though.
The whole project from taking off the stock exhaust system to putting this one on took me a leisurely 6-7 hours by myself. If you have a partner this will go much quicker and easier! Also note that I did not install the test pipe that was included. If you wish to, before step one, remove the catalytic convertor and install the test pipe.
I'm starting from the point of having the stock system already removed since there is already a great write up provided by Legal Bill in the DIY section. So lets get started.
These are the goodies included in the box, (3) gaskets, (7) - 14mm nuts, (7) 14mm bolts
Here is what your T1R system will look like all laid out, the numbers reflect the order we'll install the respective pieces. (if installing test pipe, install that first)
some side shot action
Now before you start removing all the bubble wrap if you haven't already, I recommend leaving it on the exhaust canisters and exhaust tips until you have secured the pieces to the car. this will help prevent dents and scratches if you happen to drop a piece during installation. You can go ahead and remove all the wrap from the unfinished pipe sections, flange ends, and the hangers though.
So from under the car first take the provided 3 hole gasket and place it on the end of the cat. it will only fit one way. (Note the first rubber hanger at the top left of the picture.)
Next we'll be installing the following piece, the long pipe end connects to the cat. This section has one hook that will connect from right to left on the rubber hanger, the rest of the hooks/hangers install front to back. At this point you'll want to lubricate that rubber exhaust hanger in the previous pic w/ liquid wrench.
First rest the long end of the pipe on the bolts of the cat, this way you'll have more leverage while you connect the exhaust hook at the other end of the pipe.
With that end supported, lift the canister end with one hand and guide the hook into the rubber hanger with your other hand. if you need both hands to get the hook secured you can try resting the canister end on your knee\leg while you work the rubber hanger. This is where your prying tool may come in handy, you can use it to push the rubber hanger onto the hook by pressing one end against the car for leverage. Once you have the hook secured attach the three nuts to the bolts on the cat and torque them down. (sorry i don't have the torque specs)
Next we'll attach the dual exhaust canisters leaving the small middle pipe for last. this allows you space to move the exhaust canisters back and forth to get them attached to the four rubber hangers. The numbers represent the order I attached the hooks to their respective rubber hangers. Make sure to lubricate all four rubber hangers. Also note I have removed the two rear rubber hangers from under the car and attached them to the rear hooks prior to making the first connection. If installing by yourself i recommend getting a cooler (as pictured below) or something of equal height to rest one side of the exhaust on while you lift the other side into place. Otherwise your helper can hold up the opposite side. Don't forget your prying tool, this part is tricky! use plenty of lube
With all four hooks secured it should look like this. You can remove all that wrap now though
Now to the last piece, of the provided parts you will need those (2) 2-hole gaskets, (4) 14mm nuts, and (4) 14mm bolts.
Getting this last piece in place was a pain in my @$$holes. Situate yourself under the car with the bolts, nuts, & gaskets close by and ready to grab. Hold the pipe in place with one hand and with the other place a bolt through the rear right flange hole with the 14mm end of the bolt facing the front of the car. Next take one of the gaskets and slip it between the dual canister exhaust flange and the middle pipe. Try and clamp that gasket in place with the hand that's holding that end of the pipe up. Now take a second bolt and place it through the front right flange hole. Quickly grab the third bolt and place it through the front left flange hole. At this point the pipe should be somewhat supported by the bolts.
Take 2 of the 14mm nuts and secure them to the dual canister flange bolts with your 14mm ratched on one side and your 14mm wrench on the other side. You'll have to swap the ratch and wrench roles on the right side of the flange.
Once those bolts are secured remove the rear right bolt that we first put in, slip the second gasket in between the flanges and repeat the last step. (2 nuts, 2 bolts). Torque your nuts and bolts down and go over each flange connection to make sure they are air tight.
Now you'll want to remove any plastic protective film or bubble wrap that you may not have previously removed. There is plastic film on each of the three T1R logo plates and on the exhaust tips. Make sure you remove the alan wrench nuts that secure the silencers so you may remove the plastic film underneath the nuts. You don't want that film to melt to your exhaust.
You may now start the car and listen for air leaks at the flange connections. Be careful not to touch the exhaust with your head or hands.
During my test I didn't hear any leaks, but i did notice moisture drips from each flange connection. Turn off the car and torque the bolts accordingly. If no air or moisture leaks
Lastly reinstall your rear support bar, attach wheels, lower your ride and admire all your hard work & new exhaust!
(If you're experiencing a rattle, see my post below for a solution)
Here is a picture of the test pipe & CEL fix that I'll install in the future.
My initial impression of this system is "Wow that's still f'n loud!". I'm coming from the T1R 70mm single w/ test pipe. When the silencers are out on the sparrow it sounds just a little less loud than my 70mm single. Although the single had the test pipe on and the Sparrow is running at catback. When I have the silencers in, the sound is almost comparable to stock, a little deeper though.
Video/Sound clips
here's a short clip with the silencers in on the freeway (cat is on)
Freeway clip, silencers in.
Another clip and i'm sure it's the one everyone wants to hear.
Test Pipe on, silencers out, vtec mania
More clips to come, including my vtec tunnel run
you can check out the other two tunnel clips from my youtube profile. -Spence
-----------------------------------------
Finally, for those who'd like to know. Here is my dyno read out from blacktrax performance. the dark bottom line was my base line, the mods included in that run are
the T1R 70R sparrow exhaust, AEM CAI, and my comptech LW flywheel.
the higher grey line is with all the above and a tuned AFC Neo.
so i hear AP1's usually put down around 190 WHP stock. so if you have just a CAI and this exhaust i'd imagine you gain around 8 WHP. Although i never did a stock baseline so i couldn't tell you the true gains of the exhaust.


 04-16-2007, 10:44 PM
#4
Registered User
Thread Starter
Join Date: Apr 2006
Location: San Jo F'sho
Posts: 1,811
Likes: 0
Received 0 Likes
on
0 Posts
Originally Posted by kenstyle,Apr 16 2007, 11:35 PM
Great thread! I love how there are so many DIY threads in UTH as of late
How significant was the power loss coming from a 70mm single to a 70mm dual?
How significant was the power loss coming from a 70mm single to a 70mm dual?
 04-17-2007, 05:30 PM
#6
Registered User
Thread Starter
Join Date: Apr 2006
Location: San Jo F'sho
Posts: 1,811
Likes: 0
Received 0 Likes
on
0 Posts
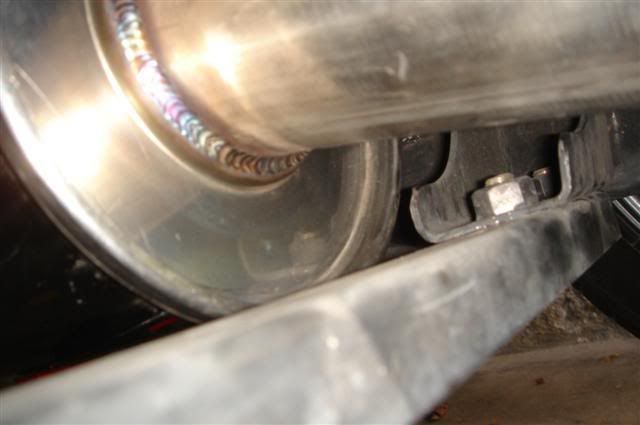
So i found the source of the rattle, it was caused by the resonator's proximity to part of the frame. Perhaps installing the test pipe (as the system is intended) will move the resonator closer to the front of the car and away from the frame by just enough. eitherway i just cut off a small piece of the frame with a dremel tool. it's a piece maybe the size of half a dime. see below.
Before
After
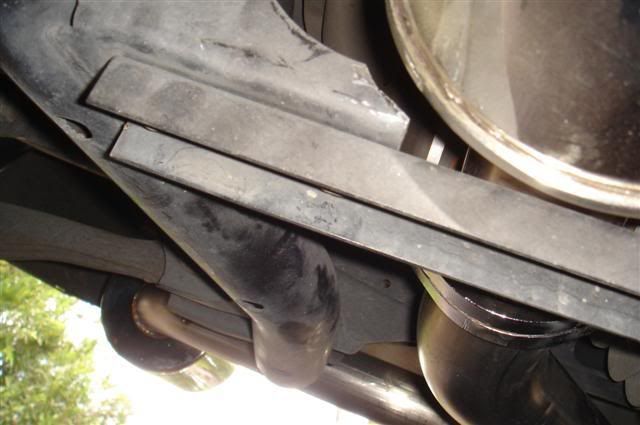
I'm sure you could also attach some heat shielding tape to the edge of the frame there which might kill the rattle, but this way I'm sure it won't come back
Before
After
I'm sure you could also attach some heat shielding tape to the edge of the frame there which might kill the rattle, but this way I'm sure it won't come back


