clutch pedal stroke not long enough
 08-22-2009, 08:28 PM
#1
Registered User
Thread Starter

Join Date: May 2008
Posts: 2,868
Likes: 0
Received 0 Likes
on
0 Posts
I got a stiffer pressure plate setup.
At first, the car wouldn't go into gear when the motor is running.
So I extended the clutch pedal stroke (underneath the dash board),
and it goes into gear, but it's rather difficult to do so & reverse is almost impossible.
Of course, when the car is in motion, it's perfectly normal.
It seems like I need more clutch pedal stroke and/or the pushrod needs to push about 6mm more, but I'm already out of all the threads on the clutch pedal. The clutch engagement is already pretty high up, i'd like it to be lower.
Any ideas on how I can fix this?
 08-22-2009, 09:51 PM
#2
Registered User

it sounds like either there is air in the line, or the clutch isn't disengaging properly. that or with the more stiff plate, it may be getting more friction.
i would start by bleading the system, then if it still isn't right try adjusting it more
i would start by bleading the system, then if it still isn't right try adjusting it more
08-22-2009, 10:03 PM
#3
Registered User
Thread Starter
Join Date: May 2008
Posts: 2,868
Likes: 0
Received 0 Likes
on
0 Posts
Originally Posted by luder_5555,Aug 22 2009, 09:51 PM
it sounds like either there is air in the line, or the clutch isn't disengaging properly. that or with the more stiff plate, it may be getting more friction.
i would start by bleading the system, then if it still isn't right try adjusting it more
i would start by bleading the system, then if it still isn't right try adjusting it more

I highly doubt it's the air, it's been refilled / bled perfectly. And the push rod moves a good distance but not enough to fully disengage (separate the pp from the clutch).
green - flywheel
yellow - clutch disc
red - pressure plate disc and body itself
blue line - thickness of the spring
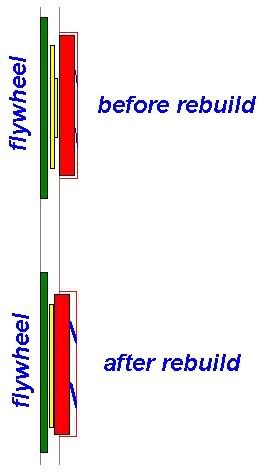
(note: there is an error in the 1st 'before rebuild' drawing, the clutch disc should be in contact with the clutch disc. However, the main point of the drawing is to show the spring.)
When I got the pressure plate rebuilt, the rebuilder added more clamp power by adding a 2nd layer of springs (not the splines, but the arms underneath the splines that act as springs). In return, I'm assuming this results in the need to make the push rod push further in order to make up for the thickness of the pp's spring.
 help
08-23-2009, 01:30 AM
help
08-23-2009, 01:30 AM
#4
Registered User

Join Date: Jan 2006
Location: 17 ft below sea level.
Posts: 4,949
Likes: 0
Received 20 Likes
on
15 Posts
krnmike Posted on Aug 23 2009, 08:03 AM

What did he change?
This is a cut-through of the OEM PP.
I guess you need to go back to the rebuilder.

When I got the pressure plate rebuilt, the rebuilder added more clamp power by adding a 2nd layer of springs (not the splines, but the arms underneath the splines that act as springs).
What did he change?
This is a cut-through of the OEM PP.
I guess you need to go back to the rebuilder.
08-23-2009, 11:50 AM
#5
Registered User
Thread Starter
Join Date: May 2008
Posts: 2,868
Likes: 0
Received 0 Likes
on
0 Posts
Originally Posted by SpitfireS,Aug 23 2009, 01:30 AM
krnmike Posted on Aug 23 2009, 08:03 AM
What did he change?
This is a cut-through of the OEM PP.
I guess you need to go back to the rebuilder.
What did he change?
This is a cut-through of the OEM PP.
I guess you need to go back to the rebuilder.
he didn't change the A figure.
the following picture is a broken pp. notice the "springs" (which I am mentioning) are broken in halves. Those are the springs that are 2 times thicker. Not the spline (which are grinding/teeth looking things)

notice how this person circled the broken springs.
so basically in your diagram its the black piece between the baby blue and dark blue that's been changed to 2 times thicker (2nd layer was added).
08-23-2009, 01:27 PM
#6
Registered User
Join Date: Jan 2006
Location: 17 ft below sea level.
Posts: 4,949
Likes: 0
Received 20 Likes
on
15 Posts
Orange = throwout bearing.
Thin black line "A" = disk spring.
Green circle = steel ring.
Red = PP housing.
Baby blue = pressure plate.
Black rectangle = clutch disk.
Dark blue = flywheel.
The "springs" you are talking about fix/hold the pressure plate in the housing.
IOW: they allow the PP to move to and from the flywheel within the housing but do not allow it to rotate in relation to the housing so it can transfer torque.
IMO they add little if anything at all to the clamping force.
I guess you really! need to go back to the rebuilder.
08-23-2009, 02:51 PM
#7
Registered User
Thread Starter
Join Date: May 2008
Posts: 2,868
Likes: 0
Received 0 Likes
on
0 Posts
kinda too late. it's been about over 6 months. most of the time the cars just been sitting there getting other stuff done to it. oh wells. i think I will just go F/i and get stronger lighter clutch.

Thread
Thread Starter
Forum
Replies
Last Post