When you click on links to various merchants on this site and make a purchase, this can result in this site earning a commission. Affiliate programs and affiliations include, but are not limited to, the eBay Partner Network.
I have checked dimensions of available ducts, and as you mentioned, what is available seems too big. I saw a post of someone who used ducts which looked ok in the bumper; I was not able to tell if ducts were cut down or pushed from behind over the bumper configuration, etc.
While waiting for C&T, I used patio drain inlets which accomodate 3" ducting into the faux ducts. The patio inlets are cut down on opposite corners to fit and the other corners are used to bolt to the faux opening, which was cut in a circular pattern to fit the patio fitting.
2" tubing will take crimping or major turns to fit around or through the air pump apparatus.
Despite heat turning my rotors blue, there was no surface crazing or cracking that I could see and pedal feel is firm; I usually get softer pedals due to bubbles with at least Super Blue. Pads are lasting longer with equal wear inside/outside pads.
I recommend ducting of some sort.
Good luck! I like the C&T; I saw them on sidweways' yesterday at UL's dyno day.
My brake ducting cost about $8 total if you don't count the hole saw.
Used Home Depot flexible 3" dryer ducting routed from in front of the radiator, through holes cut in the front underpanel - cut #1 - and then through another hole in the fender liner - cut #2 . With big front tires there's not a whole lot of room to route stuff, but a few bends and well placed cable ties got the job done.
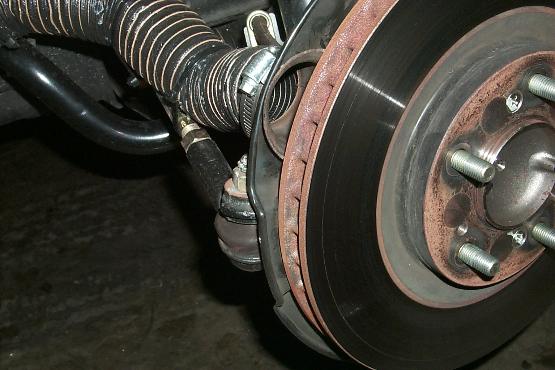
Made larger the holes in the back side of the rotor dust shields to try and accomodate the air coming out of the ducts. The stock rotors appear to be designed to take air in through these holes, routing it out through the rotor vanes.
Didn't want to permanently modify the front bumper, hence the perhaps-less-than-optimal routing. Looks ugly but worked pretty well.
My mechanic cut hole in the plastic leading to the front of the radiator, then used hose clamps to route the tube to the dust shield.
You can argue that it isn't optimal, but it is cheap and works okay.
i've read that the ducts are more effective at catching air
the closer the intakes are to middle of car, so this may be better than opening faux ducts.
thanks for the picture and info on the really low-budget BAUBD.
Doug,
thanks for the info and picture; including it here for easier reference:
Do you have a photo of the intake, or how the hose is routed?
Will,
interesting thought on intake placement. I wonder how the three locations (faux duct openings in the bumper, Jason's more central locations, C&T down low in front of tires) actually compare? I think for most of us, any thing is better than nothing, so other isssues are probably more important, like ease of construction and hose routing, aesthitics (apparently not that important to Jason )
I'll try to get a photo tomorrow, the car isn't at my house right now. If you are working on your car today, mine is pretty much like Jason's. The front is tie wrapped in front of the radiator (lower than Jason's), and then you cut a round hole in the plastic area to route it back to the brake area.
I think Jason has bigger ducting than me, which is a good thing.
thanks, no rush. I'm just trying to gather information for people who might do this, and trying to make up my mind between building my own or buying C&T's setup.
I've been considering using an electric blower to push more air to the rotors... Then it doesn't matter as much where the air comes from, just as long as its cool.

 02-15-2003 | 01:51 PM


 - and then through another hole in the fender liner - cut #2
  )
)


 )
)
