When you click on links to various merchants on this site and make a purchase, this can result in this site earning a commission. Affiliate programs and affiliations include, but are not limited to, the eBay Partner Network.
Really nice guy BTW--shared some good track tips and stuff. He let me check out the seat as mounted in his fresh-off-the-track s2k, and I saw that the seat fit absolutely perfectly--the left wing just was 1mm away from the door panel. Can't get any better than that--this seat has the be the widest and most secure you could possibly fit correctly into the standard s2k. I was sold.
Anyway, so, it turns out that installing a Bride Zeta III (FYI standard size, not S or L, driver side) with Bride sliding rails is pretty straightforward, but I do have some tips dealing with 2 issues you will encounter (sorry, pictures were taken after the fact, as I was too dirty and sweaty to be touching my camera, but you should get the idea):
1. The rear console door is blocked by the seat's right wing.
2. The Bride rail requires levers on both sides to be raised to move the seat. However, after the whole thing is bolted to the car, there's no way to reach the inner rail.
Let's start with #1:
So, SoCalAp2 had his console door modified to have some play when opening. It worked okay, but I was afraid over time the plastic will fail. So, I decided to totally remove any hinge and attach the door only by the lock (I test drove it this way, and it didn't rattle or anything--pretty secure). Took me a LONG time to figure out how to do this. At first I tried to take apart the door to look at it's inside without removing the whole console. Welp, that was fruitless. So, yeah, you have to take out the whole console to do this. Pain. Anyway, after you get the thing off, you can see from the back that the door is attached to the assembly via 2 metal expanding pins. Here's a picture of the whole door off and the pins removed:
1. Console door and pins.
The pins you see in the bag originally went through the holes and into the console walls. I think you can imagine what it looked like. So, all I did was use some bent-nose pliers and pulled them out. They're stuck in pretty good, so it might take a while, but they will eventually come out. That's it. No more hinge. Of course, this mod will work for other seats with big wings too; or if you wanted to mount both driver and passenger seats, you'd probably have no choice but to do it this way.
As for #2:
I went to Home Depot and picked up what I believe they called "peg hooks," which I found in the same hardware section where I was looking for nuts and washers. Basically, looked like a long metal rod with some hooks at the end--I think the end with the hooks go onto those hanging walls with a bunch of holes in them. The one I bought was about 1ft long (see receipt):
2. Receipt.
I used a Dremel with a metal griding attachment to take off the end with the hooks and attached that end to the inside lever on the Bride rail, first with electrical tape to keep the pieces from slipping, then with some zip ties to firmly hold it all together. Looks pretty good to me--when you move it up, it sticks out just the right amount from the seat:
3. Lever up.
And it's nice that the curved section of the rod is nice and round and actually turned in, towards you sitting in the seat. Also fits the curvature of the tunnel. Good fit. That takes care of #2.
Well, there was a third problem too: the seat belt receptacle's attachment had a tab that normally goes into a hole to keep it from moving too much. But the Bride attachment had no such hole. I tried to bend out the tab, but it broke on me. Oh well. No biggie though, cause after screwing the whole thing into the rail, there was plenty of friction keeping the receptacle pointed towards the driver. So, the tab's not needed.
So, finally, I mounted the seat to the car. No problems there. SoCalAp2 already had the rails adjusted to fit, so all I did was lower the front by one hole to be a little more upright, pushed in the seatbelt receptacle mount farther in flush against the wall, and that's about it. Straight bolt-on from there:
4. Bolted in.
And you can see from the pic how that mod'ed lever looks pulled up.
So, only about 8lbs weight savings. Was hoping for more than that. I guess the stock seat's not all that heavy. For bigger saving might need Bride fixed seat mounts + carbon-fiber version of Zeta III. Maybe later I guess.
But, I do get to sit about 1" lower now than from the stock seats--I always felt too tall in this car, but now feel okay. The new Bride's about 1" off the floor. Could be lower I guess, but not too bad. The rails are very well made--mount points were bent to touch the floor flush, and gussets were even welded in. Looks pretty strong.
I'm 5'11", ~190lbs. ~33-34" waist now (can you believe 1yr ago I was @ 6% body fat, 175lbs, 30-32" waist?... sigh ).... anyway, just letting you know, if you're any bigger than me, forget about this seat--there's no way in hell you'll fit. The seat is VERY tight on me--so tight I probably don't even need a harness to hold me in. My left leg can barely move to the dead pedal cause the walls are so snug. Just letting you know.
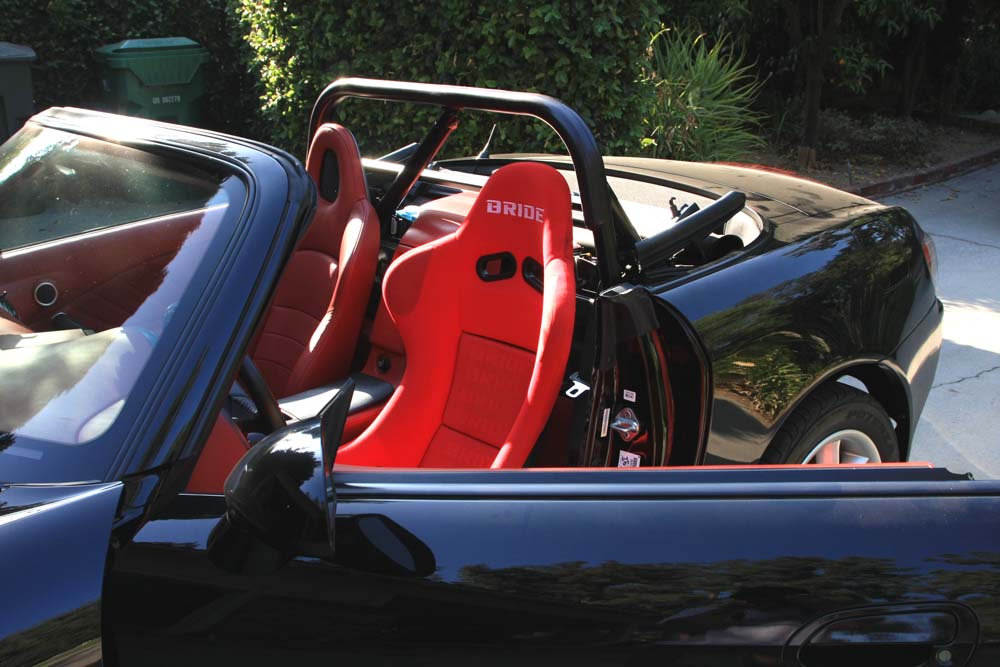
I have the same seat and rails, but my seat rubbed on the car door and it barely catches the glove box door. I actually like it like that as I usually only open that up to pop the trunk. I just pop it open and let it lean against the seat bolster to pop the trunk. Here's a picture showing this. If anyone needs more picks of this seat let me know I have some more. My seat doesn't have the bride logos going down the middle obviously.
The picture is from my last S2000, my current S2000 has that damn tan interior so my red seat looks even more out of place. I'm considering getting a black Zeta 3, does anyone know how much lighter the CF ones are over the FRP's? Thanks guys and sorry for the hijack!

 09-14-2008, 08:37 PM


 ).... anyway, just letting you know, if you're any bigger than me, forget about this seat--there's no way in hell you'll fit. The seat is VERY tight on me--so tight I probably don't even need a harness to hold me in. My left leg can barely move to the dead pedal cause the walls are so snug. Just letting you know.