
2004 Conversion/Conversions......Pics and How-tos
 01-25-2005, 04:22 PM
#31
Registered User

Originally Posted by TrackStar,Jan 21 2005, 08:35 AM
You got a TS bumper? Have any pics? Also, what do you mean bend the headlight supports?

Yes, I have a TS bumper. Yes, I have pics, but not with the bumper on the car. Yes, the headlight support bar had to be persuaded.
But not much. This was in order to have the lights fit completely flush with the bumper. The car is not put back together yet. When it is, I'll be making sure the light alignment is 
I don't want to jack the thread, so here's a link to my progress.
 02-08-2005, 09:42 AM
#32
Former Moderator

Thread Starter
Ever since I did this conversion I've been getting PM's still with questions. I don't mind helping out, but thought I might be able to clarify a little more on the front bumper cover conversion - and add a picture on these corners that need shaving.
Here is a PM I got a few minutes ago and my response.
[QUOTE]Hey Poindexter:
First, I just wanted to say thanks for the pics and description on your conversion.
Here is a PM I got a few minutes ago and my response.
[QUOTE]Hey Poindexter:
First, I just wanted to say thanks for the pics and description on your conversion.
03-09-2005, 10:26 AM
#33


Join Date: Oct 2000
Location: DC
Posts: 1,736
Likes: 0
Received 0 Likes
on
0 Posts
you guys have any issues with the 04 headlights having a gap between the light housing and the fender?
I just had mine done and i there is a slight gap. Is it supposed to be like that or can it be adjusted?
I just had mine done and i there is a slight gap. Is it supposed to be like that or can it be adjusted?
05-20-2006, 08:30 PM
#36
Registered User
I updated my 03 to AP2 today. The installation was fairly simple.
The rear bumper is easy except getting the sides of the bumper unsnapped, no easy way to do that other than pull and hope it doesn't break many of the tabs. You'll need to make 1.5" spacers to attach the bottom bumper mounts to the chassis. I used some Ikea plastic pieces that I had laying around, screwed on with Ikea screws and some large washers. I added one extra sheet metal screw under the right rear tail light to keep the side of the bumper from bulging out like all stock S2000's do.
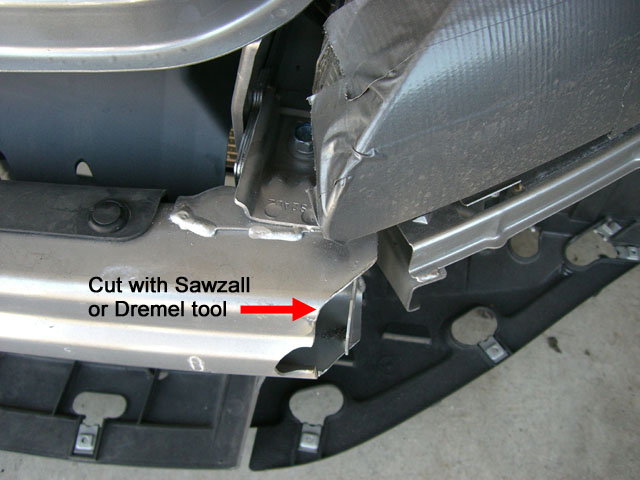
The front bumper wasn't too bad, you just have to cut the bumper bar. I used a Dremel tool with one of the large fiber cut-off discs. That seemed safer than using my Sawzall in such a tight space. The Dremel actually got through the metal pretty well, I wore out 2 of the discs in the process. I cut the bumper foam with the Sawzall.
Pics:


The rear bumper is easy except getting the sides of the bumper unsnapped, no easy way to do that other than pull and hope it doesn't break many of the tabs. You'll need to make 1.5" spacers to attach the bottom bumper mounts to the chassis. I used some Ikea plastic pieces that I had laying around, screwed on with Ikea screws and some large washers. I added one extra sheet metal screw under the right rear tail light to keep the side of the bumper from bulging out like all stock S2000's do.
The front bumper wasn't too bad, you just have to cut the bumper bar. I used a Dremel tool with one of the large fiber cut-off discs. That seemed safer than using my Sawzall in such a tight space. The Dremel actually got through the metal pretty well, I wore out 2 of the discs in the process. I cut the bumper foam with the Sawzall.
Pics:
10-11-2006, 06:48 PM
#37
Registered User

Join Date: Feb 2004
Posts: 1,948
Likes: 0
Received 0 Likes
on
0 Posts
Originally Posted by s2ka,May 20 2006, 08:30 PM
I updated my 03 to AP2 today. The installation was fairly simple.
The rear bumper is easy except getting the sides of the bumper unsnapped, no easy way to do that other than pull and hope it doesn't break many of the tabs. You'll need to make 1.5" spacers to attach the bottom bumper mounts to the chassis. I used some Ikea plastic pieces that I had laying around, screwed on with Ikea screws and some large washers. I added one extra sheet metal screw under the right rear tail light to keep the side of the bumper from bulging out like all stock S2000's do.
The front bumper wasn't too bad, you just have to cut the bumper bar. I used a Dremel tool with one of the large fiber cut-off discs. That seemed safer than using my Sawzall in such a tight space. The Dremel actually got through the metal pretty well, I wore out 2 of the discs in the process. I cut the bumper foam with the Sawzall.
Pics:
 Mine is at the shop getting it done
 09-10-2007, 02:44 PM
#39
Community Organizer

Marked.

Thread
Thread Starter
Forum
Replies
Last Post
TangoVTEC
UK & Ireland For Sale and Wanted
4
03-14-2019 11:58 PM
Stradale
Έλληνες Ιδιοκτήτες S2000 / Greek S2000 Owners
10
04-15-2013 02:17 AM