
Supra PCV install DIY


 04-15-2010, 08:15 AM
#132

I ran the Supra valve on my f20 with 10psi, but since changing to an f22 with the better oem metal pvc valve, I just left it stock to see. No dipstick issues or anything. Put 20k miles on it so far.


 01-29-2011, 06:28 AM
#137
Registered User


Join Date: Mar 2005
Posts: 222
Likes: 0
Received 0 Likes
on
0 Posts
Resurrecting this thread. I have a question:
I bought the 1009 Valve. I don't understand, you're supposed to be able to blow through one end and not on the other, but it's not working. In fact, all the PCV valves are this way at Pepboys. I can blow through both ends. Even when I use a lot of pressure on the vacuum side, the valve just barely catches.
Is this right???? Thanks!
01-30-2011, 06:20 AM
#138
Former Sponsor


Should hardly be able to blow through one end of it. I could slightly blow through one end and easily the other. The higher pressure from the engine causes the ball to close in the pcv. Can't blow much pressure through it yourself.
04-09-2011, 12:08 PM
#139

Hello all,
There have been numerous threads on krank vents, catch cans, crank case ventilation, etc. Today a thread was posted about using a PCV valve from a 97 TT Supra. Although it was quite helpful, I figured I could expand on it a bit. So, here is my version of the Supra PCV install on a Honda S2000.
DISCLAIMER - although this is a simple install requiring little mechnical skill, YOU CAN STILL CAUSE MOTOR DAMAGE if you install it improperly. If your motor fails, don't come looking for me!
On to the tutorial.
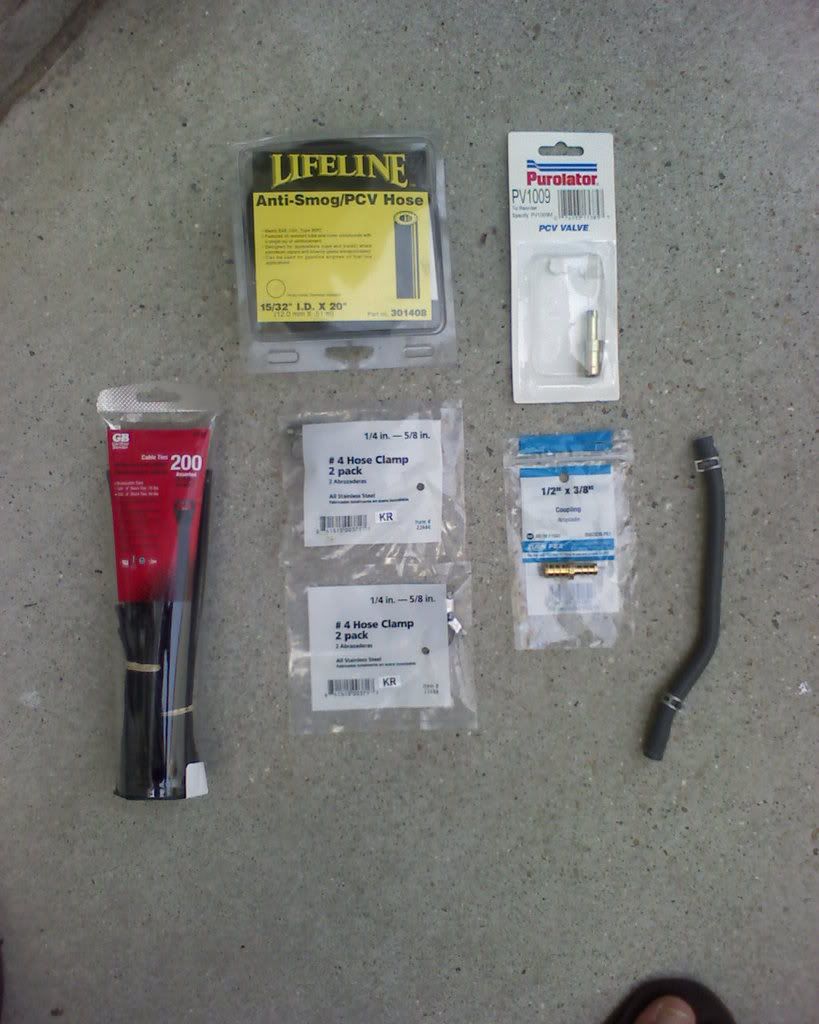
1) Gather up the parts. Here's what you need:
- 1997 Toyota Supra Turbo PCV valve - Pep Boys sells an OEM replacement: Purolator PV1009M. Cost: $4.79
- 15/32" ID Anti-Smog/PCV hose. $4.49 for 1 foot. You'll use very little.
- 1/2" x 3/8" brass coupler. Cost: $1.93 from Lowes.
- Assorted zip ties / hose clamps.
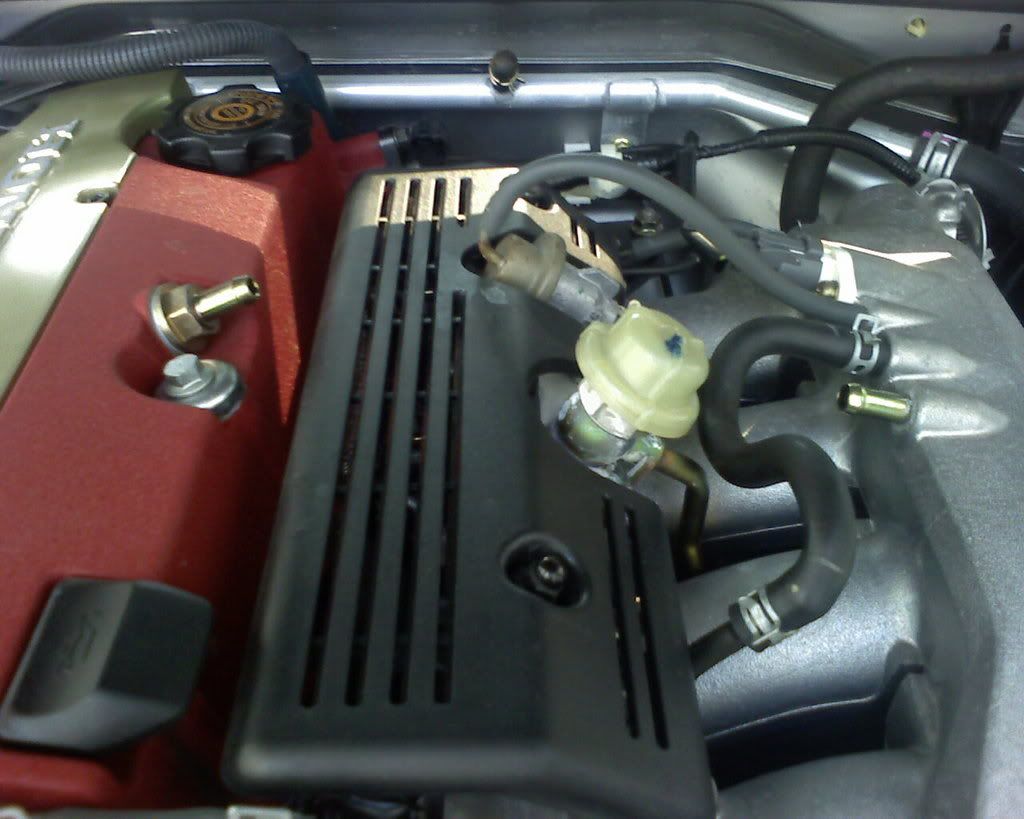
2) Remove the hose between the stock PCV valve and the intake manifold:
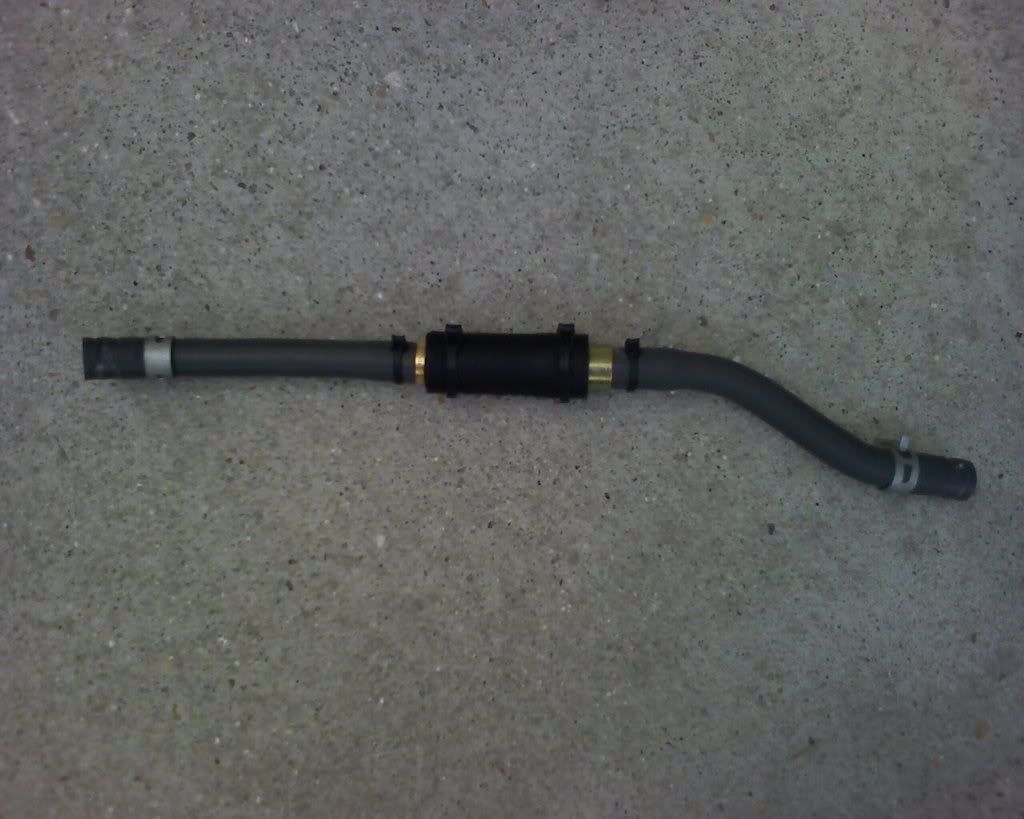
3) Cut the OEM hose in half. Cut a roughly 3" section of the 15/32" hose you purchased. Lay out your parts as follows:
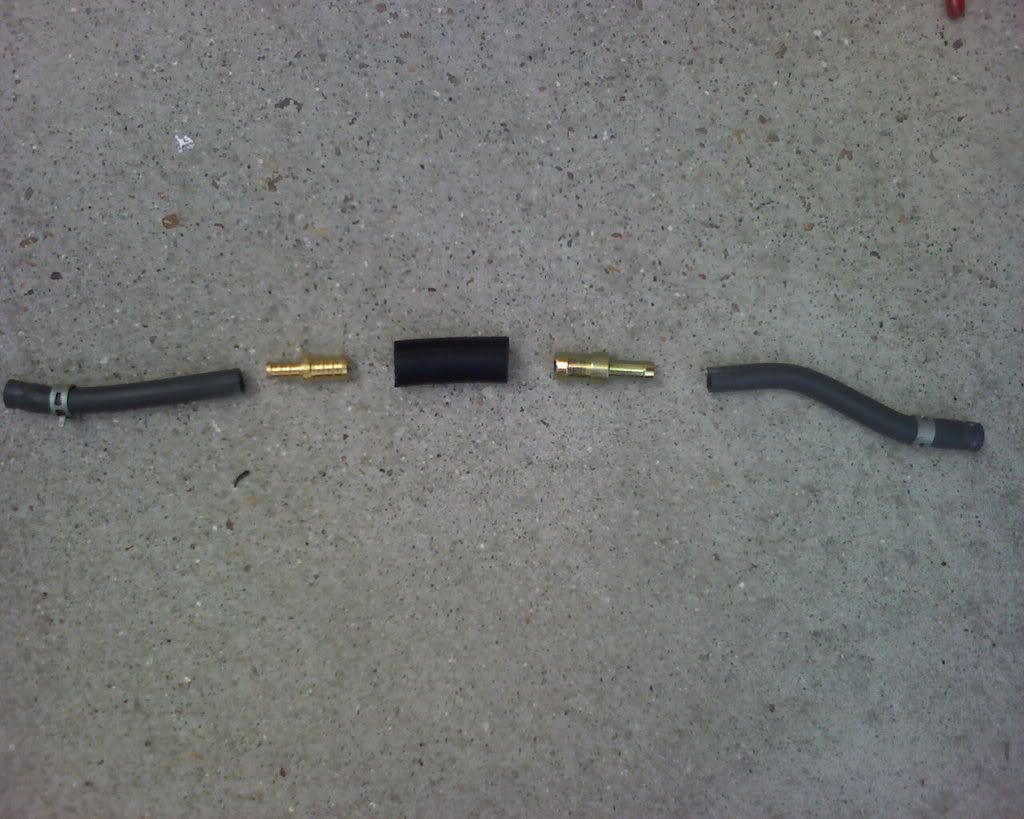
** NOTE ** The larger side (1/2" side) of the PCV valve goes TOWARDS the valve cover. The idea is pressure can escape the crank case, but should not be let in from the intake manifold. To verify, if you blow into the bigger end air will go through but if you blow through the smaller end, air will not pass. If you get this backwards, excess pressure may build in your crank case and cause valvetrain damage. (Photo curteousy of OyATL of S2K Atlanta).
4) Assemble the parts you laid out in step 3:
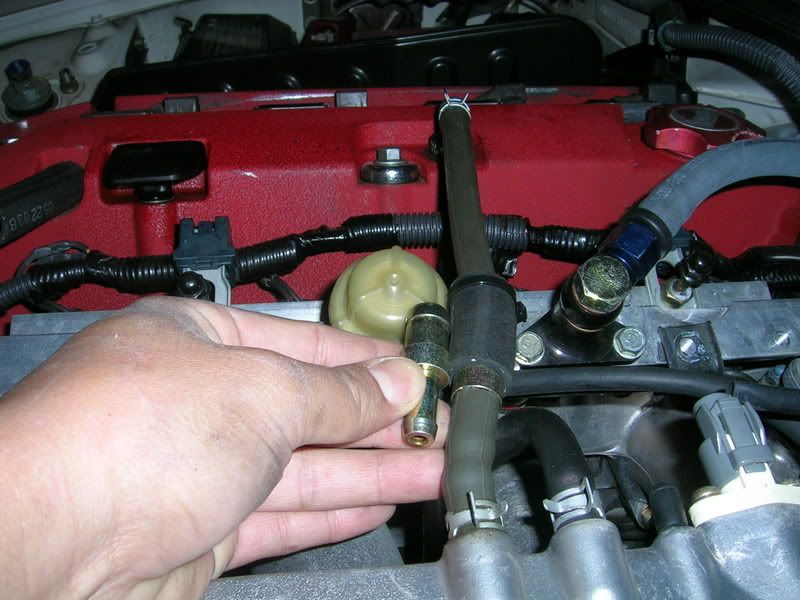
5) Reinstall the new PCV valve assembly. You'll have to trim one of the ends of stock hose as you've increased the overall length by adding a new hose section, coupler and valve:
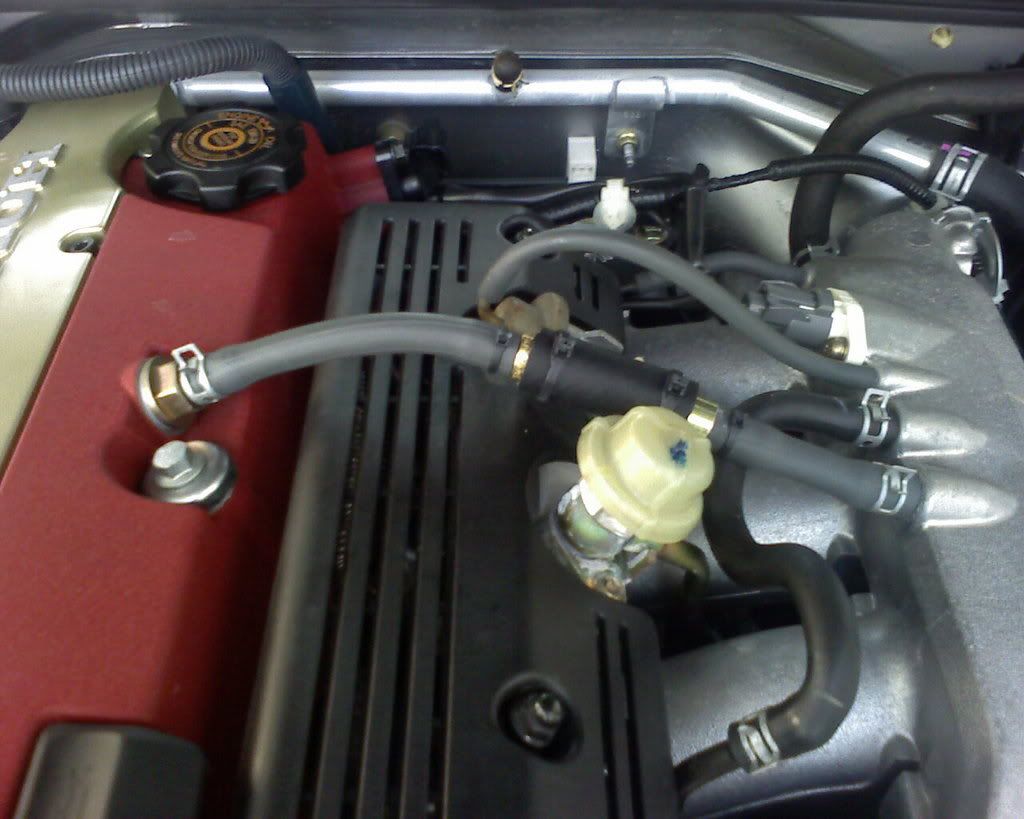
6) Start up your motor and verify there are no leaks.
The jury is out on this mod having any power benefits. There has been evidence to show it might. But above all, this mod is to relieve crank case pressure and save your valueable valvetrain!
If you have any questions, corrections or additions, please let me know.
There have been numerous threads on krank vents, catch cans, crank case ventilation, etc. Today a thread was posted about using a PCV valve from a 97 TT Supra. Although it was quite helpful, I figured I could expand on it a bit. So, here is my version of the Supra PCV install on a Honda S2000.
DISCLAIMER - although this is a simple install requiring little mechnical skill, YOU CAN STILL CAUSE MOTOR DAMAGE if you install it improperly. If your motor fails, don't come looking for me!
On to the tutorial.
1) Gather up the parts. Here's what you need:
- 1997 Toyota Supra Turbo PCV valve - Pep Boys sells an OEM replacement: Purolator PV1009M. Cost: $4.79
- 15/32" ID Anti-Smog/PCV hose. $4.49 for 1 foot. You'll use very little.
- 1/2" x 3/8" brass coupler. Cost: $1.93 from Lowes.
- Assorted zip ties / hose clamps.
2) Remove the hose between the stock PCV valve and the intake manifold:
3) Cut the OEM hose in half. Cut a roughly 3" section of the 15/32" hose you purchased. Lay out your parts as follows:
** NOTE ** The larger side (1/2" side) of the PCV valve goes TOWARDS the valve cover. The idea is pressure can escape the crank case, but should not be let in from the intake manifold. To verify, if you blow into the bigger end air will go through but if you blow through the smaller end, air will not pass. If you get this backwards, excess pressure may build in your crank case and cause valvetrain damage. (Photo curteousy of OyATL of S2K Atlanta).
4) Assemble the parts you laid out in step 3:
5) Reinstall the new PCV valve assembly. You'll have to trim one of the ends of stock hose as you've increased the overall length by adding a new hose section, coupler and valve:
6) Start up your motor and verify there are no leaks.
The jury is out on this mod having any power benefits. There has been evidence to show it might. But above all, this mod is to relieve crank case pressure and save your valueable valvetrain!
If you have any questions, corrections or additions, please let me know.
for the AP1, guessing you leave the vertical PCV in place with the addition of Supra PCV. do you need to replace or clean the stock PCV since you leave it inline with the Supra PCV?