
Setting Up Flashpro Tables for higher resolution?
 05-01-2012, 04:39 PM
#1

Thread Starter
Hello, I would like to know if anyone sets up the range on their low-cam fuel/ign tables to encompass only RPM's below their VTEC points, while setting up their high-cam fuel/ign tables to encompass RPM's above their vtec point. This would allow more resolution for both maps, if you have a rough idea of where your VTEC point will be and if you have a relatively small vtec pressure window.
Here is an example high-cam ign table, assuming the optimum VTEC point was already determined to be 4000 RPM, and a redline of 8500 was chosen.

The low-cam ign table would range between, let's say, 500 to 4700 rpm.
Looking forward to hear everyone's thoughts!
Here is an example high-cam ign table, assuming the optimum VTEC point was already determined to be 4000 RPM, and a redline of 8500 was chosen.
The low-cam ign table would range between, let's say, 500 to 4700 rpm.
Looking forward to hear everyone's thoughts!
 05-01-2012, 05:53 PM
#2

i don't think everyone takes the time to do that. i have my rpm breakpoints customized to my liking. it's really depends on the software. aem does not have as much resolution as hondata or haltech so you're limited to some extent.
05-03-2012, 04:35 AM
#3


I use all the columns and rows, but you have to leave at least 1 column above and below the expected RPM range. The VTEC system won't toggle quickly, so the ECU will sometimes need high cam fuel and timing even when it's below the VTEC window. You can also use the extra "boost" columns in order to get better resolution at high load / full throttle.
Here are the fuel maps from an eTune I'm about to complete.
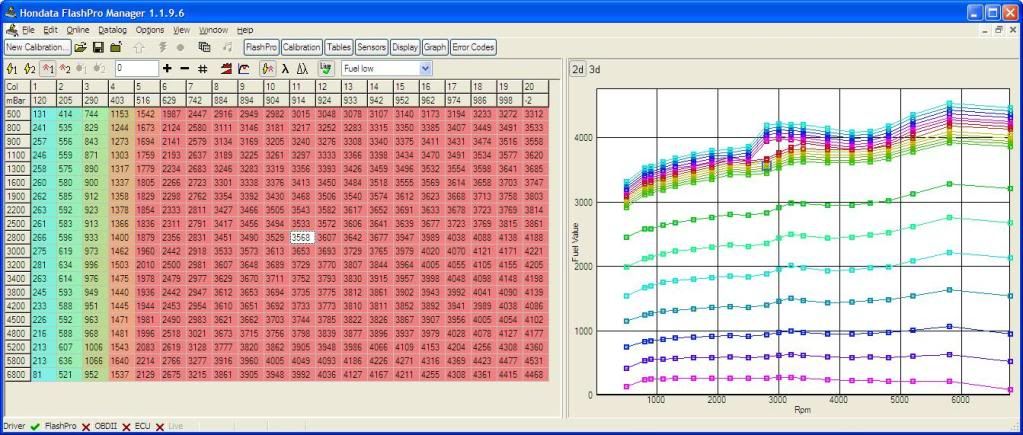
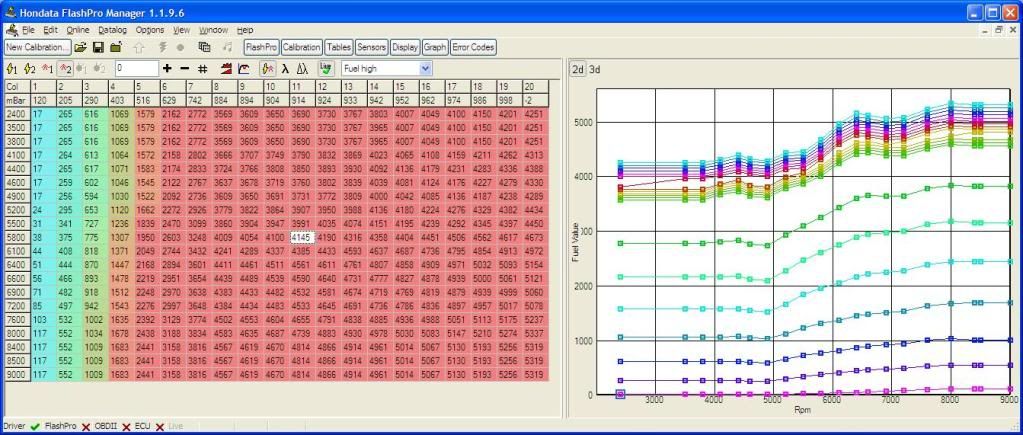
Here are the fuel maps from an eTune I'm about to complete.
05-03-2012, 05:27 AM
#4
I use all the columns and rows, but you have to leave at least 1 column above and below the expected RPM range. The VTEC system won't toggle quickly, so the ECU will sometimes need high cam fuel and timing even when it's below the VTEC window. You can also use the extra "boost" columns in order to get better resolution at high load / full throttle.
05-03-2012, 06:10 AM
#5
Originally Posted by gernby' timestamp='1336048540' post='21665352
I use all the columns and rows, but you have to leave at least 1 column above and below the expected RPM range. The VTEC system won't toggle quickly, so the ECU will sometimes need high cam fuel and timing even when it's below the VTEC window. You can also use the extra "boost" columns in order to get better resolution at high load / full throttle.
The value in doing this is that it prevents the AFR from going really rich when the driver goes half throttle while cruising. This is a huge issue with most aftermarket intakes that have a strong resonance at about 3500 RPMs. The resonance only occurs when the throttle is almost fully open, so the added resolution helps reduce wasted fuel.
Obviously, if I was tuning an FI application, I would need to spread those columns back out again, in order to cover the boost range.
05-03-2012, 07:30 AM
#7
there is no need for an extra 10 load columns between 90 and 100 kpa. you can have a break point at 90 and at 100 and the ecu will interpolate.
Trending Topics
05-03-2012, 09:51 AM
#8
Originally Posted by gernby' timestamp='1336054556' post='21665618
If the FlashPro had some sort of TPS compensation table by RPM, then there wouldn't be a need for increased resolution at full load.
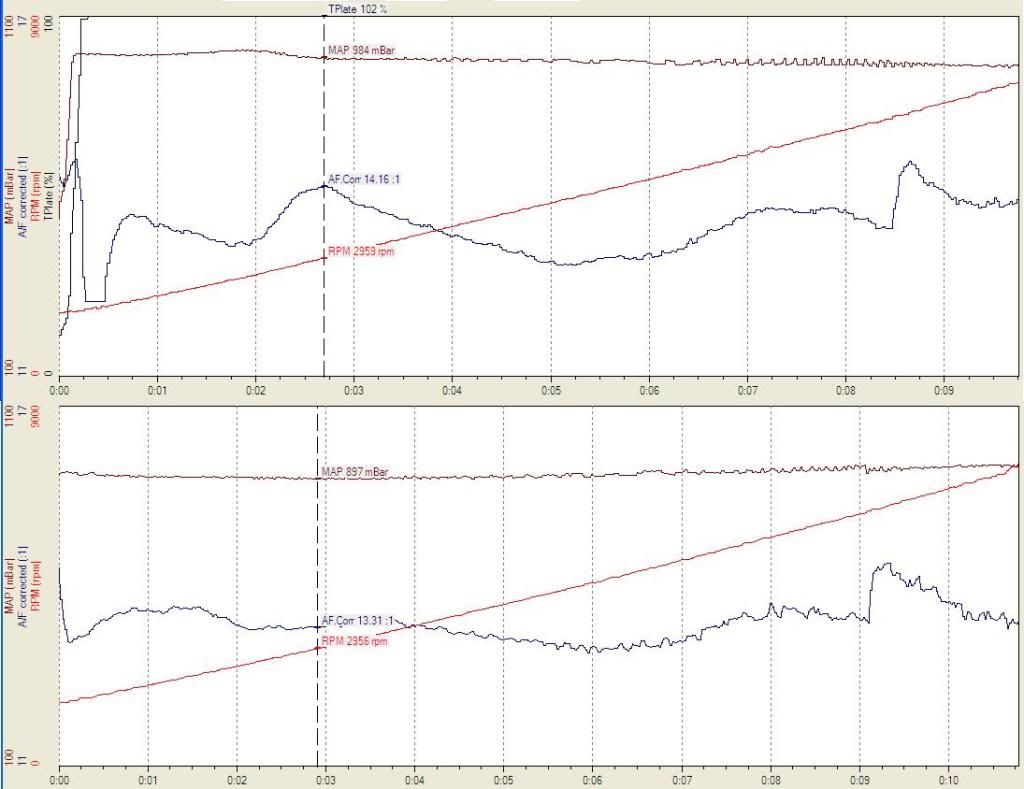
Here are 2 datalogs from the same car and a stock-like base tune at 2 different load levels. Look how much difference there is in the AFR at the RPM where the intake has a strong resonance at WOT. I've observed that this gap in AFR will exist until you get within about 4 pka. However, since the MAP drops about 4-5 pka as RPMs rise, you really need a breakpoint about every 1 pka to make sure true WOT
always follows a WOT column, and PT almost always follows a PT column.
 05-03-2012, 11:25 AM
#9
Yes, it will interpolate. Unfortunately, if you don't have break points between 90 and 100, then it will either run rich when you are at 93 kpa at part throttle OR it will run lean when you are at 96 kpa at full throttle.
Here are 2 datalogs from the same car and a stock-like base tune at 2 different load levels. Look how much difference there is in the AFR at the RPM where the intake has a strong resonance at WOT. I've observed that this gap in AFR will exist until you get within about 4 pka. However, since the MAP drops about 4-5 pka as RPMs rise, you really need a breakpoint about every 1 pka to make sure true WOT
always follows a WOT column, and PT almost always follows a PT column.
05-03-2012, 01:28 PM
#10
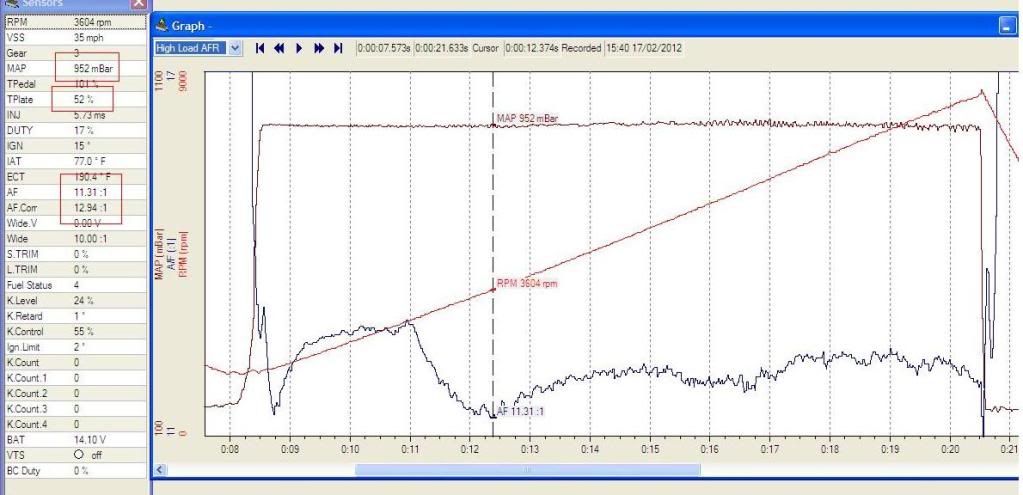
I dug up some datalogs from my testing on the issue of part throttle / high load. The top datalog shows my AFR across the rev range with 100% throttle. I'm showing AF instead of AF Corr, since the AF Corr value is WAY off on my car. At the time I did these tests, I had my AF tuned for a very flat 12.5:1 at WOT.

Here is a datalog I did with a restricted throttle plate. I did several different tests with restricted throttle plates to see where the AF curve would begin to transition from the PT shape to the WOT shape. As you can see, I was able to achieve virtually the same MAP value with a significantly restricted throttle plate, which shows significant impate to the AF.
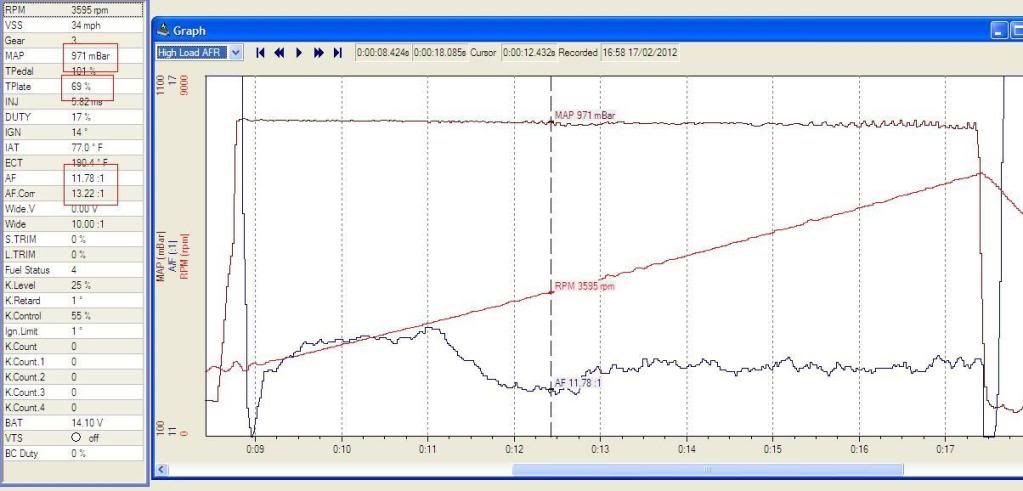
Here is a more restricted throttle plate, which shows much more impact on the AF curve. Basically, any time I touch 50% throttle (about 33% throttle pedal with the stock mapping) at 3500 RPMs, my AFR's would go pig rich. This is why I have adjusted my maps for better resolution. I've also adjusted my target throttle map so that my throttle plate transitions very quickly to 100% open once it gets to the point where it reaches full load.
Here is a datalog I did with a restricted throttle plate. I did several different tests with restricted throttle plates to see where the AF curve would begin to transition from the PT shape to the WOT shape. As you can see, I was able to achieve virtually the same MAP value with a significantly restricted throttle plate, which shows significant impate to the AF.
Here is a more restricted throttle plate, which shows much more impact on the AF curve. Basically, any time I touch 50% throttle (about 33% throttle pedal with the stock mapping) at 3500 RPMs, my AFR's would go pig rich. This is why I have adjusted my maps for better resolution. I've also adjusted my target throttle map so that my throttle plate transitions very quickly to 100% open once it gets to the point where it reaches full load.