
Is there a DIY headunit install guide for the AP2?
 06-19-2012, 08:04 PM
#151

Reposting these pics.. I stopped using the site the were posted on.. so reposting the entire posts but breaking them for new rules (which is why I didn't just edit them).
Post 1:
That's for an AP1, you can crack/break stuff if you attempt that on an AP2 as you are missing one important step.
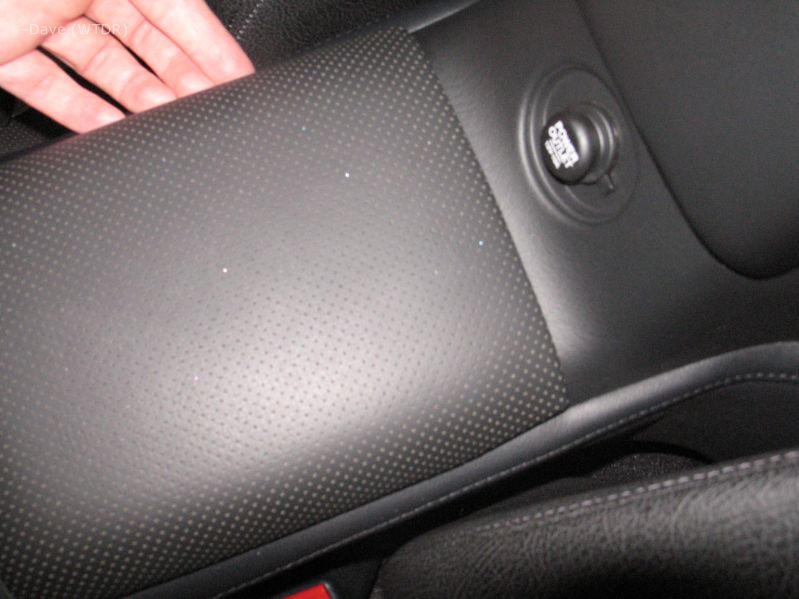
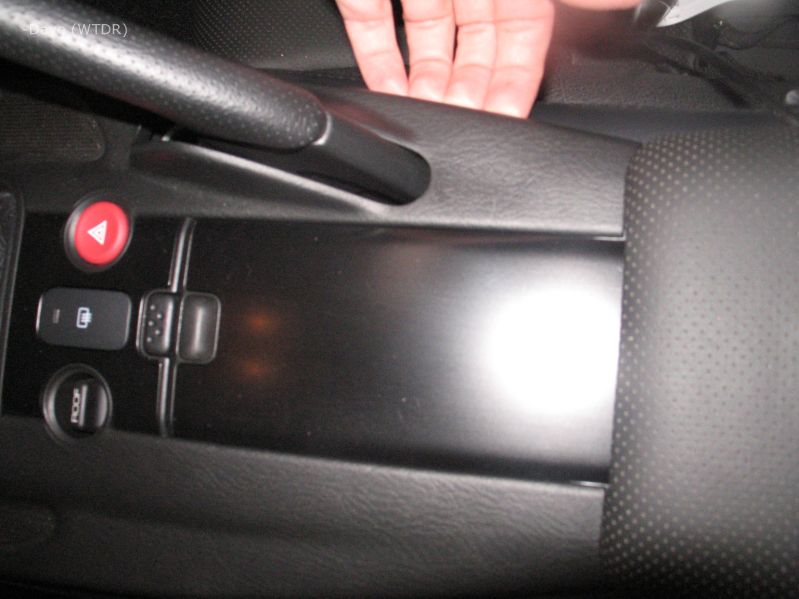
You need to remove the center console piece that holds the roof, hazard and (depending on year) defog switches, cupholder thing, etc. to do so, put your fingers (or something else that is fairly soft, screwdriver with a rag/tape around it, etc) under the perferated (sp?) leather portion near the rear of the part and lift. Do NOT lift the main piece that has leather from the front to the back, you just want to lift on the piece at the top. Once you remove one side, switch to the other side, then go back to the other side but move forward about 8" or so (you'll feel where the snaps are), lift, other side, lift, then just work your way forward one more set of snaps that are closer to the middle of the console. once all 6 things are unsnapped/removed unplug the harness and more the console out of the way. I removed the shift know to make it easy.
Here's a couple of pics of my car with the center console removed, you can see the back holes where the snaps go here.
here's where the next set are (right where the cupholder is)
you can't really see it, but the snaps go in that hole (well one of them does) at the very bottom of this pic
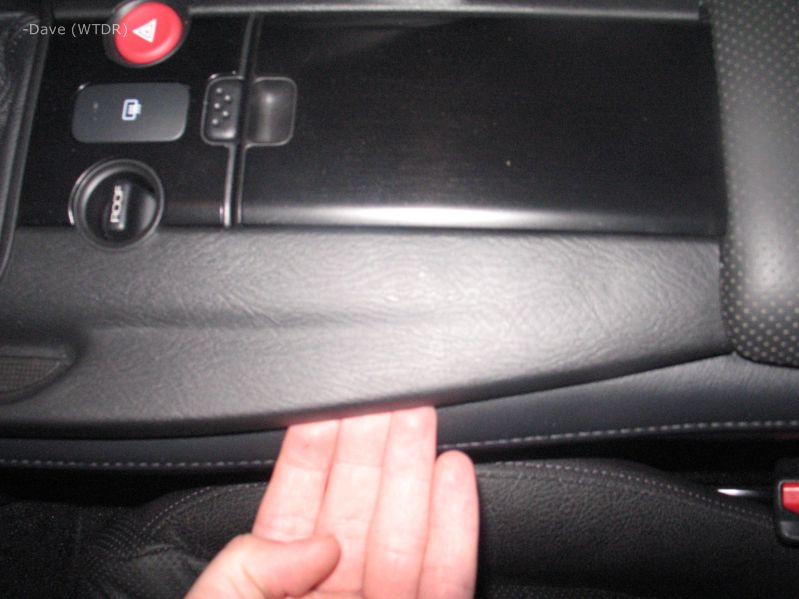
Here it is with the center console installed, the part you need to remove is just the very top part of the console, with the switches, shift boot, etc, leave the big bottom piece alone.
I have step by step pics at home. If you need them, let me know.
Post 1:
Originally Posted by golfpro,Jul 14 2006, 08:53 AM
Check the FAQ's posted at the top of this forum.
To remove the head unit:
Put theshifter in reverse (to get it out of the way)
Carefully pry out the vent/door cover. Start at the top. When that's loose, open the door and gently, but firmy, work the cover loose and off.
Undo two screws at each side of the head unit.
Done
To remove the head unit:
Put theshifter in reverse (to get it out of the way)
Carefully pry out the vent/door cover. Start at the top. When that's loose, open the door and gently, but firmy, work the cover loose and off.
Undo two screws at each side of the head unit.
Done
You need to remove the center console piece that holds the roof, hazard and (depending on year) defog switches, cupholder thing, etc. to do so, put your fingers (or something else that is fairly soft, screwdriver with a rag/tape around it, etc) under the perferated (sp?) leather portion near the rear of the part and lift. Do NOT lift the main piece that has leather from the front to the back, you just want to lift on the piece at the top. Once you remove one side, switch to the other side, then go back to the other side but move forward about 8" or so (you'll feel where the snaps are), lift, other side, lift, then just work your way forward one more set of snaps that are closer to the middle of the console. once all 6 things are unsnapped/removed unplug the harness and more the console out of the way. I removed the shift know to make it easy.
Here's a couple of pics of my car with the center console removed, you can see the back holes where the snaps go here.
here's where the next set are (right where the cupholder is)
you can't really see it, but the snaps go in that hole (well one of them does) at the very bottom of this pic
Here it is with the center console installed, the part you need to remove is just the very top part of the console, with the switches, shift boot, etc, leave the big bottom piece alone.
I have step by step pics at home. If you need them, let me know.
 06-19-2012, 08:07 PM
#152
Post 2:
Here ya go.
Ok, a few notes before the pics. You'll notice that the pics were taken after the pieces were removed.. I placed the pieces into position but didn't reinstall the pieces. I did this so I could look at the clips and such to try to ensure that the pics were correct. It won't really matter for the purpose of this post though as the pics show what you need to do to remove the HU in an AP2 (specifically, a 2006+).
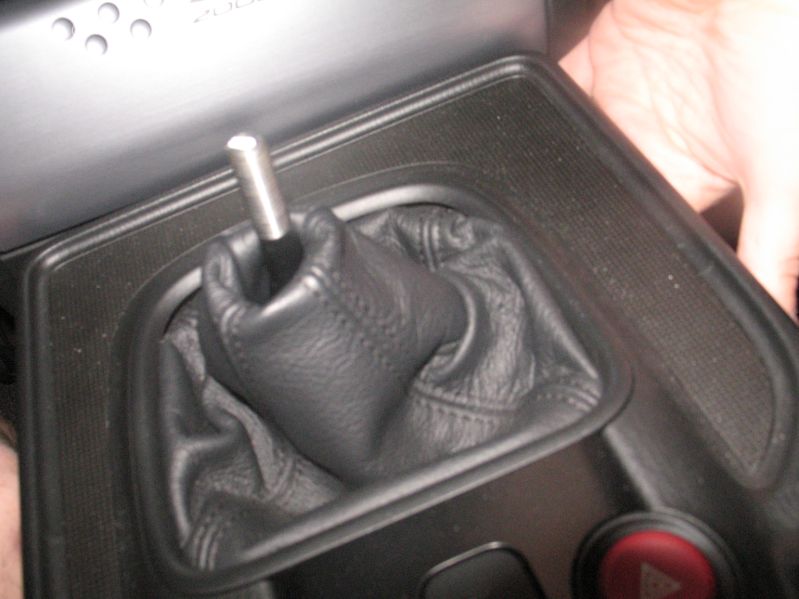
First, remove the shift knob. First, you must loosen the nut below the shift know. You may want to put tape on the nut so the wrench doesn't remove the finish. As I recall, to loosen the nut, you must "tighten" it on the shifter, which would be clockwise.. I can check to be sure if needed.
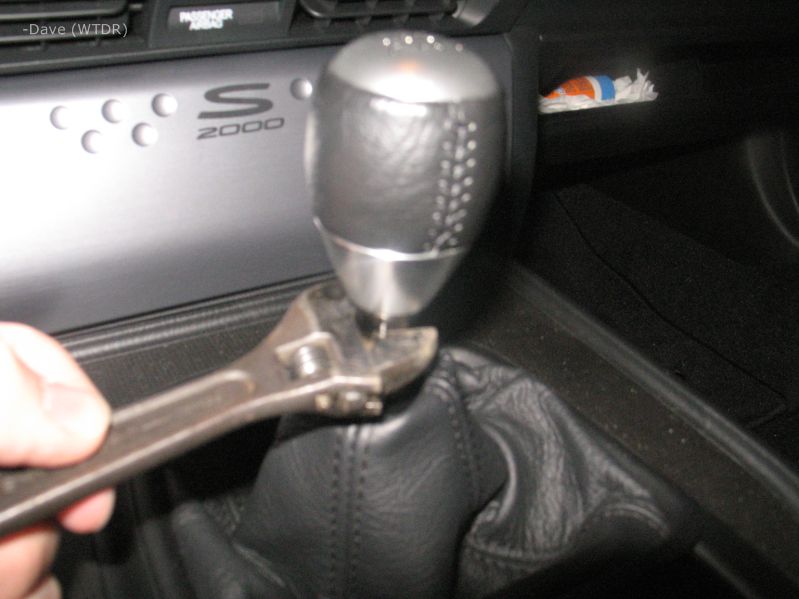
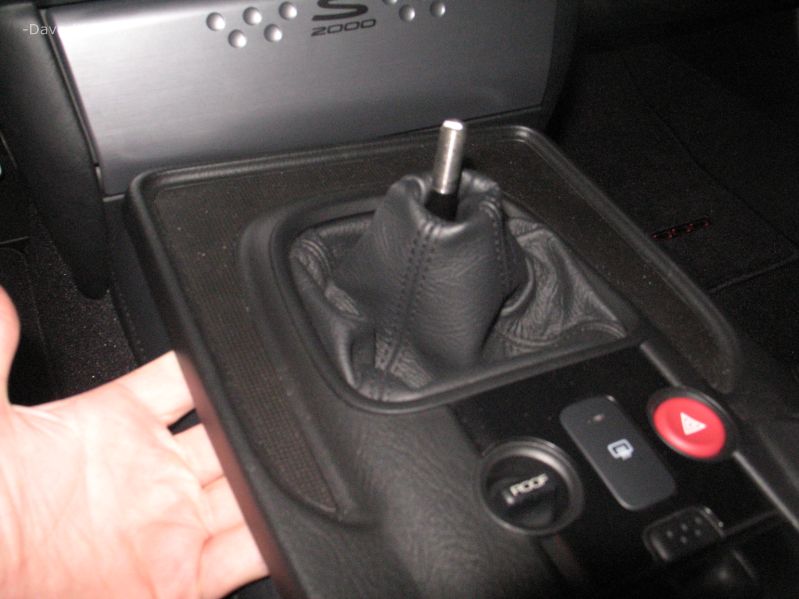
Remove the knob itself and remove the nut (not needed, but I did it anyways):
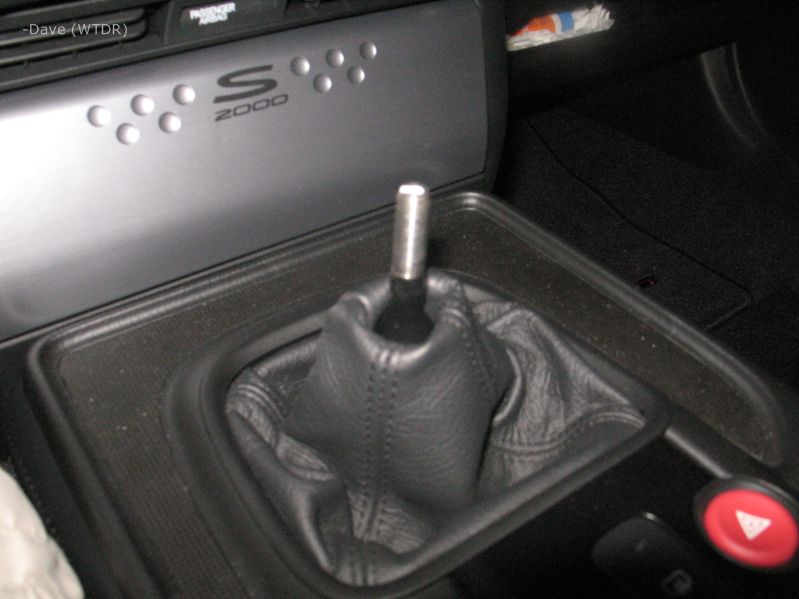
Now it's time to remove the center console. There are 6 clips holding the console top in place. These clips may be slightly difficult to remove the first time and they can be fragile, so take some care in this.
Start at the back of the console (between the seat backs and in front of the center console storage/secret compartment). Push your fingers between the center console top and bottom and pull up. On my car, the pass side had more clearance and was easier to remove first.
Now, repeat that step with the other side.
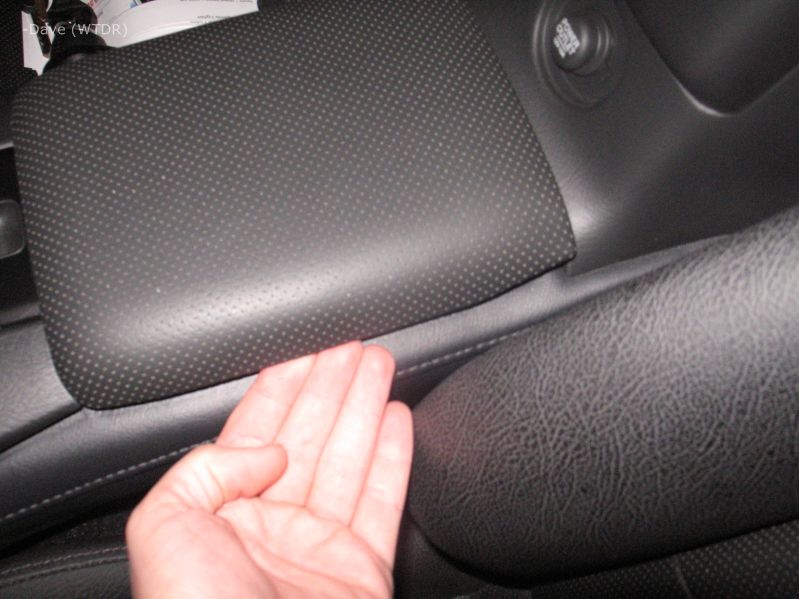
Now, switch back to the side you started with but move forward, near the cup holder/parking brake handle and repeat.
Repeat that on the other side...
The next clips are close to the middle, and snapping one side out took both out, they are fairly close to the front, but the same basic process applies.
other side..
Here ya go.
Ok, a few notes before the pics. You'll notice that the pics were taken after the pieces were removed.. I placed the pieces into position but didn't reinstall the pieces. I did this so I could look at the clips and such to try to ensure that the pics were correct. It won't really matter for the purpose of this post though as the pics show what you need to do to remove the HU in an AP2 (specifically, a 2006+).
First, remove the shift knob. First, you must loosen the nut below the shift know. You may want to put tape on the nut so the wrench doesn't remove the finish. As I recall, to loosen the nut, you must "tighten" it on the shifter, which would be clockwise.. I can check to be sure if needed.
Remove the knob itself and remove the nut (not needed, but I did it anyways):
Now it's time to remove the center console. There are 6 clips holding the console top in place. These clips may be slightly difficult to remove the first time and they can be fragile, so take some care in this.
Start at the back of the console (between the seat backs and in front of the center console storage/secret compartment). Push your fingers between the center console top and bottom and pull up. On my car, the pass side had more clearance and was easier to remove first.
Now, repeat that step with the other side.
Now, switch back to the side you started with but move forward, near the cup holder/parking brake handle and repeat.
Repeat that on the other side...
The next clips are close to the middle, and snapping one side out took both out, they are fairly close to the front, but the same basic process applies.
other side..
06-19-2012, 08:07 PM
#153
Post 3:
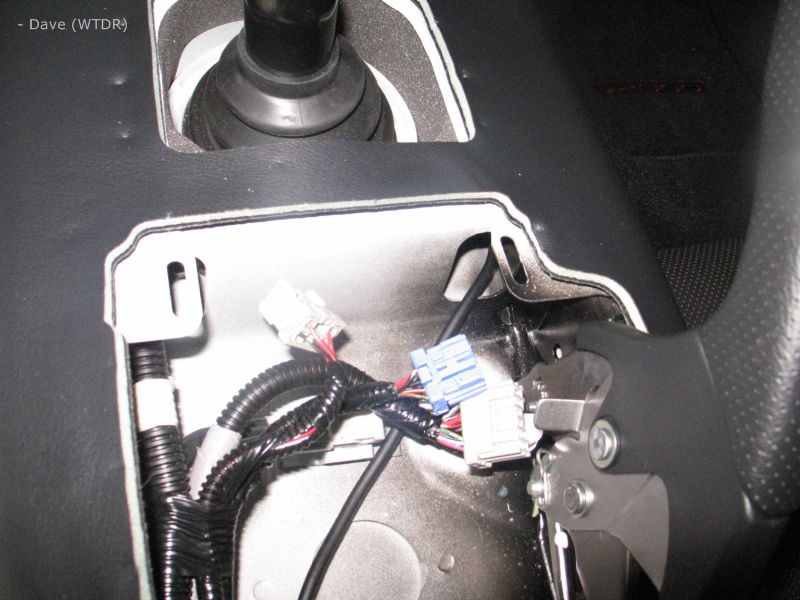
Ok, now the console should be loose, but still held in by the wiring harness. If you have an 04 or 05, you will only have 2 plugs (roof and hazard), if you have an 06+ you will have 3 plugs (roof, defog and hazard). Since my car is an 06, you will see 3 plugs in the pics. They are normal plugs, just unplug carefully (although you'd lkely have to try to break these plugs). NOTE: on 2006+ models, honda made another unusual choice. The Defog and Roof plugs are the same, except for color. They CAN be plugged into the wrong switch. Make a note of which is which on your car. If you forget, simply look at the switches, one of them will have one less terminal in use, then look at the wire harness plug and see which plug leaves the same terminal open, then match them that way.
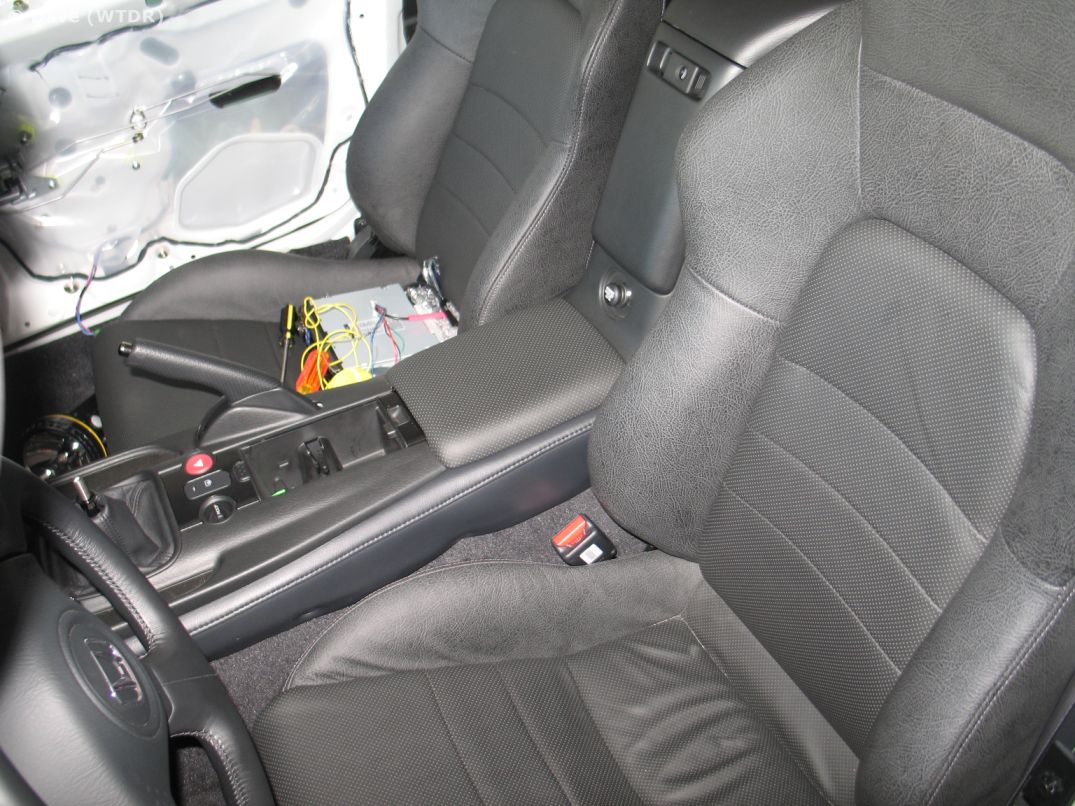
Once the wiring harness is disconnected, move the console out of the way but watch for pieces falling off of it. The cup holder spring loaded separator likes to loose the piece that locks it in place, at least mine liked to.
Ok now for the head unit. As you can see it was already loose in the pics here, but that doesn't matter for this.
Put the Shifter in 2nd.
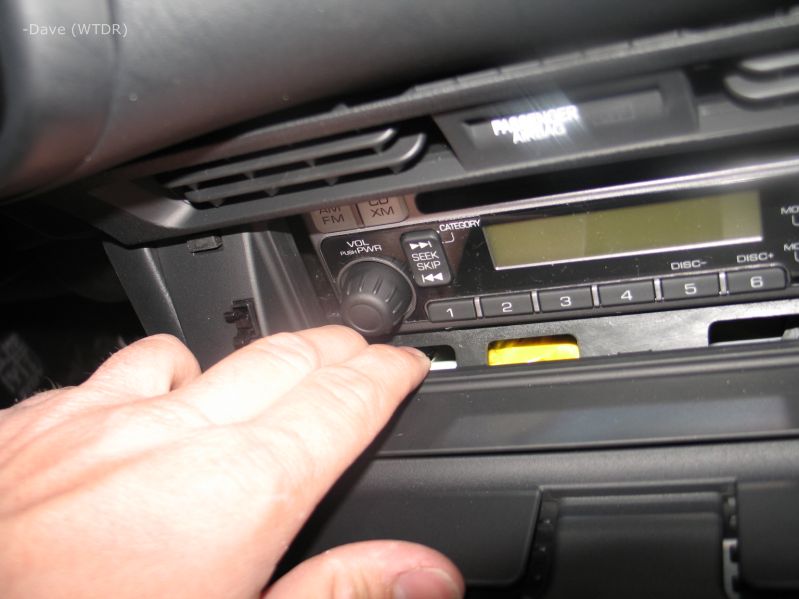
First, open the door and grasp each side of the door with one hand. Wiggle (with some force, but be reasonable here, this is just some pieces of plastic with clips, although you'll likely use more force than you think you will to get it out ) the bezel side to side with the door while pulling on it. You will pop out one side (or both) at the bottom.
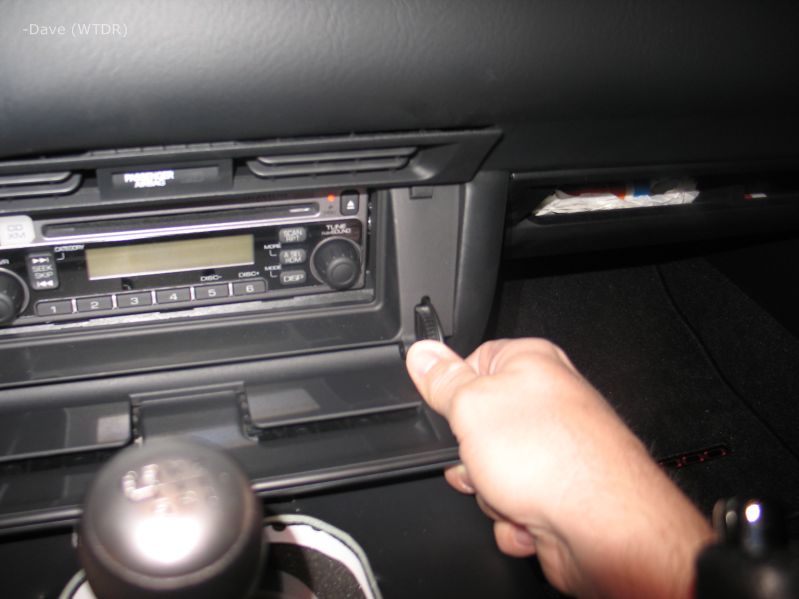
Using the door, pop out the other side if pop didn't come out already.
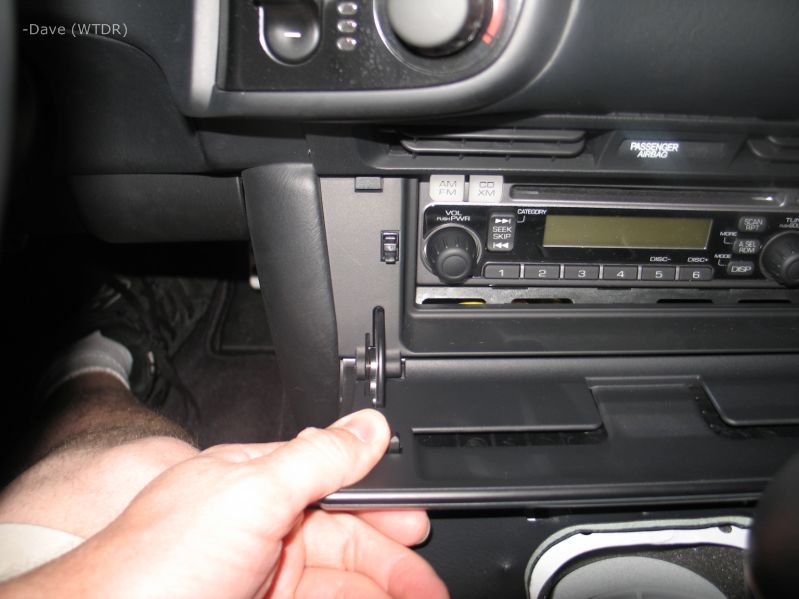
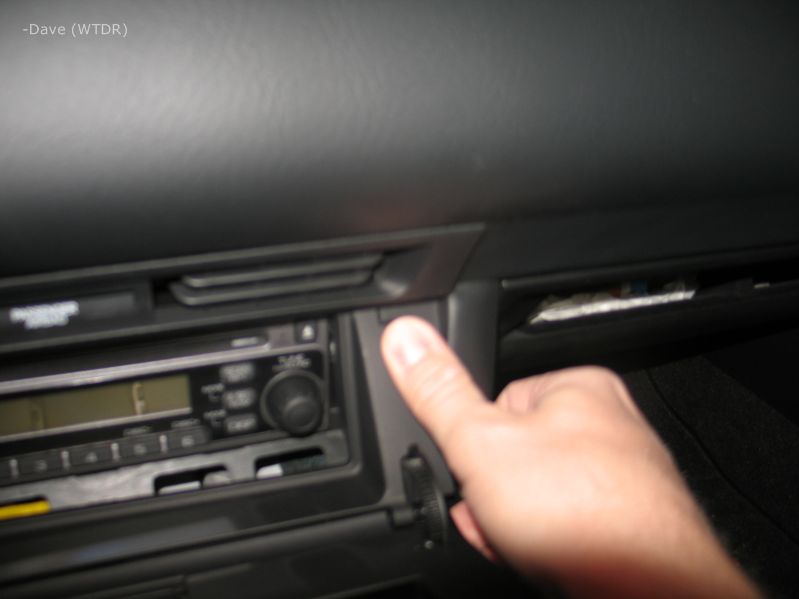
For the middle clips, I pulled the door to give some room then used my fingers to pry it away from the radio, seemed to work fine.
Repeat for the other side.
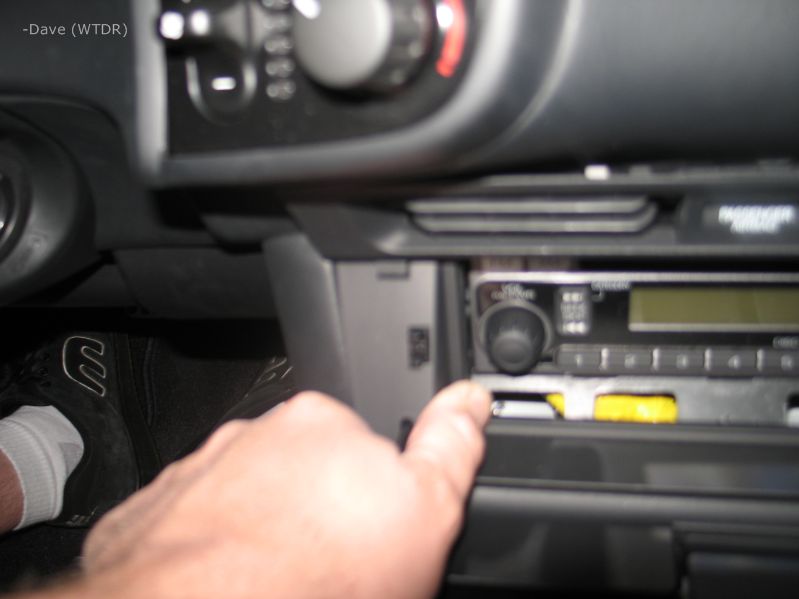
Once those are out, grasp one side of the bezel and pull carefully, I also wiggled the bezel around some (vertically that is) so I didn't put too much stress on the clips.
Repeat for the other side
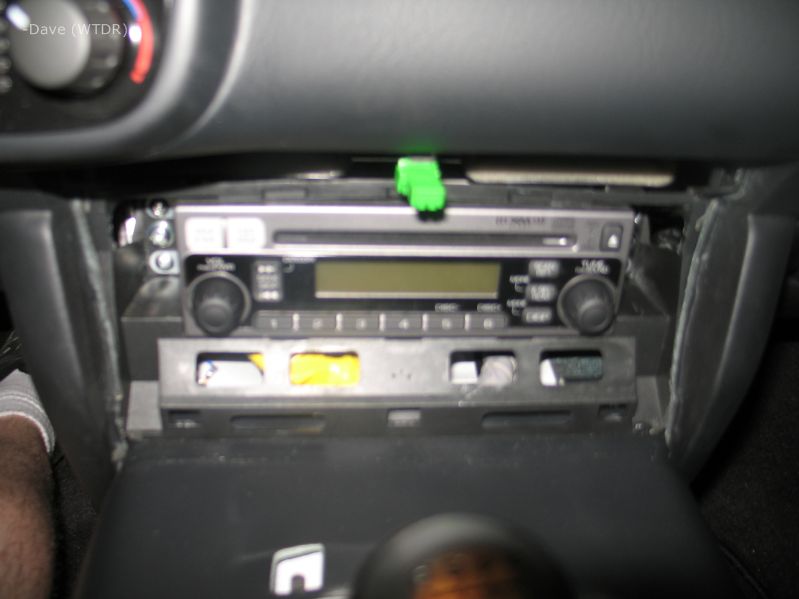
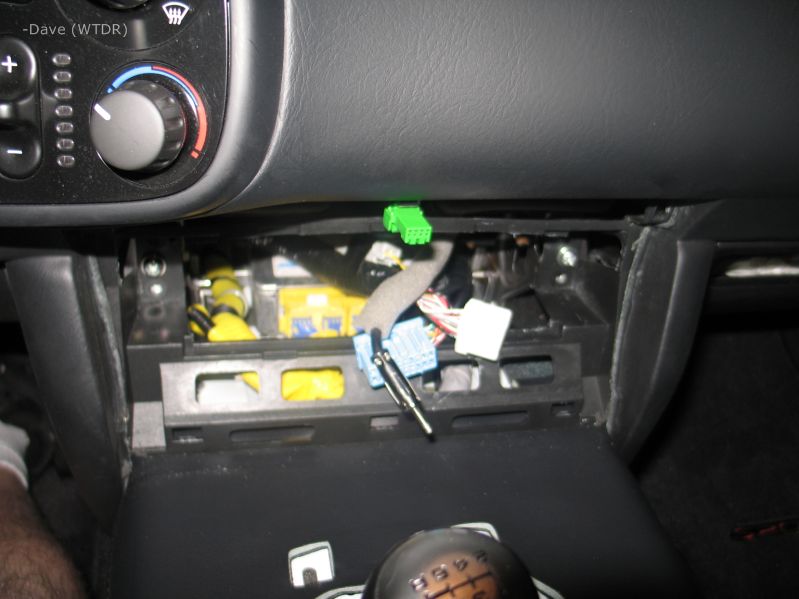
2006+ ONLY - Unplug the green wire for the Passenger side airbag disabled light. Note: If you leave this unplugged and put any weight in the pass seat the airbag warning light will light up when you drive the car.
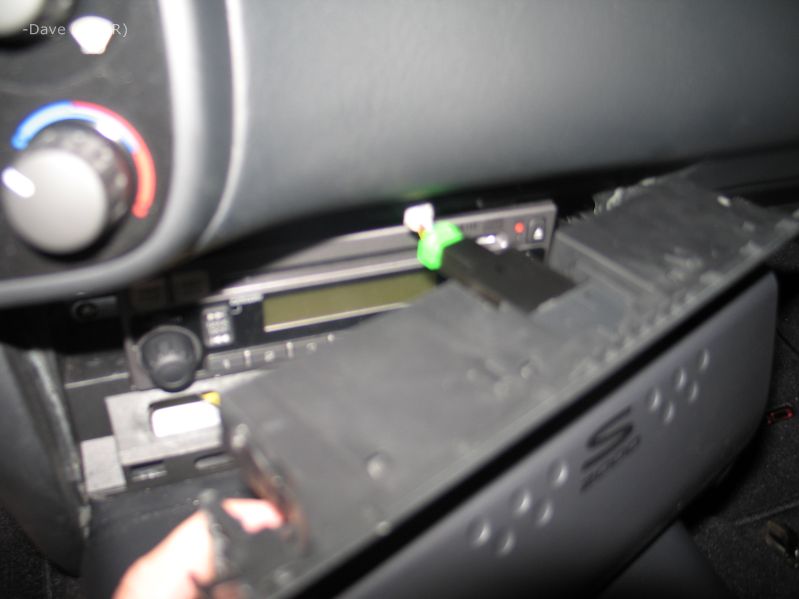
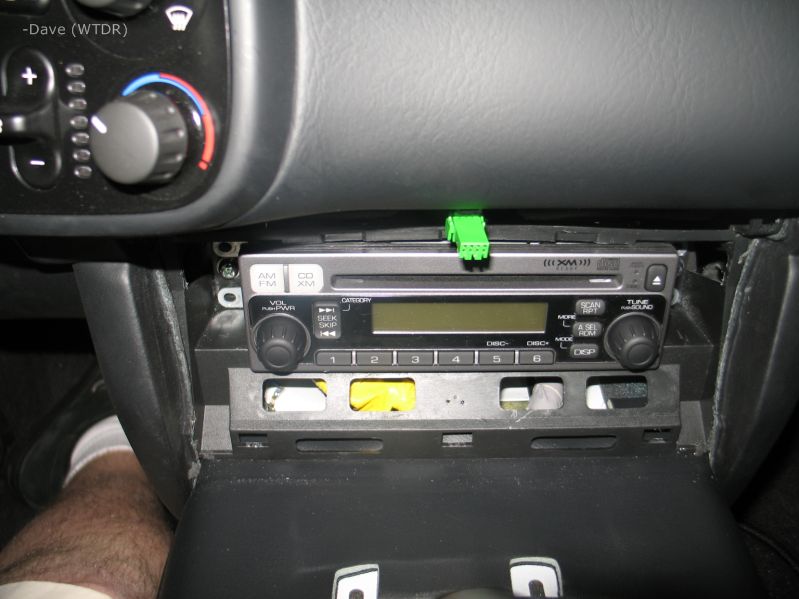
You should now see this, green plug applies only to 2006+.
Now, you will need to remove four (4) phillips head screws to remove the head unit itself. The screws you want to remove can be found to the sides of the head unit. There will be 3 screws on each side, remove the top and bottom one, leave the middle one. Here are pics of the screws.
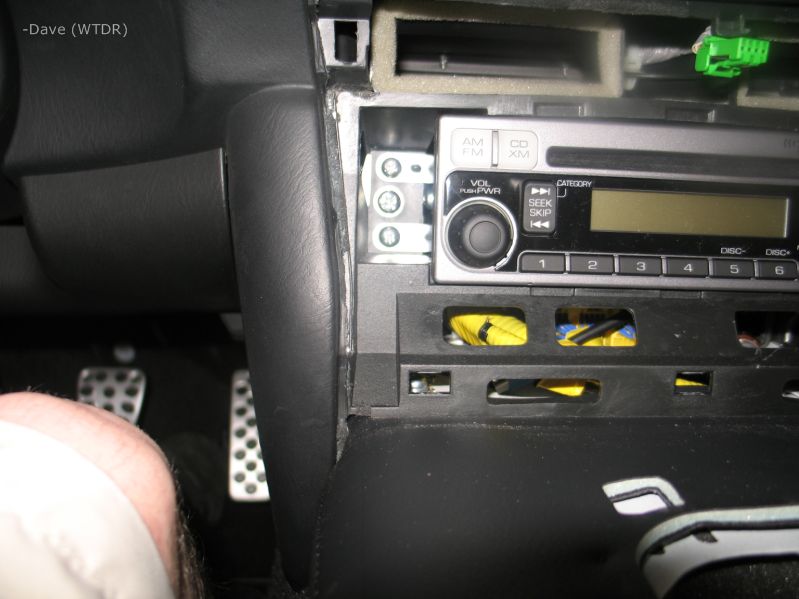
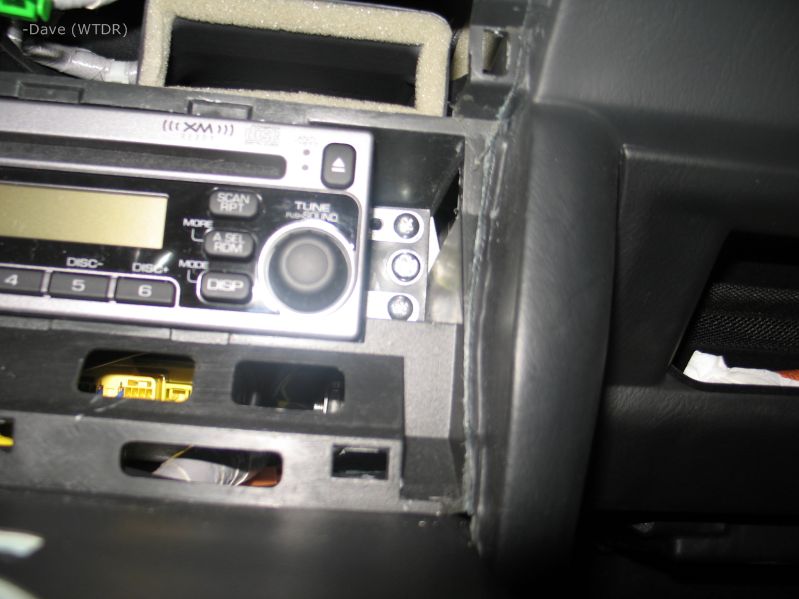
Here's a pic with the 4 screws removed.
Next, pull out the head unit (rotate the HU to the right side of the car for better access to the wiring and to avoid the shifter).
You should see the following (or similar)
First, unplug the attenna
Next, unplug the blue (at least on my car) plug, this is the larger/main plug.
Lastly, unplug the white plug (on my car, this is the smaller plug).
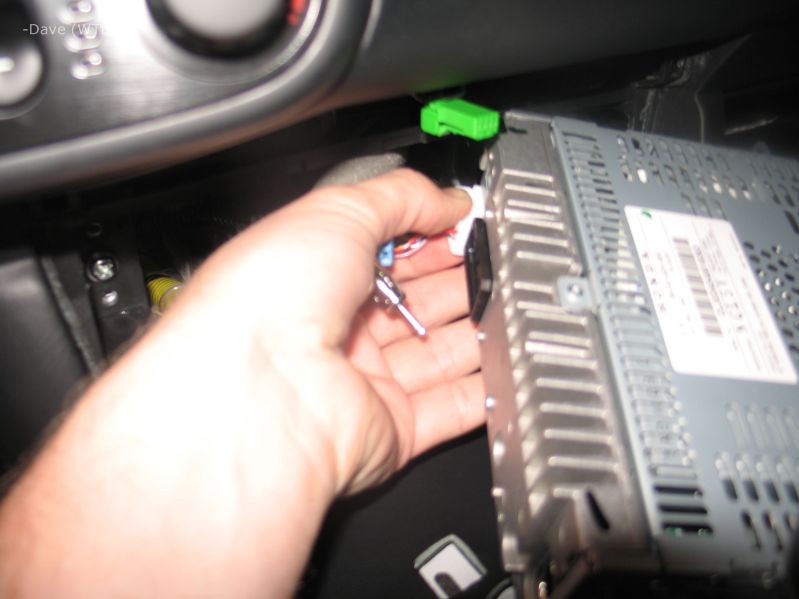
This should be the final result.
Ok, now the console should be loose, but still held in by the wiring harness. If you have an 04 or 05, you will only have 2 plugs (roof and hazard), if you have an 06+ you will have 3 plugs (roof, defog and hazard). Since my car is an 06, you will see 3 plugs in the pics. They are normal plugs, just unplug carefully (although you'd lkely have to try to break these plugs). NOTE: on 2006+ models, honda made another unusual choice. The Defog and Roof plugs are the same, except for color. They CAN be plugged into the wrong switch. Make a note of which is which on your car. If you forget, simply look at the switches, one of them will have one less terminal in use, then look at the wire harness plug and see which plug leaves the same terminal open, then match them that way.
Once the wiring harness is disconnected, move the console out of the way but watch for pieces falling off of it. The cup holder spring loaded separator likes to loose the piece that locks it in place, at least mine liked to.
Ok now for the head unit. As you can see it was already loose in the pics here, but that doesn't matter for this.
Put the Shifter in 2nd.
First, open the door and grasp each side of the door with one hand. Wiggle (with some force, but be reasonable here, this is just some pieces of plastic with clips, although you'll likely use more force than you think you will to get it out
) the bezel side to side with the door while pulling on it. You will pop out one side (or both) at the bottom.Using the door, pop out the other side if pop didn't come out already.
For the middle clips, I pulled the door to give some room then used my fingers to pry it away from the radio, seemed to work fine.
Repeat for the other side.
Once those are out, grasp one side of the bezel and pull carefully, I also wiggled the bezel around some (vertically that is) so I didn't put too much stress on the clips.
Repeat for the other side
2006+ ONLY - Unplug the green wire for the Passenger side airbag disabled light. Note: If you leave this unplugged and put any weight in the pass seat the airbag warning light will light up when you drive the car.
You should now see this, green plug applies only to 2006+.
Now, you will need to remove four (4) phillips head screws to remove the head unit itself. The screws you want to remove can be found to the sides of the head unit. There will be 3 screws on each side, remove the top and bottom one, leave the middle one. Here are pics of the screws.
Here's a pic with the 4 screws removed.
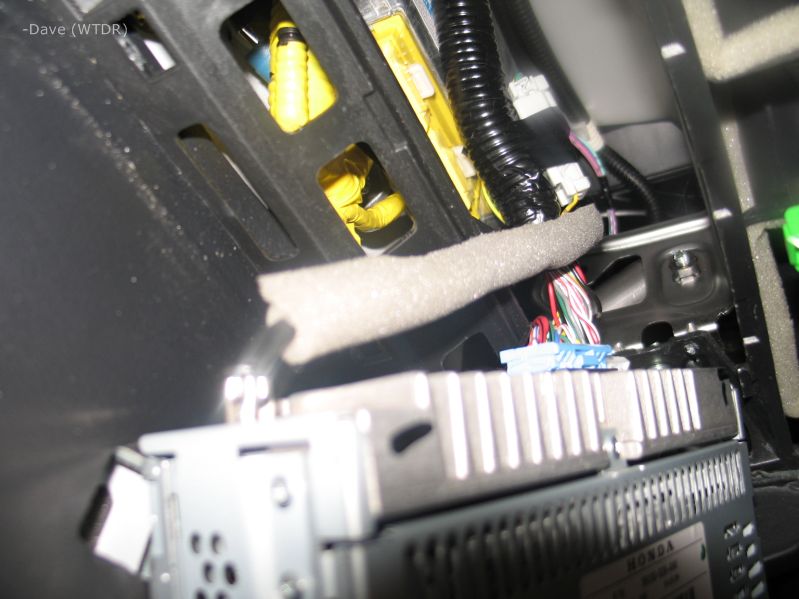
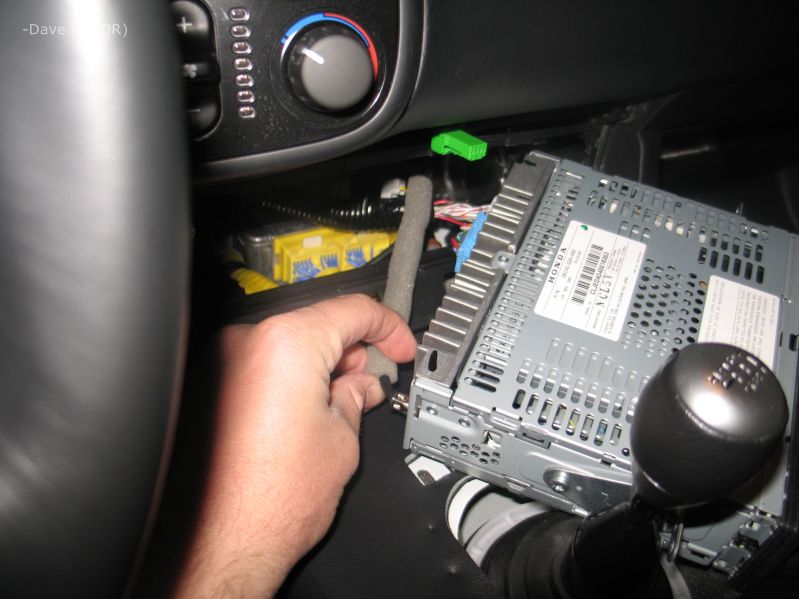
Next, pull out the head unit (rotate the HU to the right side of the car for better access to the wiring and to avoid the shifter).
You should see the following (or similar)
First, unplug the attenna
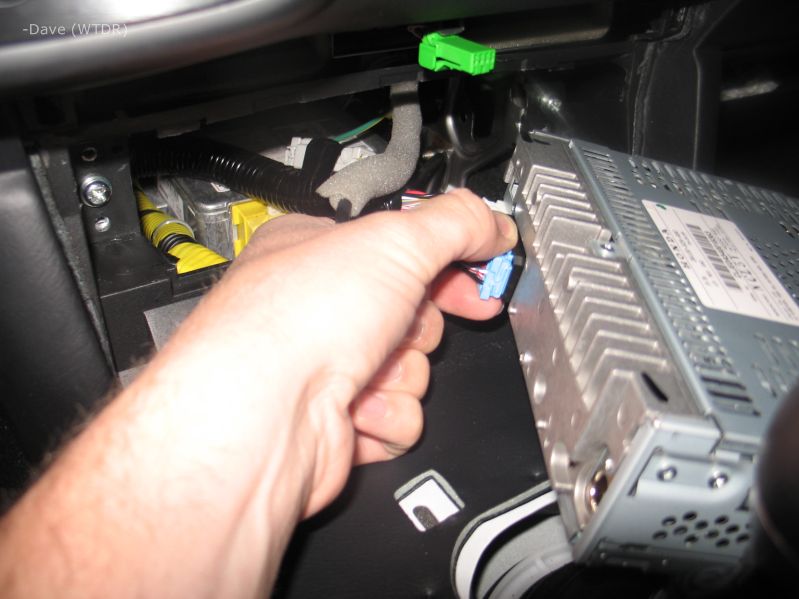
Next, unplug the blue (at least on my car) plug, this is the larger/main plug.
Lastly, unplug the white plug (on my car, this is the smaller plug).
This should be the final result.
The following users liked this post:
RYui (11-27-2020)
06-19-2012, 08:09 PM
#154
Post 4:
Well here's how I ran the iPod cable....
You could skip a few of these steps depending on the order of how you install stuff. Since I ran the iPod cable before deciding on my final mounting position (to check for an open path for the wire) I had to run the wire twice. Once for testing and once for final install (had to remove the wire to run it through the secret compartment tray). If you find yourself having to pull the cable out for some reason, connect a snake wire (thin wire) to it and pull it through with it, it'll make refeeding it back to the HU compartment much easier, but these steps are going to try and avoid that.
These are the steps I used. I didn't follow these steps exactly but I'm trying to present them in a logical order.
Since I tested two locations, I will describe both install locations. The two locations I tried was the secret compartment (my final install location) and the glove box (which I decided against, even though it could have been a LOT easier). Also, I did remove the glove box/secret compartment cover for the glove box install (and you have to for the secret compartment install). You do NOT have to do so for the glove box install, but I wanted to make sure the wire routing was clean and wanted to have plenty of room for messing around with it. See the stepsin the Glove Box install section for screws/steps that you should be able to skip if you don't want to deal with the harder parts.
These instructions assume that you already have the center console cover removed.
I'm going to break this down into groups, first the glove box removal and cable test fit, then the secret compartment removal (missing some pics of that I know for a fact), then how/where I ran the iPod cable to the HU compartment. Note, if you are installing the iPod into the secret compartment you must first follow the steps for the glovebox removal.
Glove Box Removal:
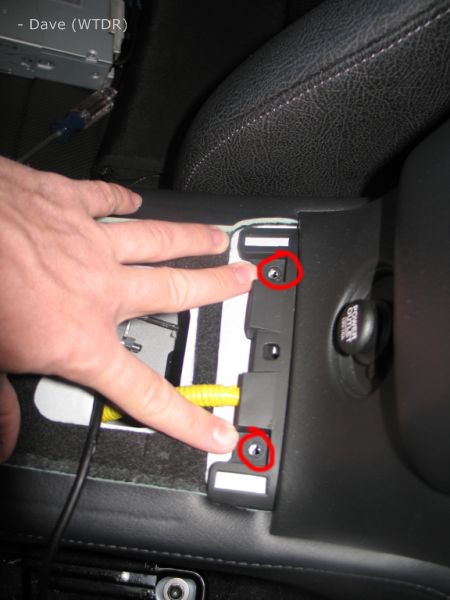
1.Remove the two screws at the bottom/front of the glove box door. The screws are removed in the pic below but the holes are circled.
2. On the driver side, move the seat all the way forward to access the rear panel. Open the screw covers on the hooks on the rear panel and remove the screws:
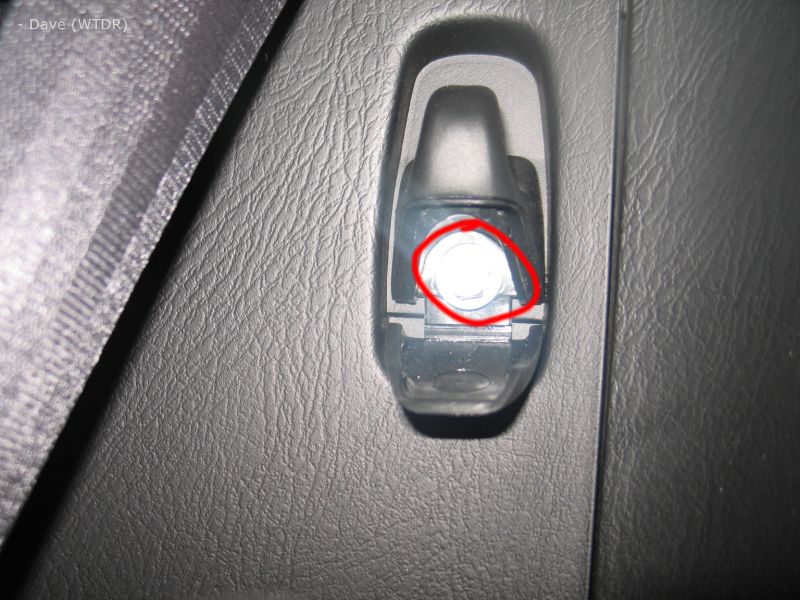
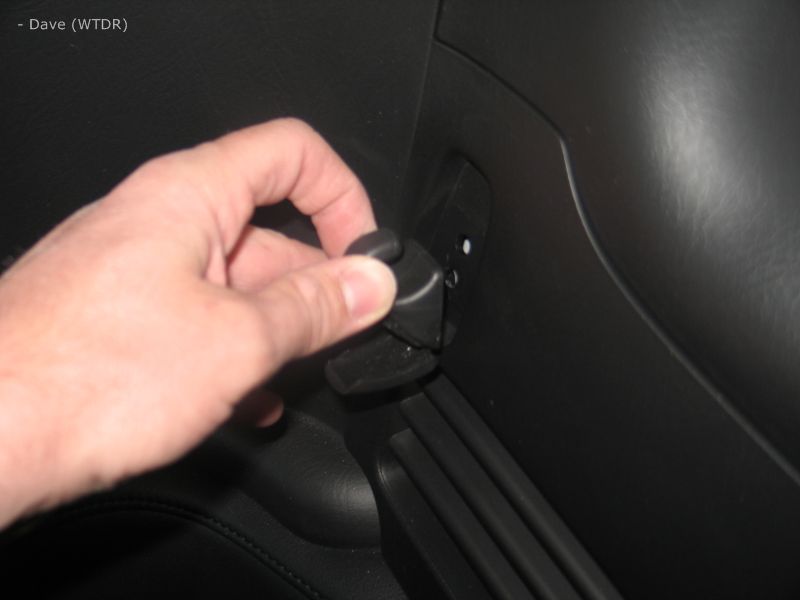
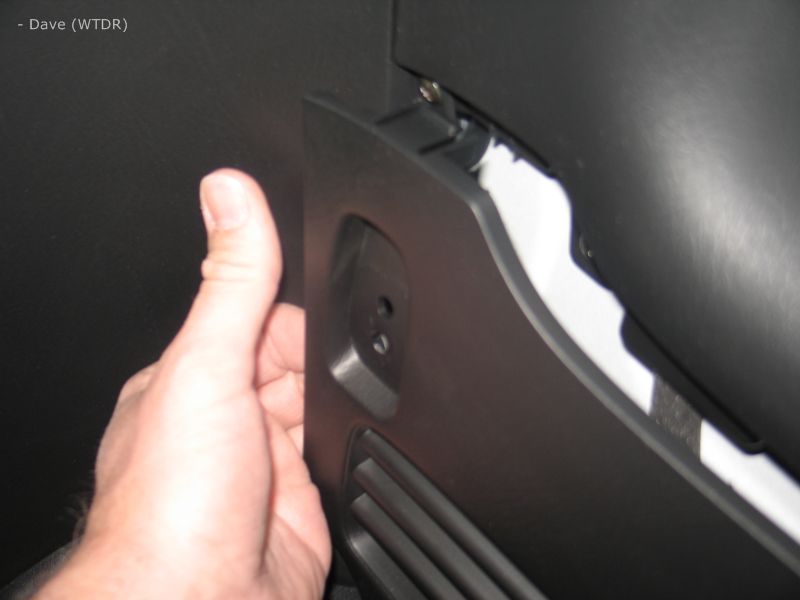
3. Remove the hooks from the panel:
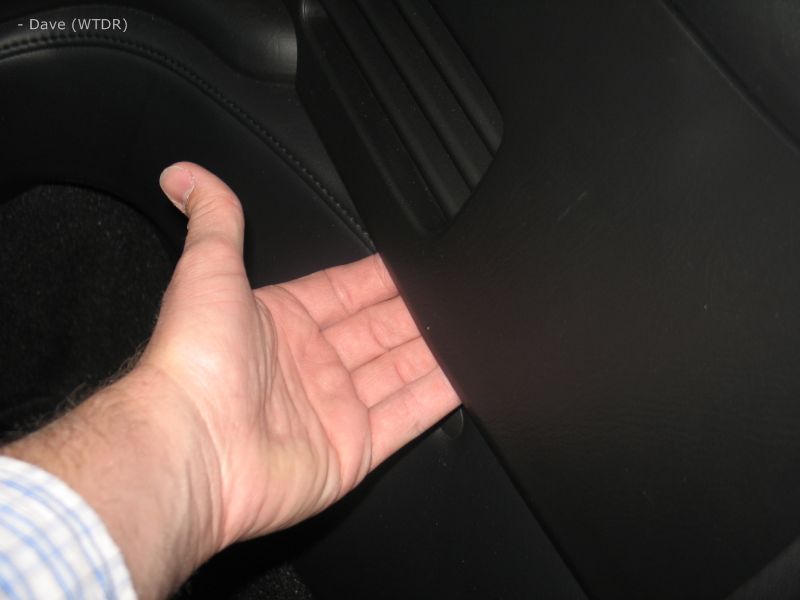
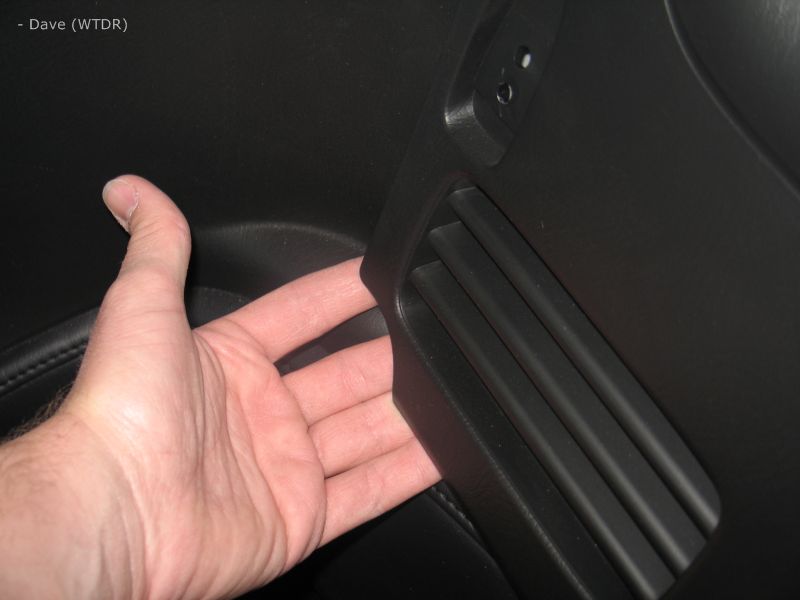
4. Remove the panel by sticking your hand underneath it and carefully pulling it off, move around the panel carefully pulling each clip out. On the drivers side I started in the middle of the botton, on the passenger side I started on the outside bottom corner.
Well here's how I ran the iPod cable....
You could skip a few of these steps depending on the order of how you install stuff. Since I ran the iPod cable before deciding on my final mounting position (to check for an open path for the wire) I had to run the wire twice. Once for testing and once for final install (had to remove the wire to run it through the secret compartment tray). If you find yourself having to pull the cable out for some reason, connect a snake wire (thin wire) to it and pull it through with it, it'll make refeeding it back to the HU compartment much easier, but these steps are going to try and avoid that.
These are the steps I used. I didn't follow these steps exactly but I'm trying to present them in a logical order.
Since I tested two locations, I will describe both install locations. The two locations I tried was the secret compartment (my final install location) and the glove box (which I decided against, even though it could have been a LOT easier). Also, I did remove the glove box/secret compartment cover for the glove box install (and you have to for the secret compartment install). You do NOT have to do so for the glove box install, but I wanted to make sure the wire routing was clean and wanted to have plenty of room for messing around with it. See the stepsin the Glove Box install section for screws/steps that you should be able to skip if you don't want to deal with the harder parts.
These instructions assume that you already have the center console cover removed.
I'm going to break this down into groups, first the glove box removal and cable test fit, then the secret compartment removal (missing some pics of that I know for a fact), then how/where I ran the iPod cable to the HU compartment. Note, if you are installing the iPod into the secret compartment you must first follow the steps for the glovebox removal.
Glove Box Removal:
1.Remove the two screws at the bottom/front of the glove box door. The screws are removed in the pic below but the holes are circled.
2. On the driver side, move the seat all the way forward to access the rear panel. Open the screw covers on the hooks on the rear panel and remove the screws:
3. Remove the hooks from the panel:
4. Remove the panel by sticking your hand underneath it and carefully pulling it off, move around the panel carefully pulling each clip out. On the drivers side I started in the middle of the botton, on the passenger side I started on the outside bottom corner.
06-19-2012, 08:10 PM
#155
Post 5:
5. The driver side panel should now be removed from the car.
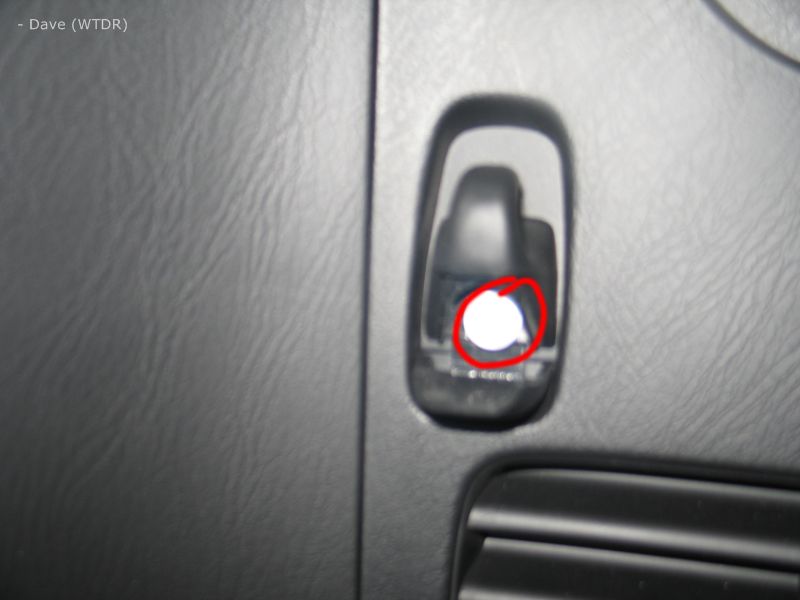
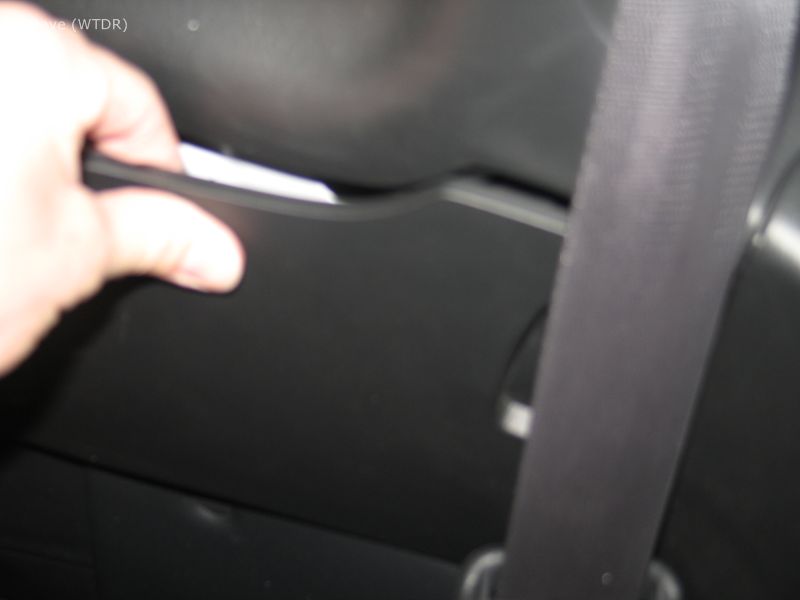
6. On the passenger side, move the seat all the way forward to access the rear panel. Using a small flat head screw driver carefully lift the screw covers.
7. Remove the screws from under the covers and repeat step #4.
8. The passenger side panel should now be removed from the car.
9. Remove the screws on the sides of the glove box, these were hidden under the rear panels you just removed. One screw per side as I recall:

10. Open the glove box door and remove the screw from the back of the compartment near the trunk release (sorry no pic).
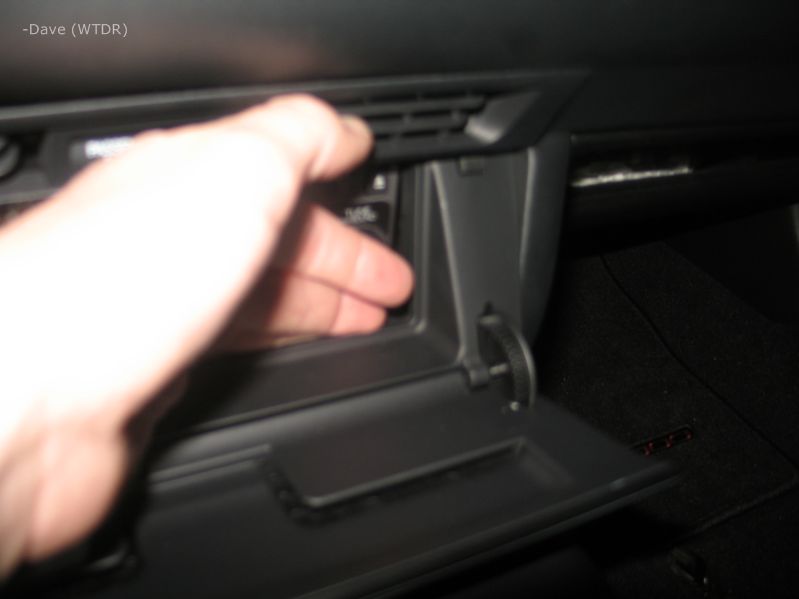
11. If you are installing the iPod into the glove box, you can probably stop here. You can try to install the wire by carefully lifting on the compartment to get enough room to manuever the cable into position. I decided against using this location because the door would not shut perfectly flush on the side you run the cable through. Trimming the plastic would probably fix that but I decided not to try. When I test fitted this area here's where I fed the ipod cable through:
12. If you want to fully remove the glove box for the install, or are installing into the secret compartment, continue.
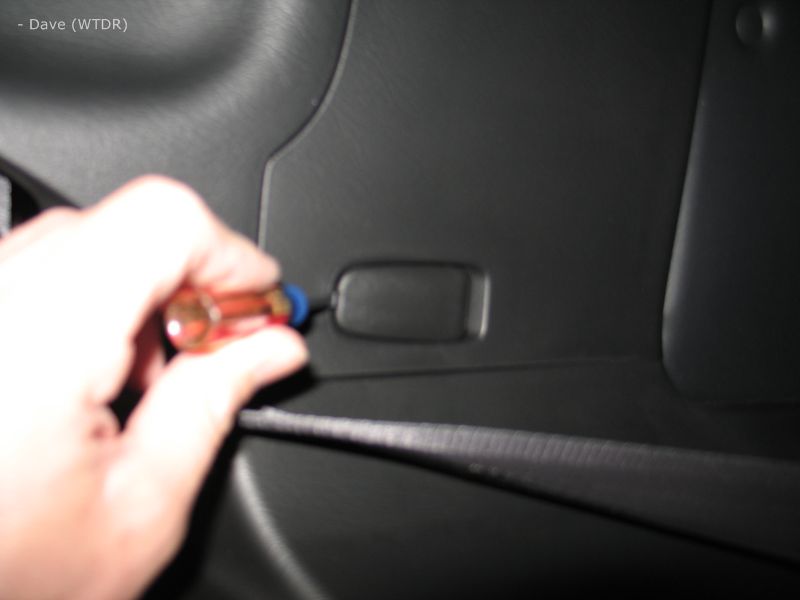
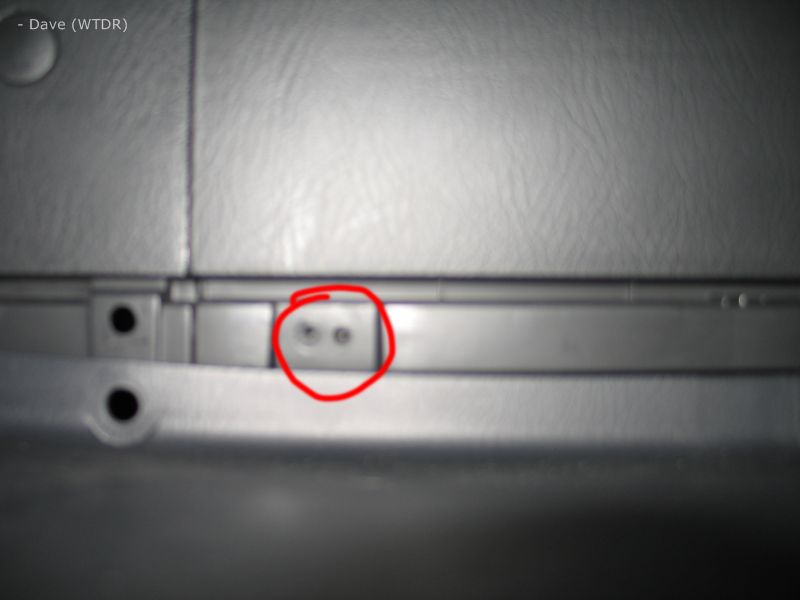
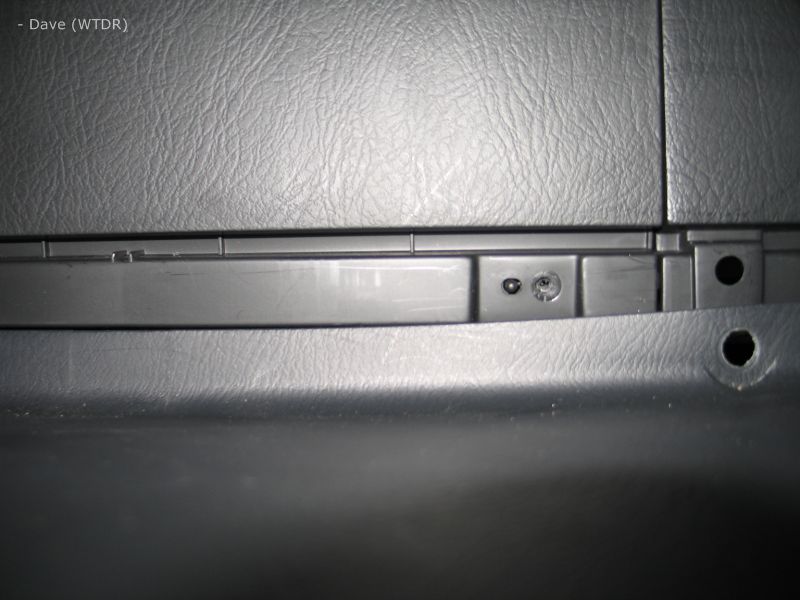
13. Lift up the secret compartment cover/door, remove the two screws on each side near the hinge:
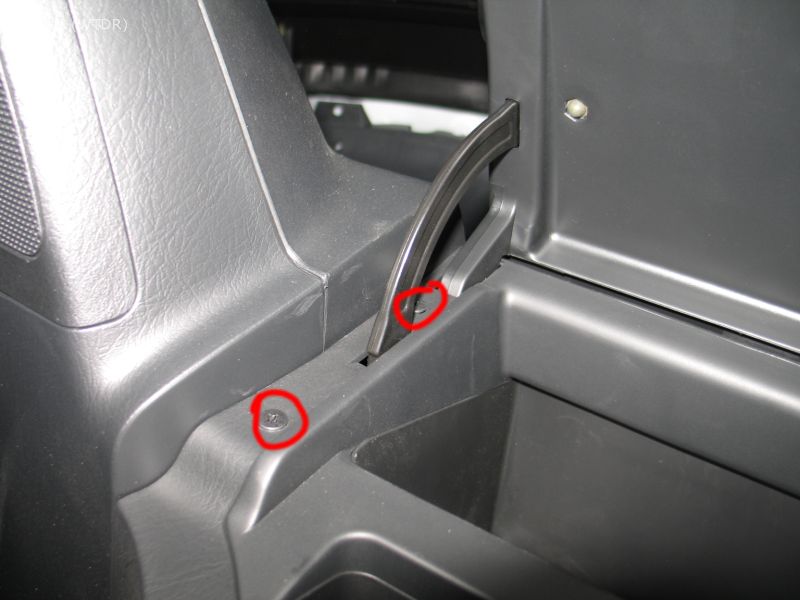
Close up of the screw closest to the hinge:
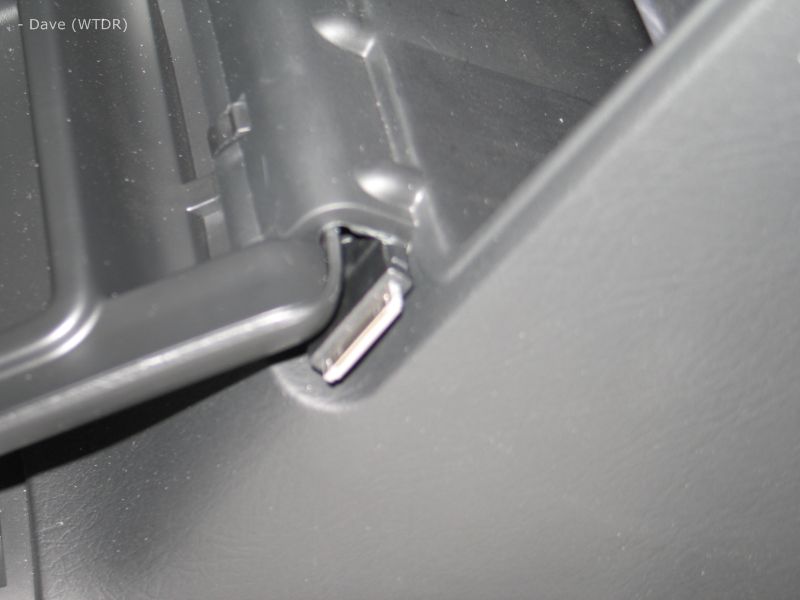
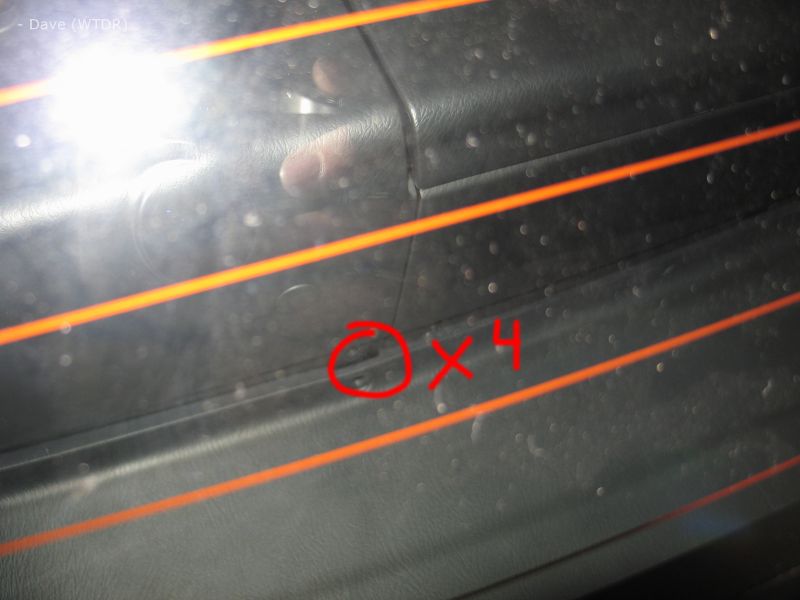
14. Remove the 4 pushpin clips that hold the front of the top panel in place. To remove this type of clip, you push the center pin in a bit, then remove the clip. The four clips are spread across the entire front edge of the panel.
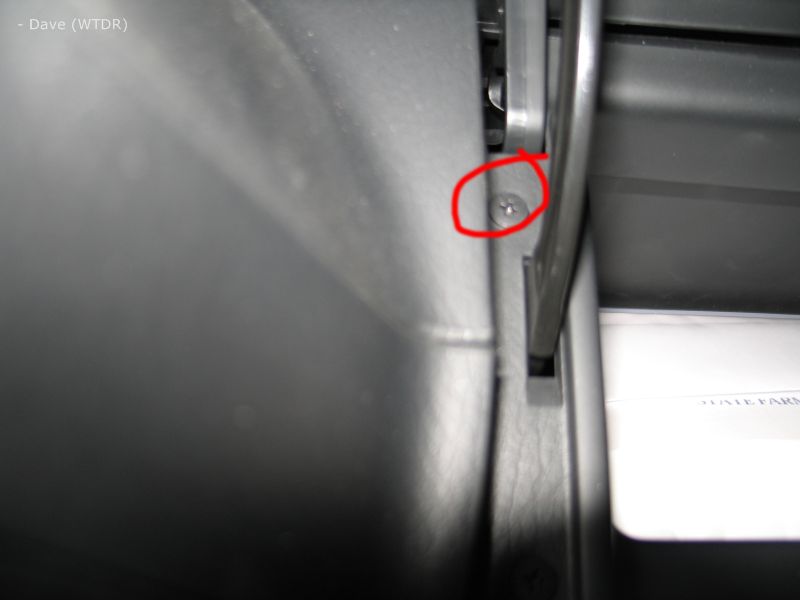
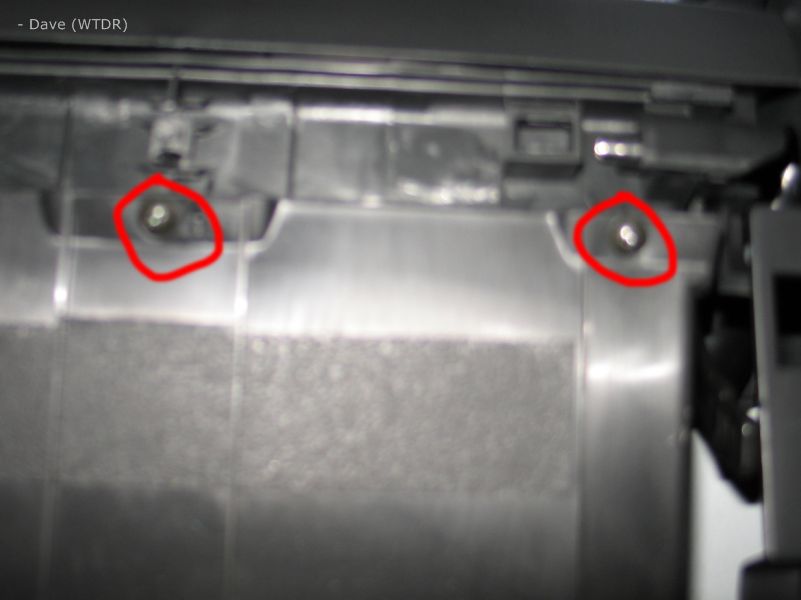
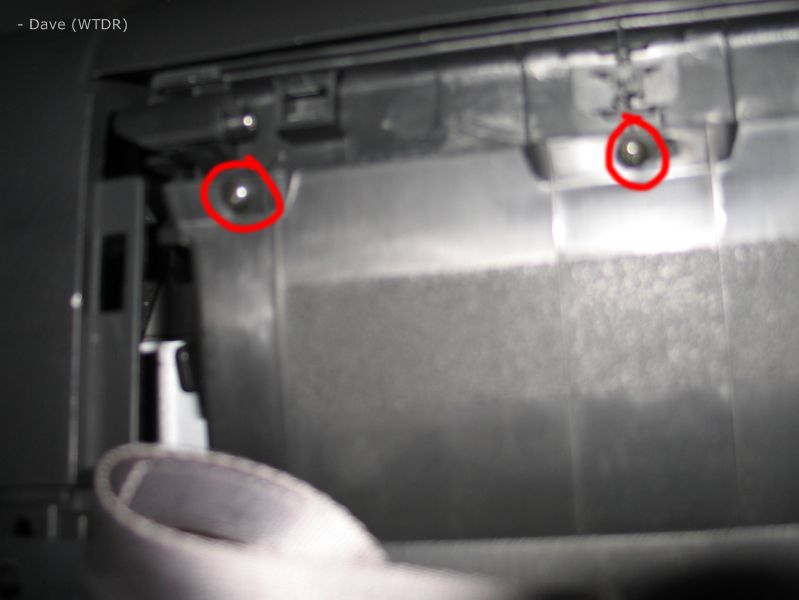
15. Once the clips are removed, you should be able to push it down to remove the screws from the rear of the glove box panel cover. I circled it in the first pic below. (note, to get enough clearance you may want to remove all the clips, that's what I ended up doing anyways, that's a LOT more work though.)
16. Once those two are removed, you will have to remove the center rear panel that the screws were installed onto. This panel is also held in with clips, so carefully pull it away from the glove box and towards the rear of the car. Once it's lose, remove it and fit the following 3 screws (note: the middle screw is circled in both pics, there are only 3 screws, not 4)
5. The driver side panel should now be removed from the car.
6. On the passenger side, move the seat all the way forward to access the rear panel. Using a small flat head screw driver carefully lift the screw covers.
7. Remove the screws from under the covers and repeat step #4.
8. The passenger side panel should now be removed from the car.
9. Remove the screws on the sides of the glove box, these were hidden under the rear panels you just removed. One screw per side as I recall:
10. Open the glove box door and remove the screw from the back of the compartment near the trunk release (sorry no pic).
11. If you are installing the iPod into the glove box, you can probably stop here. You can try to install the wire by carefully lifting on the compartment to get enough room to manuever the cable into position. I decided against using this location because the door would not shut perfectly flush on the side you run the cable through. Trimming the plastic would probably fix that but I decided not to try. When I test fitted this area here's where I fed the ipod cable through:
12. If you want to fully remove the glove box for the install, or are installing into the secret compartment, continue.
13. Lift up the secret compartment cover/door, remove the two screws on each side near the hinge:
Close up of the screw closest to the hinge:
14. Remove the 4 pushpin clips that hold the front of the top panel in place. To remove this type of clip, you push the center pin in a bit, then remove the clip. The four clips are spread across the entire front edge of the panel.
15. Once the clips are removed, you should be able to push it down to remove the screws from the rear of the glove box panel cover. I circled it in the first pic below. (note, to get enough clearance you may want to remove all the clips, that's what I ended up doing anyways, that's a LOT more work though.)
16. Once those two are removed, you will have to remove the center rear panel that the screws were installed onto. This panel is also held in with clips, so carefully pull it away from the glove box and towards the rear of the car. Once it's lose, remove it and fit the following 3 screws (note: the middle screw is circled in both pics, there are only 3 screws, not 4)
06-19-2012, 08:11 PM
#156
Post 6:
17. That should be all the screws for the glove box/secret compartment cover. Open the secret compartment door and carefully work the glove box out. As I recall it has some more clips so you'll have to locate them and get them to release (as I recall they clip into the secret compartment tray). You will almost have to remove two wiring harness plugs, one for the cig lighter/12V power outlet and one for the trunk release button. Sorry no pics and I don't recall exactly - I did this about 8 months ago.
18. Reinstallation is basically exactly the reverse, MAKE SURE YOU PLUG IN THE HARNESSES! Also be careful with the clips, make sure it's lined up or you will bend and possibly break the clips.
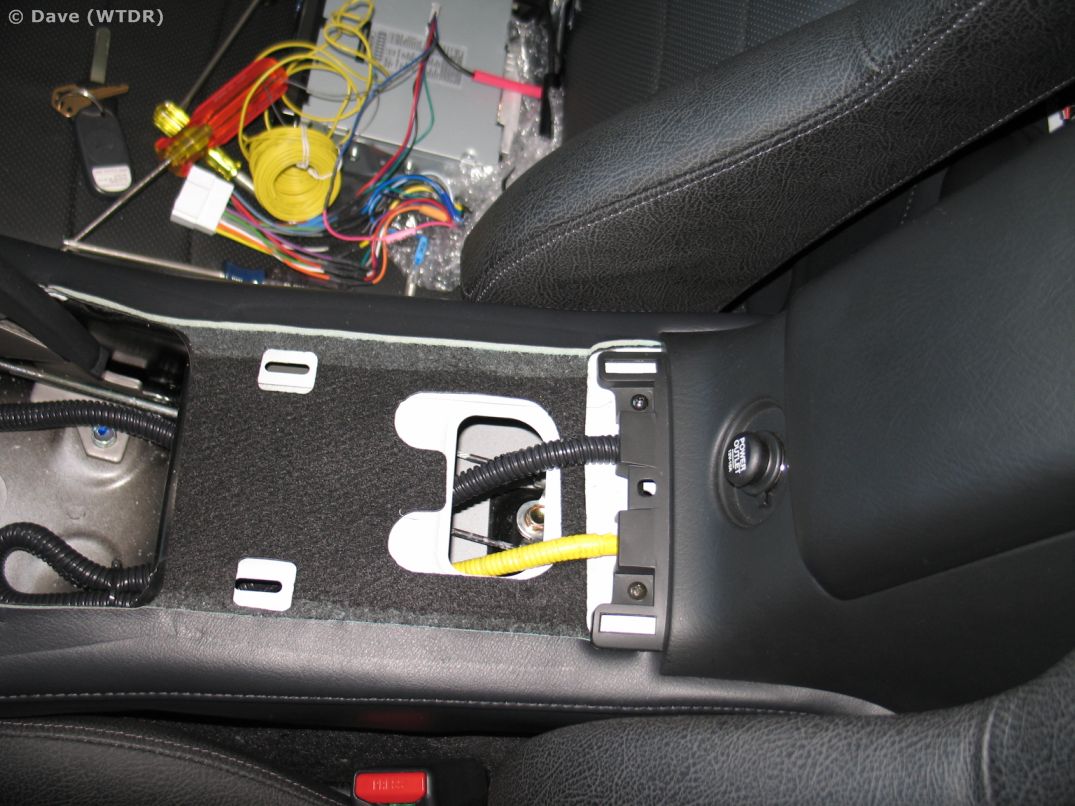
Secret Compartment Removal/Modification of the smaller tray in the SC for the iPod wiring:
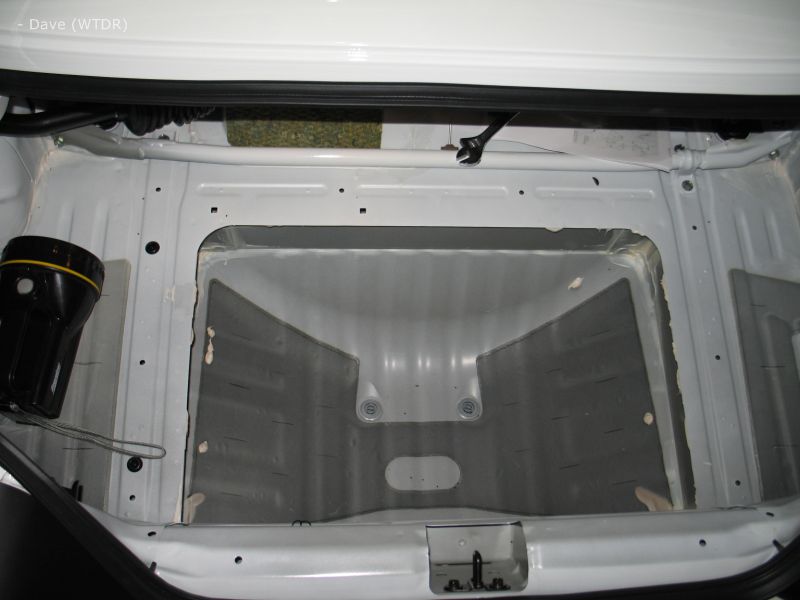
1. First I have to apologize. I was annoyed with this process by this point and stopped taking pics. There are only 4 bolts as I recall that hold the secret compartment tray in. I believe that they are all accessible through the trunk once you remove the front panels of the trunk. You will need some really long extension to get to them. Two of them may be accessible from the interior by pushing the top panel down, but I am not sure, so when you get to this point, just look for the 4 bolts and remove them. Also unclip the trunk release wiring from the compartment. This is what my trunk looked like at the time because I removed it all for sub/amp wiring and to get to the SC bolts:
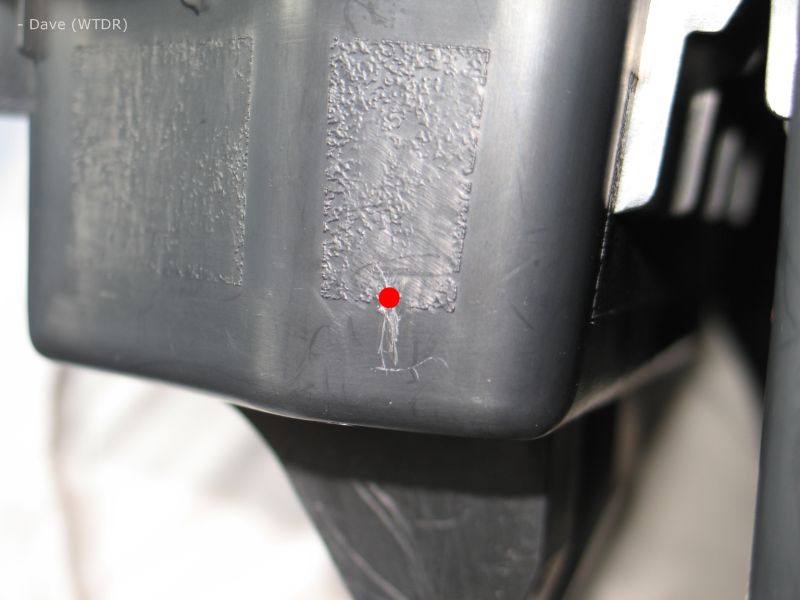
2. Once the SC is removed, mark the spot you want to drill. Make sure that you mark a spot high enough to avoid the interior floor of the tray and provide some addition height for the carpet that's in the small tray. If you put it in the big tray instead, just make it high enough to clear the floor, or higher if you are mounting the iPod on some sort of hanger/bracket. Basically, pick the best spot to drill to clear the floor/walls of the interior of the compartment. Note, I was rushing here so I scratched the hell out of mine by rotating a 1/2" drill bit around to enlarge the hole, sanding it helped some, but not much. Luckily this is a cheap part to replace, although time consuming
3. Here's where I marked mine:
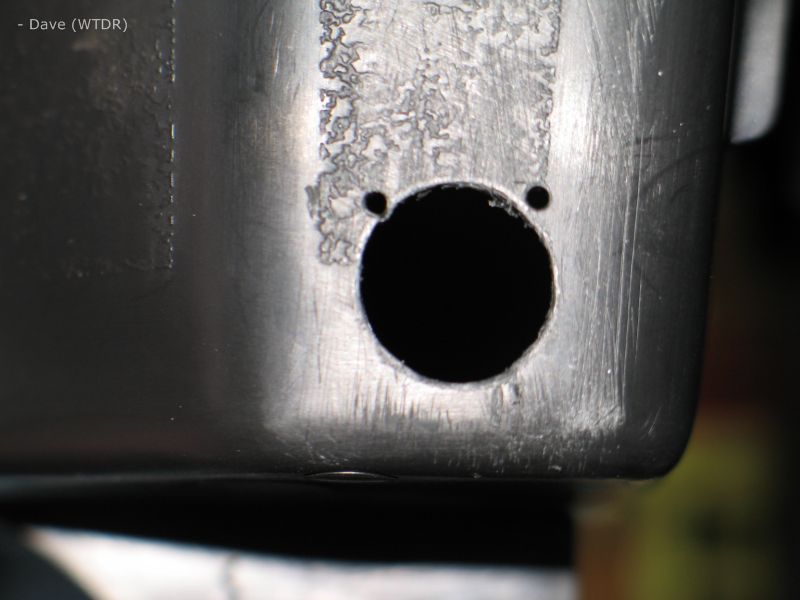
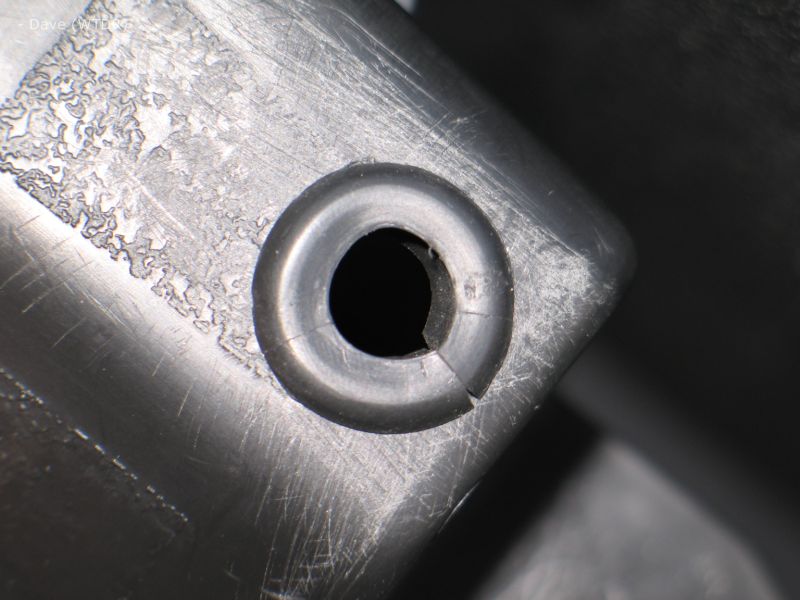
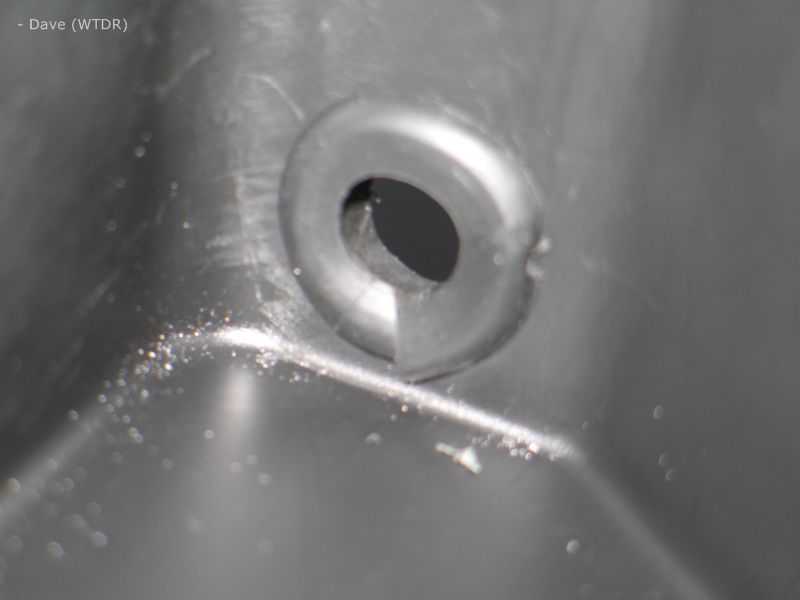
4. Once I drilled the hole (1/2" as I recall) the main part of the plug (head unit side) fit through, however, not all of it did becaused it's not a circle. I then drilled two small holes (1/16" bit if I recall correctly) on the upper corners of the main hole. Once I did that I just pushed the drill bit down and to the side (again be careful here! ) to join together. I then sanded it some. Anyways, the first pic is with the holes drilled, second is with them joined and sanded some, ignore the wire in the second pic for now.
5. Next, I took a grommet that was larger than the hole (not sure on the size honestly, but I think 5/8? - I bought a few different sizes, I can confirm the size if needed as I have the package at home) and tried to install it. Since the grommet was too large (but the next size smaller at Home Depot was too small) I ended up cutting a portion of the grommet out. Carefully keep cutting it until it fits:
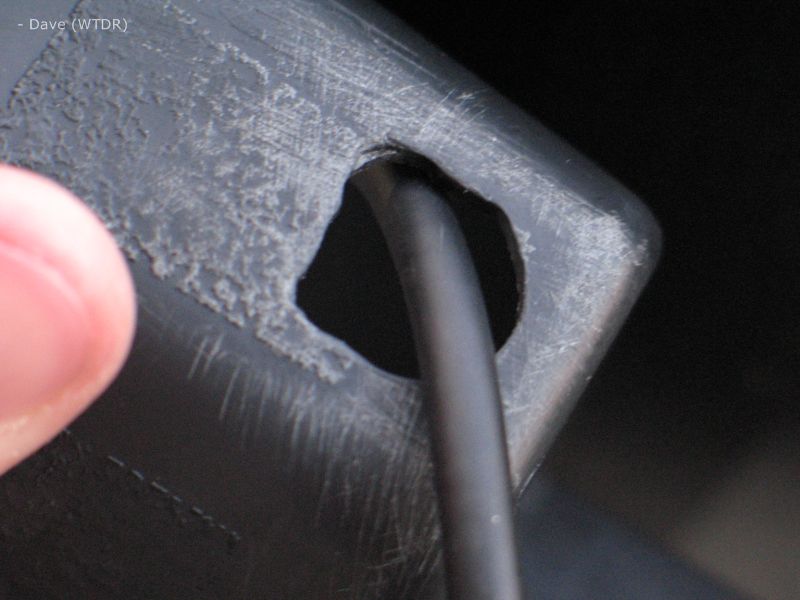
6. Now remove the grommet and feed the iPod cable through:
7. Reinstall the grommet and carpeting (if you use the smaller of the two compartments in the secret compartment):
8. To reinstall the tray, line it up and tighten the 4 bolts, then clip the trunk release wiring harness back onto the compartment.
iPod cable routing:
Note: You will notice that sometimes the cable has wire loom over it and sometimes it doesn't. As I recall I ran the cable without it, then starting in the cup holder area I pushed the wire loom onto the wire and forced it to the HU compartment. Once that was complete I installed the wire loom on the wire leading from the compartment all the way back to the iPod in the secret compartment.
17. That should be all the screws for the glove box/secret compartment cover. Open the secret compartment door and carefully work the glove box out. As I recall it has some more clips so you'll have to locate them and get them to release (as I recall they clip into the secret compartment tray). You will almost have to remove two wiring harness plugs, one for the cig lighter/12V power outlet and one for the trunk release button. Sorry no pics and I don't recall exactly - I did this about 8 months ago.
18. Reinstallation is basically exactly the reverse, MAKE SURE YOU PLUG IN THE HARNESSES! Also be careful with the clips, make sure it's lined up or you will bend and possibly break the clips.
Secret Compartment Removal/Modification of the smaller tray in the SC for the iPod wiring:
1. First I have to apologize. I was annoyed with this process by this point and stopped taking pics. There are only 4 bolts as I recall that hold the secret compartment tray in. I believe that they are all accessible through the trunk once you remove the front panels of the trunk. You will need some really long extension to get to them. Two of them may be accessible from the interior by pushing the top panel down, but I am not sure, so when you get to this point, just look for the 4 bolts and remove them. Also unclip the trunk release wiring from the compartment. This is what my trunk looked like at the time because I removed it all for sub/amp wiring and to get to the SC bolts:
2. Once the SC is removed, mark the spot you want to drill. Make sure that you mark a spot high enough to avoid the interior floor of the tray and provide some addition height for the carpet that's in the small tray. If you put it in the big tray instead, just make it high enough to clear the floor, or higher if you are mounting the iPod on some sort of hanger/bracket. Basically, pick the best spot to drill to clear the floor/walls of the interior of the compartment. Note, I was rushing here so I scratched the hell out of mine by rotating a 1/2" drill bit around to enlarge the hole, sanding it helped some, but not much. Luckily this is a cheap part to replace, although time consuming
3. Here's where I marked mine:
4. Once I drilled the hole (1/2" as I recall) the main part of the plug (head unit side) fit through, however, not all of it did becaused it's not a circle. I then drilled two small holes (1/16" bit if I recall correctly) on the upper corners of the main hole. Once I did that I just pushed the drill bit down and to the side (again be careful here!
) to join together. I then sanded it some. Anyways, the first pic is with the holes drilled, second is with them joined and sanded some, ignore the wire in the second pic for now.5. Next, I took a grommet that was larger than the hole (not sure on the size honestly, but I think 5/8? - I bought a few different sizes, I can confirm the size if needed as I have the package at home) and tried to install it. Since the grommet was too large (but the next size smaller at Home Depot was too small) I ended up cutting a portion of the grommet out. Carefully keep cutting it until it fits:
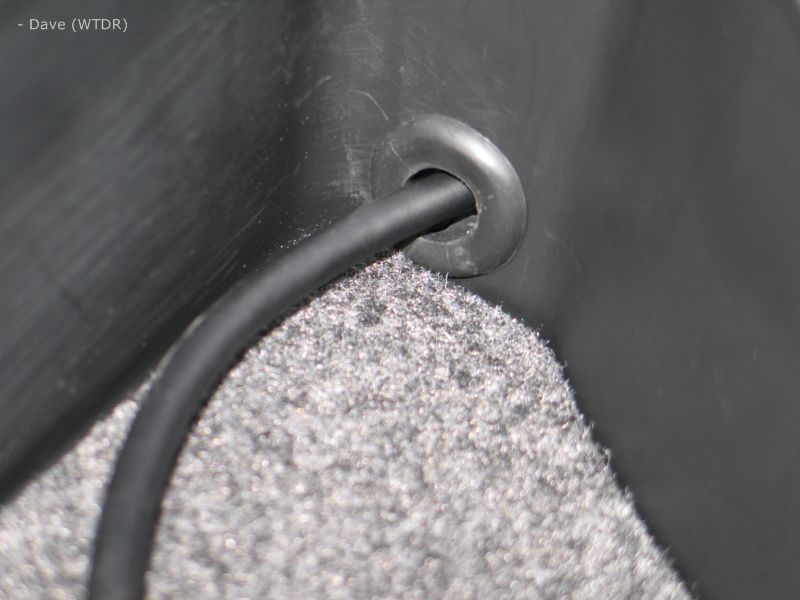
6. Now remove the grommet and feed the iPod cable through:
7. Reinstall the grommet and carpeting (if you use the smaller of the two compartments in the secret compartment):
8. To reinstall the tray, line it up and tighten the 4 bolts, then clip the trunk release wiring harness back onto the compartment.
iPod cable routing:
Note: You will notice that sometimes the cable has wire loom over it and sometimes it doesn't. As I recall I ran the cable without it, then starting in the cup holder area I pushed the wire loom onto the wire and forced it to the HU compartment. Once that was complete I installed the wire loom on the wire leading from the compartment all the way back to the iPod in the secret compartment.
06-19-2012, 08:12 PM
#157
Post 7:
iPod cable routing:
Note: You will notice that sometimes the cable has wire loom over it and sometimes it doesn't. As I recall I ran the cable without it, then starting in the cup holder area I pushed the wire loom onto the wire and forced it to the HU compartment. Once that was complete I installed the wire loom on the wire leading from the compartment all the way back to the iPod in the secret compartment.
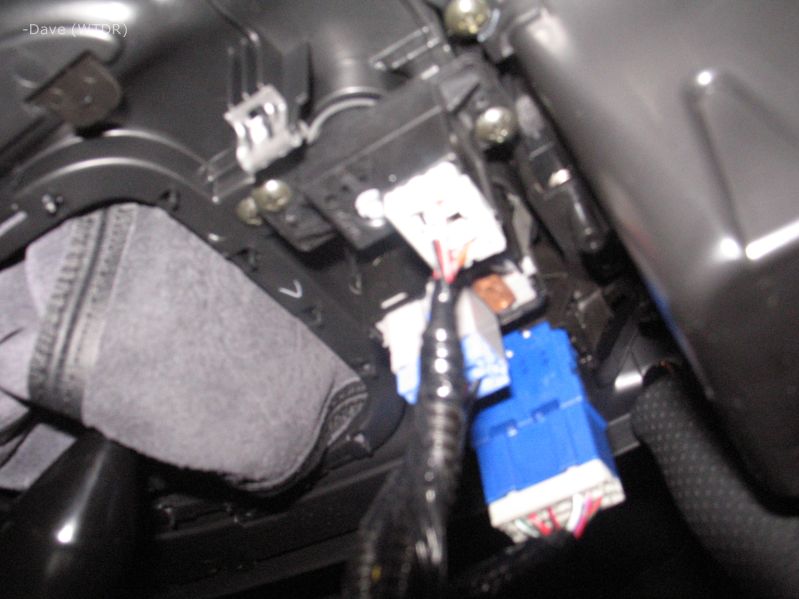
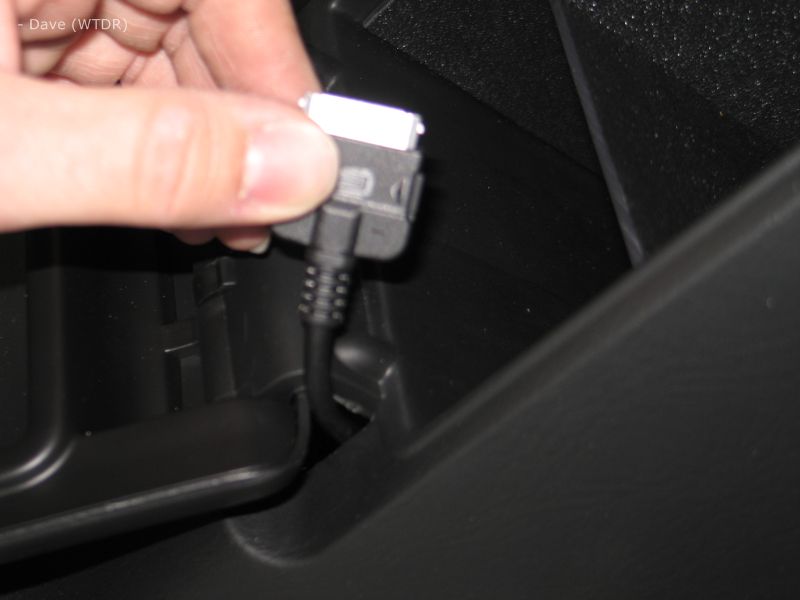
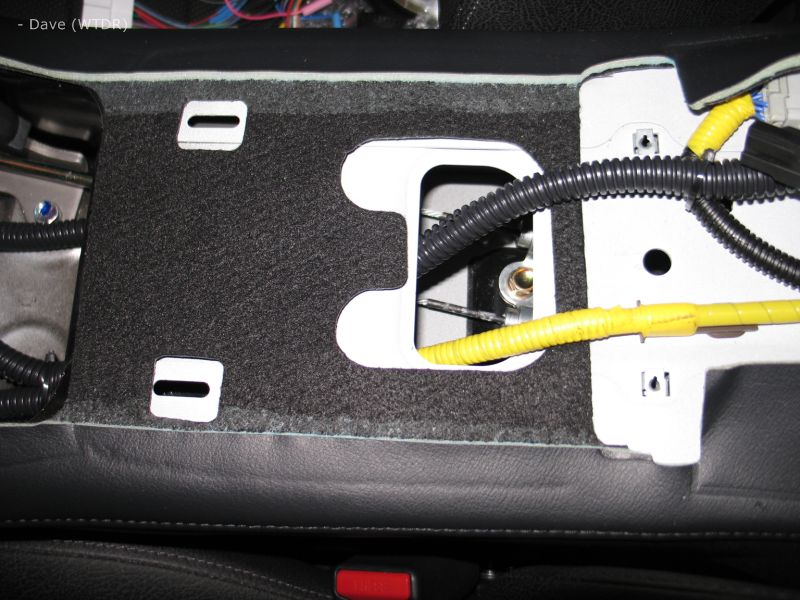
1. Start by feeding the cable through the hole that provide parking brake cable access, this is behind the cup holder area and in front of the glove box:
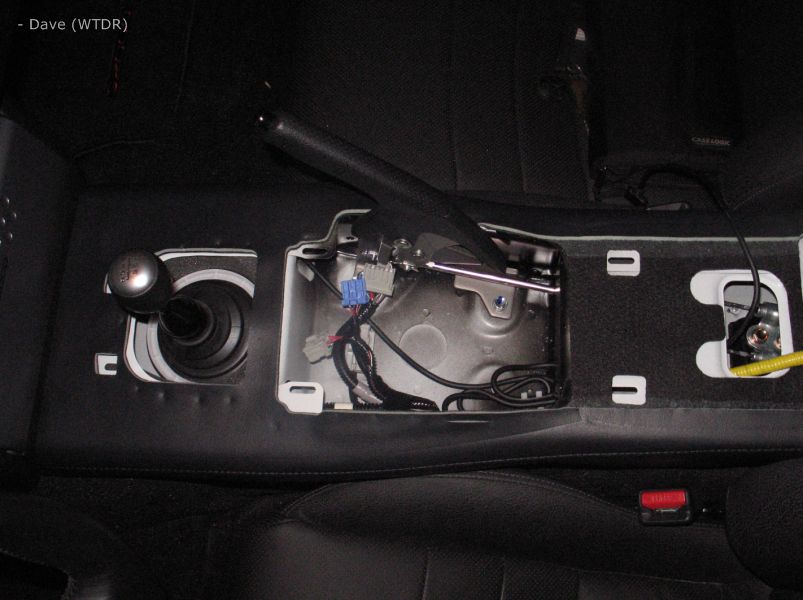
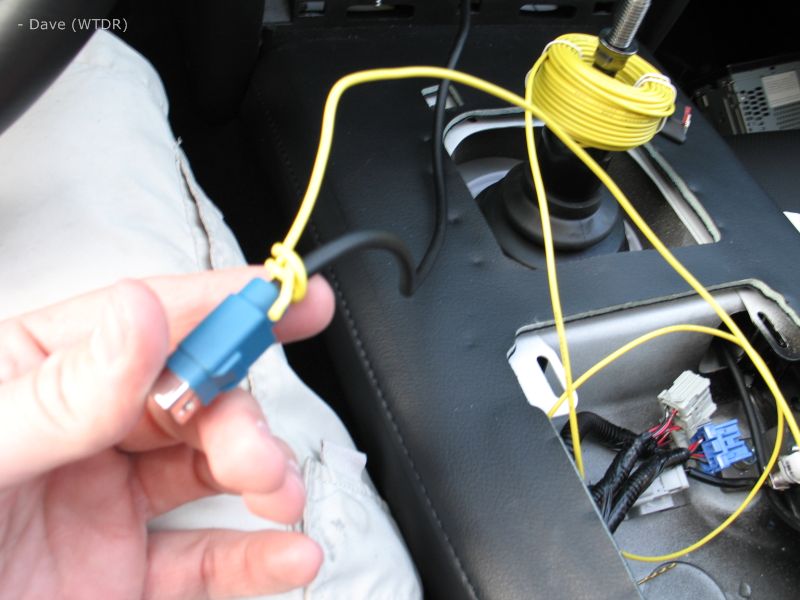
2. Now feed it through the cup holder area (there will be excess, I bundled it on the white clip on the drivers side). I ran mine under the parking brake switch wire but above it should be fine also. Run it into the shifter area using the hole on the passenger side:
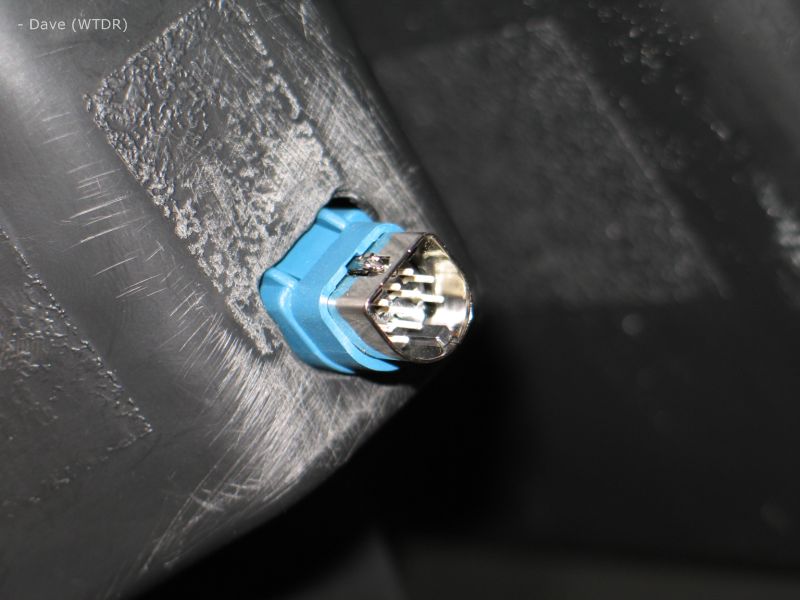
Close up of the parking brake switch wire and the ipod wire:
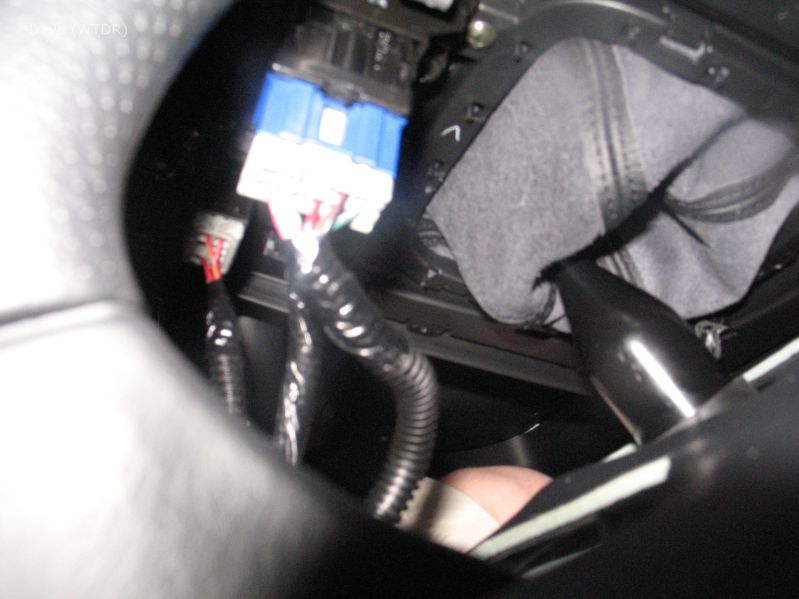
3. Now you have to slowly and painfully route the cable to the head unit compartment. You can move the foam around the shifter (visible in the picture above). You will just have to keep messing with it until you get it through. If you are having a hard time, use a snake wire instead and feed it through started at the head unit compartment, into the shifter area, then into the cup holder area through the hole on the passenger side, then tie it to the ipod cable and pull it through to the head unit compartment:
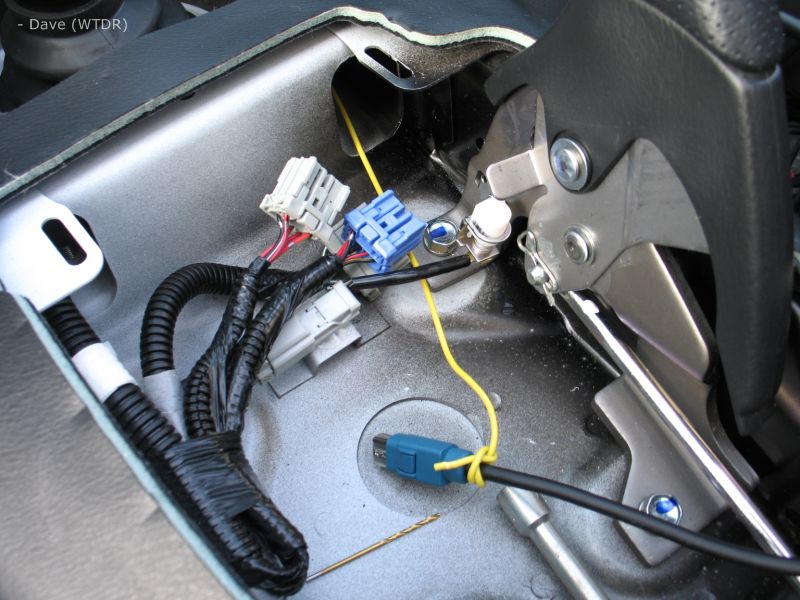
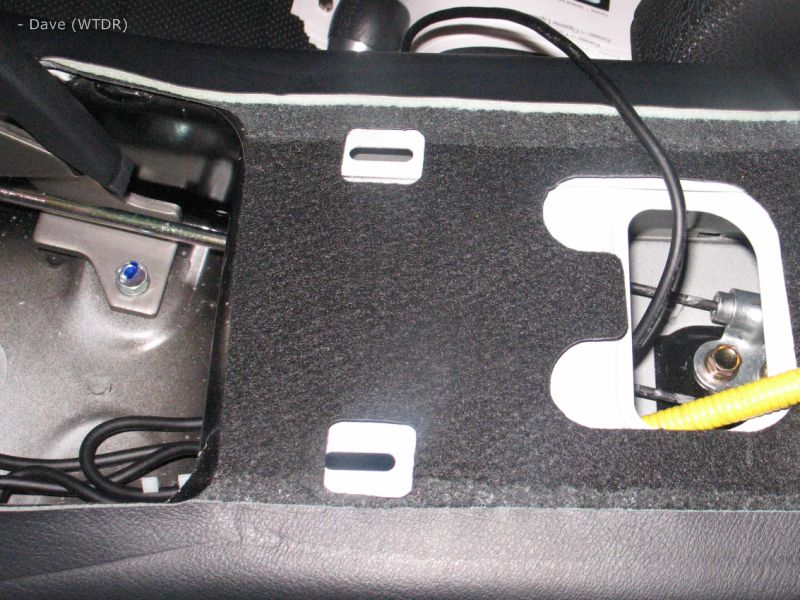
4. This is about where the wire should come out in the head unit compartment:
5. I didn't take any pics, but here is where I installed the wire loom. Once completed, continue. (or skip it if desired I guess)
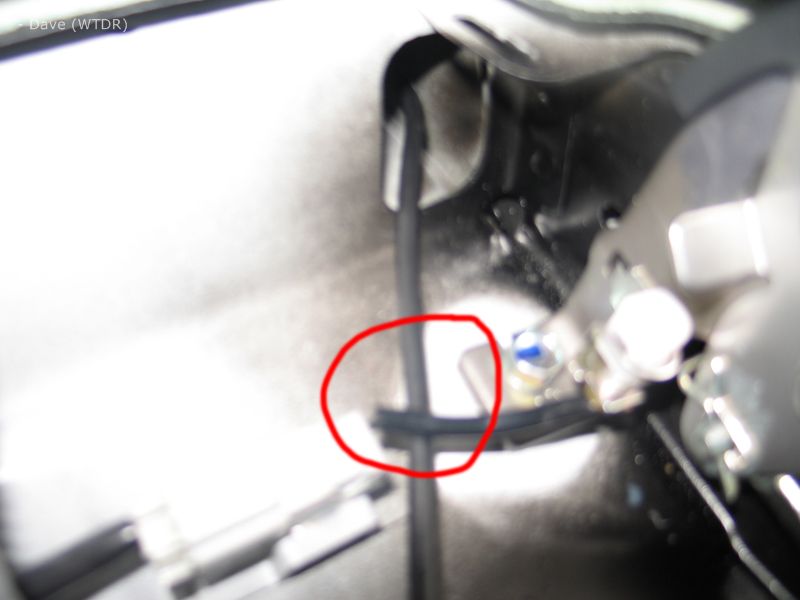
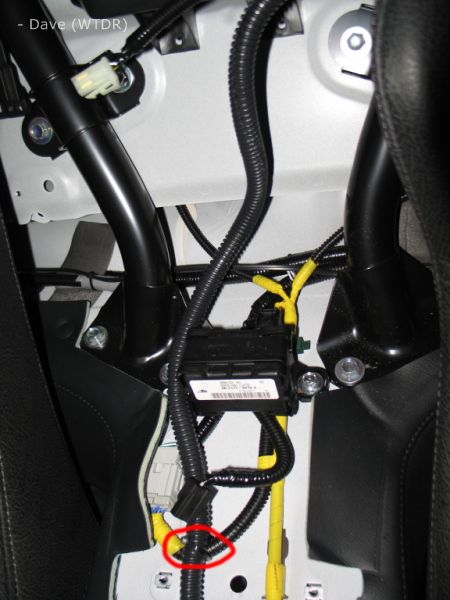
6. Here's the ipod installed in the SC and the ipod wire/loom is zip tied to the existing harness where the red circle is:

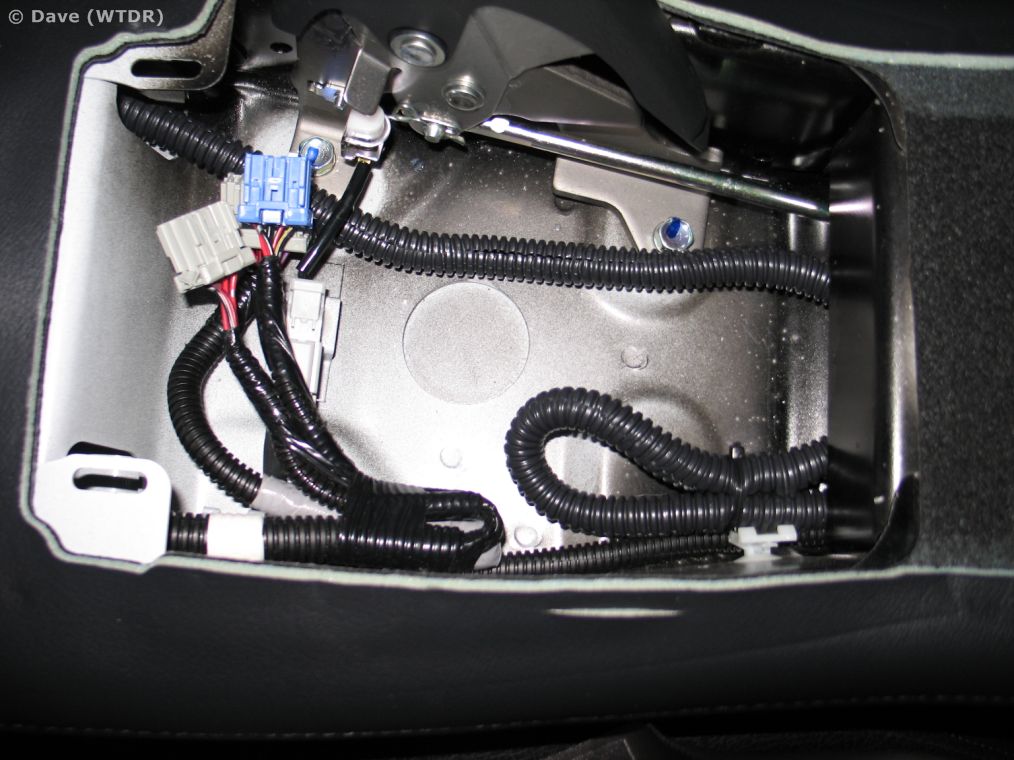
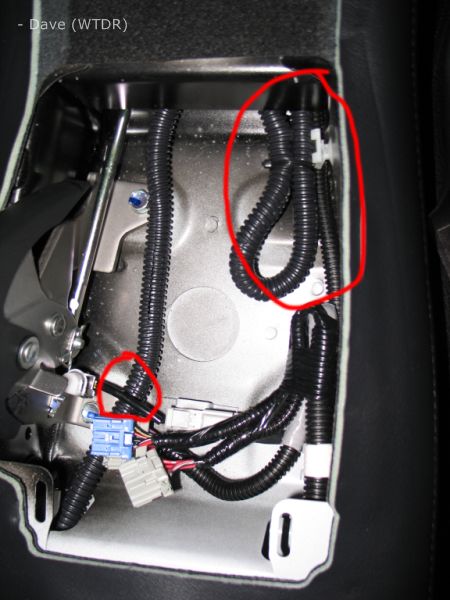
7. Keep the cable routed in a way where it won't get in the way of the glove box when you reinstall it, etc, here's where I routed mine (this is behind the glove box/under the secret compartment tray). Zip tie location circled again:
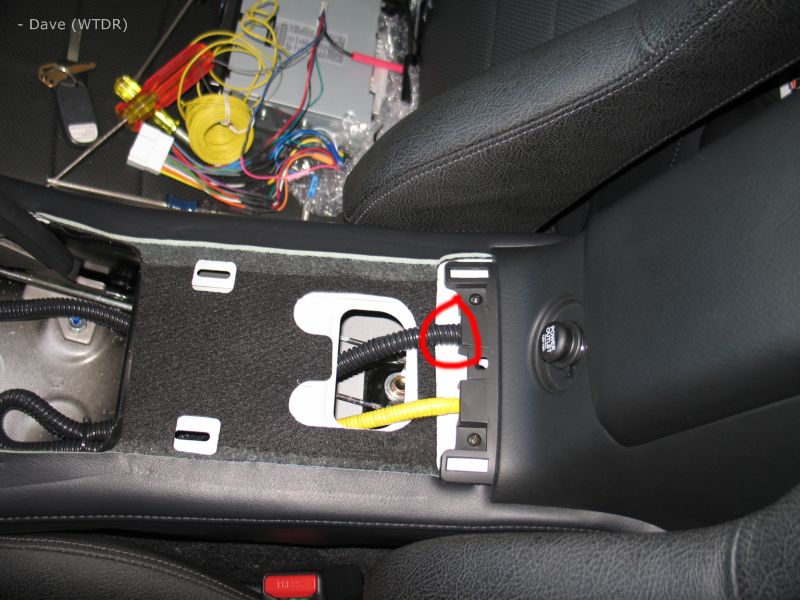
8. Keep this wire just about where it is in this picture, this is where it enters the parking brake cable access hole:
9. Here's how I routed it in the cup holder area. Honda left that nice white cable holder on the drivers side so I used it and zip tied the excess together. Also circled is where the cable runs under the parking brake switch wire again.
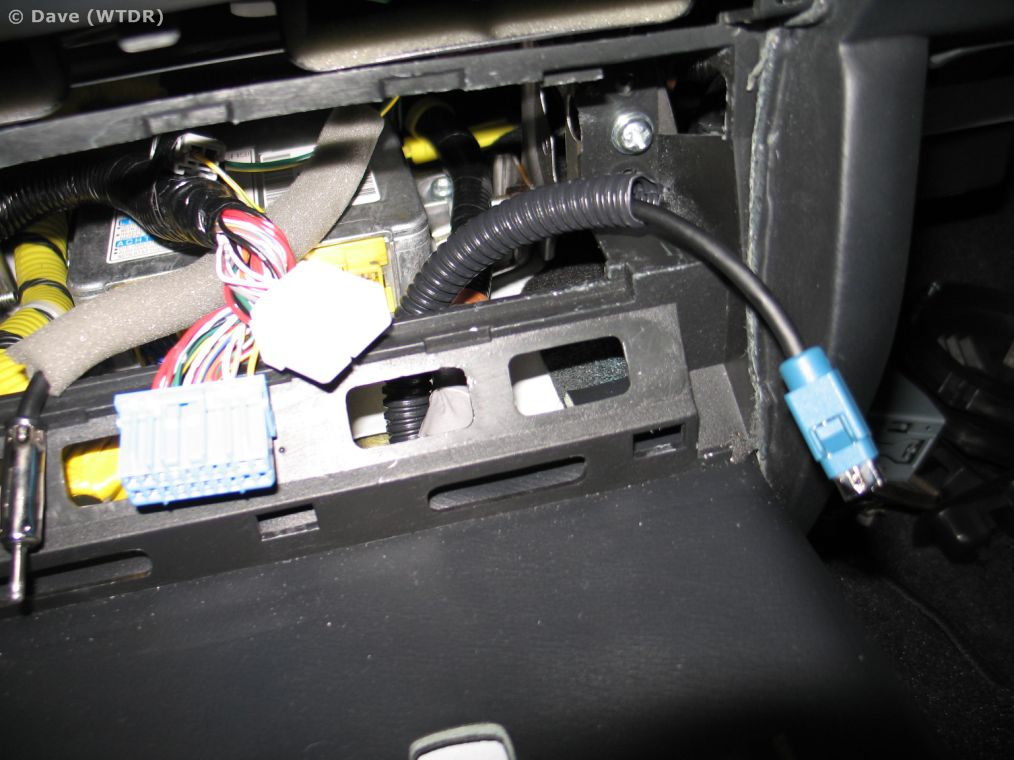
10. This is where you will end up with the loom/wire in the head unit compartment. You don't want too much wire loom in here because of the limited space:
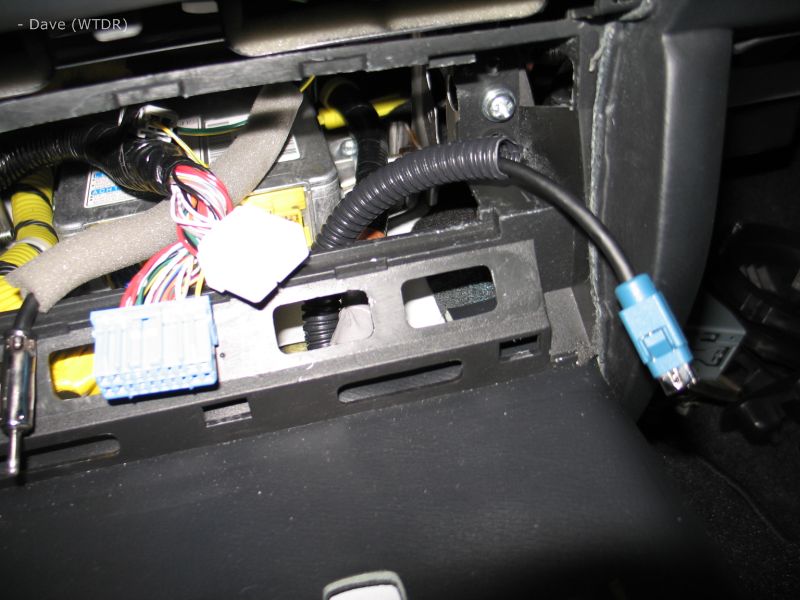
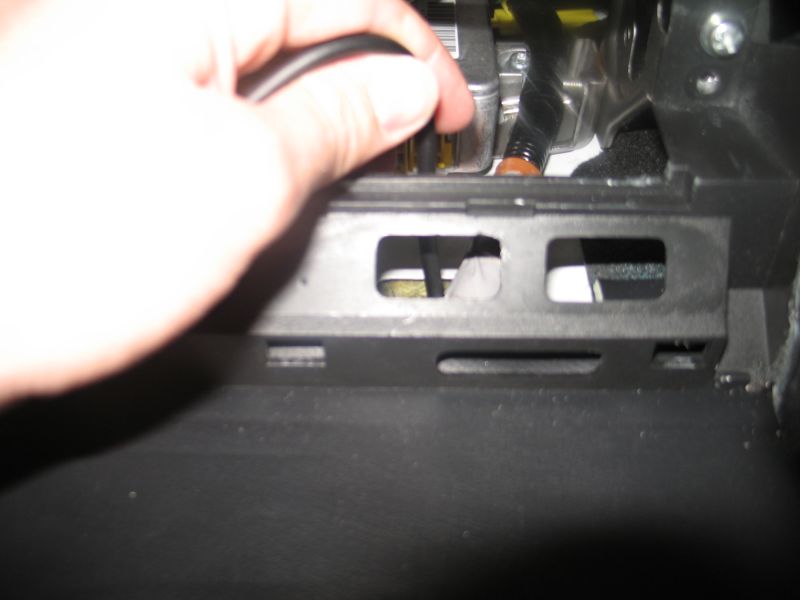
11. This is why I mentioned keeping the wire in a certain area in Step #8. As you can see the glove box cover has two openings for wiring, one is taken by a OEM honda harness (safety harness, so probably belt pre tensioners), use the other "opening" for the iPod wire:
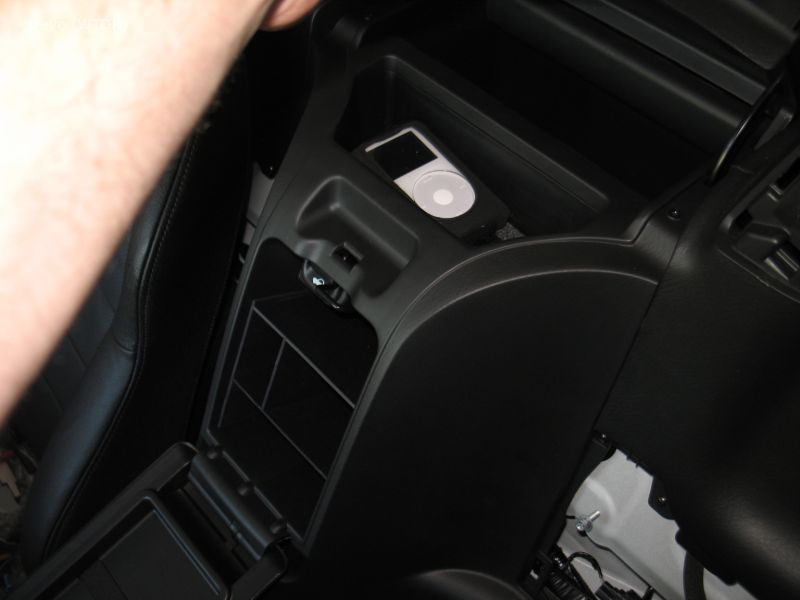
12. Final product after reinstall of the glove box cover, etc.
----------------------
That's "it". Hope this helps.
iPod cable routing:
Note: You will notice that sometimes the cable has wire loom over it and sometimes it doesn't. As I recall I ran the cable without it, then starting in the cup holder area I pushed the wire loom onto the wire and forced it to the HU compartment. Once that was complete I installed the wire loom on the wire leading from the compartment all the way back to the iPod in the secret compartment.
1. Start by feeding the cable through the hole that provide parking brake cable access, this is behind the cup holder area and in front of the glove box:
2. Now feed it through the cup holder area (there will be excess, I bundled it on the white clip on the drivers side). I ran mine under the parking brake switch wire but above it should be fine also. Run it into the shifter area using the hole on the passenger side:
Close up of the parking brake switch wire and the ipod wire:
3. Now you have to slowly and painfully route the cable to the head unit compartment. You can move the foam around the shifter (visible in the picture above). You will just have to keep messing with it until you get it through. If you are having a hard time, use a snake wire instead and feed it through started at the head unit compartment, into the shifter area, then into the cup holder area through the hole on the passenger side, then tie it to the ipod cable and pull it through to the head unit compartment:
4. This is about where the wire should come out in the head unit compartment:
5. I didn't take any pics, but here is where I installed the wire loom. Once completed, continue. (or skip it if desired I guess)
6. Here's the ipod installed in the SC and the ipod wire/loom is zip tied to the existing harness where the red circle is:
7. Keep the cable routed in a way where it won't get in the way of the glove box when you reinstall it, etc, here's where I routed mine (this is behind the glove box/under the secret compartment tray). Zip tie location circled again:
8. Keep this wire just about where it is in this picture, this is where it enters the parking brake cable access hole:
9. Here's how I routed it in the cup holder area. Honda left that nice white cable holder on the drivers side so I used it and zip tied the excess together. Also circled is where the cable runs under the parking brake switch wire again.
10. This is where you will end up with the loom/wire in the head unit compartment. You don't want too much wire loom in here because of the limited space:
11. This is why I mentioned keeping the wire in a certain area in Step #8. As you can see the glove box cover has two openings for wiring, one is taken by a OEM honda harness (safety harness, so probably belt pre tensioners), use the other "opening" for the iPod wire:
12. Final product after reinstall of the glove box cover, etc.
----------------------
That's "it". Hope this helps.
11-03-2014, 08:33 PM
#158
Registered User

Join Date: Oct 2014
Location: Houston
Posts: 9
Likes: 0
Received 0 Likes
on
0 Posts
A note to those installing modifry SCV on a 2006+ vehicle, to get to the passenger access panel there is a single screw and two pins that have to be pushed in at the center to be released. After these are removed, just pull it off with force but carefully.
https://www.s2ki.com/s2000/topic/382...panel-in-2006/
Does anyone have a link to purchase these pins? Mine no longer lock properly, a minor issue but annoying nonetheless.
https://www.s2ki.com/s2000/topic/382...panel-in-2006/
Does anyone have a link to purchase these pins? Mine no longer lock properly, a minor issue but annoying nonetheless.


