

Re-Installing stock suspension
 06-07-2010, 04:44 PM
#1
Registered User
Thread Starter

Join Date: Feb 2010
Posts: 5
Likes: 0
Received 0 Likes
on
0 Posts
Okay well I was taking off some coilover that I didn't want anymore and I was putting the Stock AP1 suspension back on the car.
The front stuff when on with a ease
The rear on the other is being a royal pain
I wanted to know do I need to compression the spring or something to get the lower
nut to line up
I unbolted the upper arm bolts, sway bar link, and the D link for the sway bar as well
It seems like it's just not wanting to go down enough for me to line the bolt up and get
the threads lined up and started?
If anyone has any idea, I know must people don't go back to stock but it's just for the
time being. Thanks for any help you all can give.
Ps.. thinking about compressing the spring and bolting everything up then taking
the compressor stuff off if i can get it all to fit
LMK what you all think thanks again
 06-07-2010, 04:56 PM
#2

Have a friend push down on the brake rotor/hub. I don't have a shock in front of me, but if there is a part of the shock body that is lower than the control arm, put your jack on the shock body to push it up.
06-07-2010, 06:48 PM
#3
Registered User


Join Date: Jun 2009
Location: Chicago
Posts: 528
Likes: 0
Received 0 Likes
on
0 Posts
I've tried compressing the springs - don't bother doing that because the spring compressors just get in the way and you won't be able to squeeze them in. Instead, place the OEM scissor jack between fender liner and the upper control arm. You'll need to lay a few pieces of wood in between the OEM scissor jack and fender to make this work and to minimize damage to the fender.
02-08-2016, 08:56 AM
#4
Registered User
Join Date: Nov 2010
Location: TX
Posts: 611
Likes: 0
Received 0 Likes
on
0 Posts
Reviving this thread because I currently have this problem
I have the two lower A-arm bolts loose & the sway bar link off, still struggling to fit the stock coilovers in.
If I bolt the bottom bolt (coilover to lower A arm) first, I can't clear the tophat into the chassis. It's about .5" too tall, even with the a-arm bolts loose.
Here's a picture showing the coilover in place and the lower a-arm being held up by a floor jack. As you can see the problem, the coilover bolt is completely off alignment of the lower a-arm
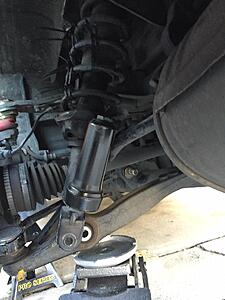
 02-08-2016, 09:41 AM
#5
As mentioned above, leave ALL control arms fully attached and torqued. Disconnect the sway bar end link. Pull out the OEM scissor jack and stand it on the upper ball joint. Add a few chunks of wood to add height. Extend the jack so it pushes on the top inside of the fender well, and therefore pushes the suspension assembly lower until you can easily align and insert the lower shock bolt. Once the bolt is in and snug (not torqued), you can remove the scissor jack. Then use your floor jack to lift the bottom ball joint until the suspension is compressed to roughly "ride height," and torque everything down to spec. 
02-08-2016, 09:54 AM
#6
Registered User
Join Date: Nov 2010
Location: TX
Posts: 611
Likes: 0
Received 0 Likes
on
0 Posts
As mentioned above, leave ALL control arms fully attached and torqued. Disconnect the sway bar end link. Pull out the OEM scissor jack and stand it on the upper ball joint. Add a few chunks of wood to add height. Extend the jack so it pushes on the top inside of the fender well, and therefore pushes the suspension assembly lower until you can easily align and insert the lower shock bolt. Once the bolt is in and snug (not torqued), you can remove the scissor jack. Then use your floor jack to lift the bottom ball joint until the suspension is compressed to roughly "ride height," and torque everything down to spec.

Forgot to mention the top nuts on the coilover are on the top bolts, but not tightened down. So there's a little wiggle room vertically, but not much.
02-08-2016, 11:56 AM
#7
Well, cut off those zip ties and bolt back up the lower control arm to start with!
From there, there's still a certain amount of pushing on the bottom of the shock needed to achieve alignment to get the bolt in. This is necessary because the shock needs to be able to angle in and out slightly as the lower arm moves through its range of travel. That angling movement is achieved with the stiff rubber bushing in the top mount, and the rubber naturally resists movement and prefers to sit in its neutral angle (which is designed to be the angle the shock sits when the lower arm is at ride height). When the suspension is at full droop, the shock needs to angle-in a little to follow the lower control arm. Finger-snug the top mount bolts to the body and don't be afraid to push on the shock a little to get it over the hole on the control arm.
From there, there's still a certain amount of pushing on the bottom of the shock needed to achieve alignment to get the bolt in. This is necessary because the shock needs to be able to angle in and out slightly as the lower arm moves through its range of travel. That angling movement is achieved with the stiff rubber bushing in the top mount, and the rubber naturally resists movement and prefers to sit in its neutral angle (which is designed to be the angle the shock sits when the lower arm is at ride height). When the suspension is at full droop, the shock needs to angle-in a little to follow the lower control arm. Finger-snug the top mount bolts to the body and don't be afraid to push on the shock a little to get it over the hole on the control arm.
Trending Topics
02-08-2016, 12:17 PM
#8
Registered User
Join Date: Nov 2010
Location: TX
Posts: 611
Likes: 0
Received 0 Likes
on
0 Posts


Yes in that photo the bolts holding the lower a-arm to the chassis are both in.
Is this truly a case of just muscling the shock over the control arm ? Please say no
02-08-2016, 01:21 PM
#9
Site Moderator

It is a huge pain in the ass. When I helped a buddy do this I think we ended up fully disconnecting the sway bar and then he stood on the hub and pushed it down while I shoved the shock into place. I found that once I got the bolt through if the exit side still wasn't aligned I used a screwdriver to align it and then a hammer on the bolt to push it through. Its a real nightmare so good luck.
02-08-2016, 02:01 PM
#10
Used a bit of 2x2 inch wood about 4 ft long to lever arm down with my knee