

PowerFlex Bushings Limited Time Discount!
 01-31-2012, 02:28 PM
#51
Registered User

Thread Starter

Join Date: May 2010
Location: Melbourne, FL
Posts: 150
Likes: 0
Received 0 Likes
on
0 Posts
I talked to PowerFlex UK and they will be manufacturing the compliance bushing in the next couple weeks. Should see some compliance bushings come out in February for those willing to wait.
On another note, I ordered from GoTuning and they ran out of stock of the Mugen compliance bushing!! King Motorsports raised the prices so I missed out on the lower price. Looks like I have to order at the new price now or wait for the PowerFlex bushing. Those looking for a track compliance bushing sooner can get the Spoon compliance hard bushing from GoTuning for $98.
On another note, I ordered from GoTuning and they ran out of stock of the Mugen compliance bushing!! King Motorsports raised the prices so I missed out on the lower price. Looks like I have to order at the new price now or wait for the PowerFlex bushing. Those looking for a track compliance bushing sooner can get the Spoon compliance hard bushing from GoTuning for $98.

 02-01-2012, 04:26 PM
#53
Registered User
Join Date: Jun 2009
Location: Frankfort, KY
Posts: 4,340
Likes: 0
Received 0 Likes
on
0 Posts
I've got the mugan bushings setting at the house but I got a email from evasive saying they are waiting for powerflex to ship more s2000 bushings to them. So I'm still waiting on the powerflex bushings. I still need to order a new bolts from honda which is about $225-250. I also ordered 4 extra bushing lube packages from powerflex that came in yesterday. I'm gonna soak mine in the lube. I'm debating ordering some POR-15 to paint all the arms but I'm not sure if I want to spend the time doing that or not.
02-01-2012, 07:09 PM
#54
Registered User
Thread Starter
Join Date: May 2010
Location: Melbourne, FL
Posts: 150
Likes: 0
Received 0 Likes
on
0 Posts
I've got the mugan bushings setting at the house but I got a email from evasive saying they are waiting for powerflex to ship more s2000 bushings to them. So I'm still waiting on the powerflex bushings. I still need to order a new bolts from honda which is about $225-250. I also ordered 4 extra bushing lube packages from powerflex that came in yesterday. I'm gonna soak mine in the lube. I'm debating ordering some POR-15 to paint all the arms but I'm not sure if I want to spend the time doing that or not.
02-01-2012, 07:56 PM
#55
Registered User
Thread Starter
Join Date: May 2010
Location: Melbourne, FL
Posts: 150
Likes: 0
Received 0 Likes
on
0 Posts
Ok, here's my attempt at a DIY. The goal is to illustrate each step in the correct order to help reduce the amount of pain required to install these bushings. In the end, I had seized bolts that required generous application of PB Blaster anti-seize penetrant spray as well as help from a local auto shop.
Front and Rear Upper Control Arms
For the most part, the Front and rear upper control arms are very similar. In fact, I believe the bushings are the same size regardless of the fact that PowerFlex labels them differently.
1) Disconnect the metal bracket in the center that holds the brake lines to the upper control arm using a 10mm wrench or ratchet.

2) Loosen the bolts holding the control arm to the chassis. Use a ratchet with at 17mm socket and an extra wrench for leverage if necessary.

3) Remove the clip from the upper ball joint castle nut

4) Remove the castle nut with the 17mm socket and ratchet. (I forgot to take a pic)
5) Use a ball joint puller to remove the control arm from the knuckle. Either of the following tools can work.


6) I rented this tool kit from Advance Auto Parts for free with a $169 deposit on my credit card that I got back when I returned the kit. Align the correct die and cup to push the bushing from the inside to toward the outside of the wishbone into the cup. I literally had to get the parts into place by hand, then stand on the clamp with my left foot and step on the ratchet with my right foot to get enough torque and force to push the bushing out. The borrowed kit had the right size cup, but it didn't have the right size die. I found that a 24mm impact socket fit perfectly or the upper control arms. A 27mm impact socket fits for the track control arms.

If you don't have an auto zone or advance auto parts or similar auto store nearby, you can purchase a kit similar to the one shown here at harbor freight online: http://www.harborfreight.com/four-wh...-kit-4065.html
The other option is to simply take the disconnected arm to a machine shop with a shop press and have them press the bushings out.
7) Apply the copper grease to the bushing and push them into the control arm by hand. Then apply some more grease to the sleeve and push the sleeve into the bushings. Make note that the thin side goes on the inside of the wishbone and the thicker side faces the outside of the wishbone.
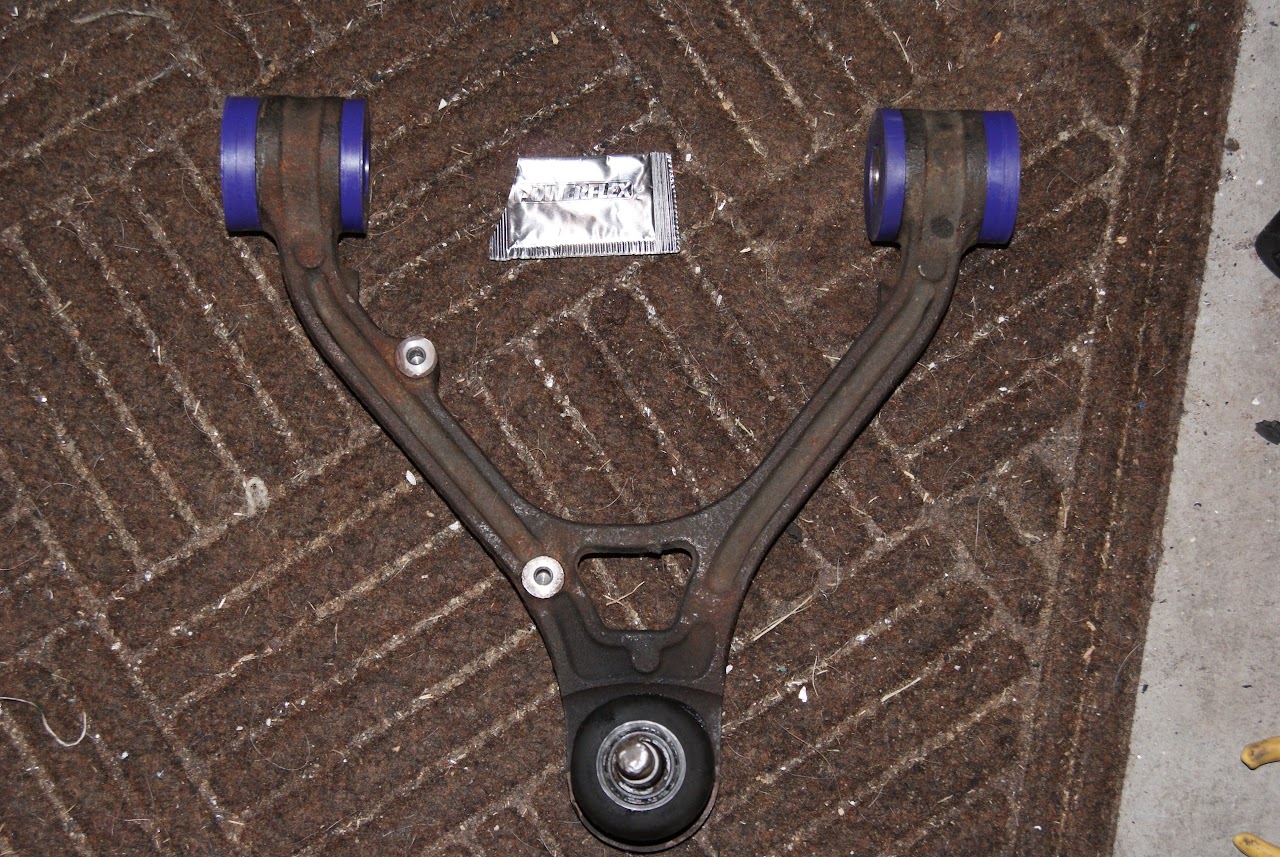
8) Now is a good time to replace the ball joint boot with a new rubber boot and apply new ball joint grease. You can order from Honda or Energy Suspension sells a polyurethane universal replacement. I didn't do this yet so I'll update this DIY when I find out if the boots I ordered from Energy Suspension fit before I list the part #s I ordered.
9) Now simply apply more copper grease to the outside of the bushings and push the control arm back into place. The extra grease on the outside keeps it from squeaking against the chassis. Also important to mention is that I had to bend the control arm brackets just slightly with some vice grips because they were bent inward a little bit preventing me from pushing the control arm into place. This is probably normal, but be careful not to stress or stretch the bracket too far that the bolt won't thread through properly.

9) Now press the ball joint back into the knuckle. I applied some PB Blaster to the threaded portion and to the castle nut and screwed it on and off by hand to remove any corrosion on the threads prior to pressing it back into the knuckle. Screw the castle nut back onto the ball joint bolt. Apply pressure from above with your body weight as you tighten with a 17mm wrench or socket. Then use pliers to place the clip back into the castle nut to hold it in place.

10) Reconnect the metal bracket holding the brake lines to the control arm with the 10mm bolts. You're done with 1 arm, 3 more to go!

Front and Rear Upper Control Arms
For the most part, the Front and rear upper control arms are very similar. In fact, I believe the bushings are the same size regardless of the fact that PowerFlex labels them differently.
1) Disconnect the metal bracket in the center that holds the brake lines to the upper control arm using a 10mm wrench or ratchet.
2) Loosen the bolts holding the control arm to the chassis. Use a ratchet with at 17mm socket and an extra wrench for leverage if necessary.
3) Remove the clip from the upper ball joint castle nut
4) Remove the castle nut with the 17mm socket and ratchet. (I forgot to take a pic)
5) Use a ball joint puller to remove the control arm from the knuckle. Either of the following tools can work.
6) I rented this tool kit from Advance Auto Parts for free with a $169 deposit on my credit card that I got back when I returned the kit. Align the correct die and cup to push the bushing from the inside to toward the outside of the wishbone into the cup. I literally had to get the parts into place by hand, then stand on the clamp with my left foot and step on the ratchet with my right foot to get enough torque and force to push the bushing out. The borrowed kit had the right size cup, but it didn't have the right size die. I found that a 24mm impact socket fit perfectly or the upper control arms. A 27mm impact socket fits for the track control arms.
If you don't have an auto zone or advance auto parts or similar auto store nearby, you can purchase a kit similar to the one shown here at harbor freight online: http://www.harborfreight.com/four-wh...-kit-4065.html
The other option is to simply take the disconnected arm to a machine shop with a shop press and have them press the bushings out.
7) Apply the copper grease to the bushing and push them into the control arm by hand. Then apply some more grease to the sleeve and push the sleeve into the bushings. Make note that the thin side goes on the inside of the wishbone and the thicker side faces the outside of the wishbone.
8) Now is a good time to replace the ball joint boot with a new rubber boot and apply new ball joint grease. You can order from Honda or Energy Suspension sells a polyurethane universal replacement. I didn't do this yet so I'll update this DIY when I find out if the boots I ordered from Energy Suspension fit before I list the part #s I ordered.
9) Now simply apply more copper grease to the outside of the bushings and push the control arm back into place. The extra grease on the outside keeps it from squeaking against the chassis. Also important to mention is that I had to bend the control arm brackets just slightly with some vice grips because they were bent inward a little bit preventing me from pushing the control arm into place. This is probably normal, but be careful not to stress or stretch the bracket too far that the bolt won't thread through properly.
9) Now press the ball joint back into the knuckle. I applied some PB Blaster to the threaded portion and to the castle nut and screwed it on and off by hand to remove any corrosion on the threads prior to pressing it back into the knuckle. Screw the castle nut back onto the ball joint bolt. Apply pressure from above with your body weight as you tighten with a 17mm wrench or socket. Then use pliers to place the clip back into the castle nut to hold it in place.
10) Reconnect the metal bracket holding the brake lines to the control arm with the 10mm bolts. You're done with 1 arm, 3 more to go!
02-01-2012, 08:22 PM
#56
Registered User
Thread Starter
Join Date: May 2010
Location: Melbourne, FL
Posts: 150
Likes: 0
Received 0 Likes
on
0 Posts
DIY Continued...
Sorry for the blurry pictures. I took these with my cell phone at the auto shop since I didn't have my nice Sony Alpha DSLR.
Front Lower Control Arms
So the lower control arms have a horizontal bushing on the front side just like the upper control arms but bigger. The inner bushing on the rear side of the arm is the Compliance bushing that PowerFlex is still in the process of manufacturing. I have yet to order the Compliance bushing either from Mugen, Spoon, nor PowerFlex. I'm still waiting to see what the reviews are on the PowerFlex compliance bushing before proceeding.
See that weird bolt at the top of the image below? That's an alignment bolt. Be sure to note the position of the alignment disc before removing. You'll want to put it back to the same position. Removing these bushings causes your car to become unaligned. You must get an alignment after this procedure.

Rear Track Control Arms
Caution: Pay attention to the alignment bolt of the track control arm. You will want to re-position the alignment bolt disc to the same position as it began when re-installing the control arm. Removing this bolt will cause your vehicle to be unaligned! Be sure to get an alignment after completing this installation.
1) Remove the bolt holding the track control arm to the chassis using a 17mm ratchet/wrench.

2) Remove the clip and castle nut with a 17mm wrench. A ratchet socket wouldn't it. The boot is damaged, but I'm awaiting a polyurethane boot to be shipped from Energy Suspension.

3) Press out the bearing using a 27mm socket and a bushing press. I didn't take a picture of me doing this with the track control bushing because I had the shop press it with their 10 ton press instead. Theoretically you can do this yourself.
4) Grease the bushings and press them into the track control arm by hand. Then grease the sleeve and press the sleeve in. Both sides of bushing are the same thickness so no need to worry about what direction to press them in.
5) Re-attach the control arm with the 17mm bolt being careful to place the alignment disc in the same position as it was before you removed it. The track control arm alignment affects toe more than camber. If the toe is off, the wheel will face inward or outward rather than straight. Camber will affect leaning inward or outward from the wheel well. Try to be as close as possible. Once you are done with the bushing installation, immediately get an alignment done. This is very important! You risk damaging your car with improper alignment. I recommend staying under 30mph on the way to the alignment shop.
6) Re-attach the ball joint to the knuckle. Screw the 17mm castle nut back on apply pressure to the joint. Put the clip back in. Do the other side.
Rear Lower Control Arms
This one I had to take to a shop because the rear alignment bolt was seized. Anyway, here's the steps:
1) Remove the bolt holding the shock/strut to the lower control arm. I have coilovers, but struts or coilovers are both attached the same way. I used a 17mm ratchet on one side and held the other side with a 17mm wrench.

2) Use a hex key to hold the center of the tie rod bolt and use a wrench (I used a ratcheting wrench) to loosen the nut.

3) Note the location of the alignment bolt and disc because you will want to put it back to the same location when reinstalling. Remove the alignment bolt.

4) The front side of the lower control arm has no alignment so simply remove the bolt.

5) Now remove the tie rode end from the control arm

6) I forgot to take a picture here but remove the cotter pin and castle nut from the ball joint and use a ball joint puller to remove the control arm like you did on the UCAs and the Track control arms.
7) Press out the bushings with a proper die and cup using the C-clamp. If you can't fit it in the C-clamp, go to a machine shop to have them pressed out. These bushings are significantly larger than the upper control arm bushings so I couldn't do this with the tools I had.
8) Install the PowerFlex bushings with plenty of copper grease. Place the control arms back into place.

9) Re-attach the tie rod end.
10) Place the ball joint back into the knuckle. Apply upward pressure with a floor jack, raising the control arm into place and attack the castle nut, tighten, then place in a new cotter pin. Bend the cotter pin downward to hold it in place. Don't reuse cotter pins if you can help it.
11) Tighten everything down, making sure the alignment bolt is in the original position that it was in when you removed it. The car will be unaligned, but if it's close to where it was to start, your alignment should be safe enough to carefully drive to the nearest alignment shop for a proper alignment. I recommend staying under 30mph on the way to the shop.
Final Mentions
I hope this DIY was useful to everyone doing the install themselves. This is no quick task, and I guarantee that if you don't have an air compressor and air tools, your back will be sore by the time you're done. Pace yourself. Do one arm at a time if your car is a daily driver, and you can do this across multiple days. I found that the upper control arm bushings had 4 bushings and only 1 pack of copper grease. I recommend you pick up more copper grease from PowerFlex. I ended up using some of the grease from the lower control arm bushings for the uppers. Be sure to pick up a can of PB Blaster or some kind of anti-seize penetrant or those hard to loosen bolts. The compliance bushing sleeve is notorious for corroding and seizing.
All in all this was a straightforward task, but it takes a lot of elbow grease and smart use of tools. If you're lucky enough to have a rent kit from Autozone or Advance Auto Parts then you can do the upper control arms yourself or all 4 wheels. I found that I couldn't fit the rear control arms into the C-clamp and had to take the car to the shop to unseize an alignment bolt. it cost me $30 per bushing for the shop to pull the rear control arms and replace the bushings. Then it cost another $79.99 for an alignment.
Try to remove the arms yourself and have a friend shuttle you to a machine shop to press out the old bushings. The new PowerFlex bushings are easy to install by hand compared to Mugen or Spoon that have to be pressed in. My understanding is the PowerFlex compliance bushing will also have to be pressed in as it's got a metal sleeve just like the Mugen and Spoon bushings.
Good luck with your installation!
Thanks to Mike Chang at Evasive Motorsports for stocking the parts for this group buy. Thanks to Carrie LeBarre from PowerFlex USA or agreeing to this discount. Thanks to AquilaEagle for his write up that helped me do my own installation and DIY.
Sorry for the blurry pictures. I took these with my cell phone at the auto shop since I didn't have my nice Sony Alpha DSLR.
Front Lower Control Arms
So the lower control arms have a horizontal bushing on the front side just like the upper control arms but bigger. The inner bushing on the rear side of the arm is the Compliance bushing that PowerFlex is still in the process of manufacturing. I have yet to order the Compliance bushing either from Mugen, Spoon, nor PowerFlex. I'm still waiting to see what the reviews are on the PowerFlex compliance bushing before proceeding.
See that weird bolt at the top of the image below? That's an alignment bolt. Be sure to note the position of the alignment disc before removing. You'll want to put it back to the same position. Removing these bushings causes your car to become unaligned. You must get an alignment after this procedure.
Rear Track Control Arms
Caution: Pay attention to the alignment bolt of the track control arm. You will want to re-position the alignment bolt disc to the same position as it began when re-installing the control arm. Removing this bolt will cause your vehicle to be unaligned! Be sure to get an alignment after completing this installation.
1) Remove the bolt holding the track control arm to the chassis using a 17mm ratchet/wrench.
2) Remove the clip and castle nut with a 17mm wrench. A ratchet socket wouldn't it. The boot is damaged, but I'm awaiting a polyurethane boot to be shipped from Energy Suspension.
3) Press out the bearing using a 27mm socket and a bushing press. I didn't take a picture of me doing this with the track control bushing because I had the shop press it with their 10 ton press instead. Theoretically you can do this yourself.
4) Grease the bushings and press them into the track control arm by hand. Then grease the sleeve and press the sleeve in. Both sides of bushing are the same thickness so no need to worry about what direction to press them in.
5) Re-attach the control arm with the 17mm bolt being careful to place the alignment disc in the same position as it was before you removed it. The track control arm alignment affects toe more than camber. If the toe is off, the wheel will face inward or outward rather than straight. Camber will affect leaning inward or outward from the wheel well. Try to be as close as possible. Once you are done with the bushing installation, immediately get an alignment done. This is very important! You risk damaging your car with improper alignment. I recommend staying under 30mph on the way to the alignment shop.
6) Re-attach the ball joint to the knuckle. Screw the 17mm castle nut back on apply pressure to the joint. Put the clip back in. Do the other side.
Rear Lower Control Arms
This one I had to take to a shop because the rear alignment bolt was seized. Anyway, here's the steps:
1) Remove the bolt holding the shock/strut to the lower control arm. I have coilovers, but struts or coilovers are both attached the same way. I used a 17mm ratchet on one side and held the other side with a 17mm wrench.
2) Use a hex key to hold the center of the tie rod bolt and use a wrench (I used a ratcheting wrench) to loosen the nut.
3) Note the location of the alignment bolt and disc because you will want to put it back to the same location when reinstalling. Remove the alignment bolt.
4) The front side of the lower control arm has no alignment so simply remove the bolt.
5) Now remove the tie rode end from the control arm
6) I forgot to take a picture here but remove the cotter pin and castle nut from the ball joint and use a ball joint puller to remove the control arm like you did on the UCAs and the Track control arms.
7) Press out the bushings with a proper die and cup using the C-clamp. If you can't fit it in the C-clamp, go to a machine shop to have them pressed out. These bushings are significantly larger than the upper control arm bushings so I couldn't do this with the tools I had.
8) Install the PowerFlex bushings with plenty of copper grease. Place the control arms back into place.
9) Re-attach the tie rod end.
10) Place the ball joint back into the knuckle. Apply upward pressure with a floor jack, raising the control arm into place and attack the castle nut, tighten, then place in a new cotter pin. Bend the cotter pin downward to hold it in place. Don't reuse cotter pins if you can help it.
11) Tighten everything down, making sure the alignment bolt is in the original position that it was in when you removed it. The car will be unaligned, but if it's close to where it was to start, your alignment should be safe enough to carefully drive to the nearest alignment shop for a proper alignment. I recommend staying under 30mph on the way to the shop.
Final Mentions
I hope this DIY was useful to everyone doing the install themselves. This is no quick task, and I guarantee that if you don't have an air compressor and air tools, your back will be sore by the time you're done. Pace yourself. Do one arm at a time if your car is a daily driver, and you can do this across multiple days. I found that the upper control arm bushings had 4 bushings and only 1 pack of copper grease. I recommend you pick up more copper grease from PowerFlex. I ended up using some of the grease from the lower control arm bushings for the uppers. Be sure to pick up a can of PB Blaster or some kind of anti-seize penetrant or those hard to loosen bolts. The compliance bushing sleeve is notorious for corroding and seizing.
All in all this was a straightforward task, but it takes a lot of elbow grease and smart use of tools. If you're lucky enough to have a rent kit from Autozone or Advance Auto Parts then you can do the upper control arms yourself or all 4 wheels. I found that I couldn't fit the rear control arms into the C-clamp and had to take the car to the shop to unseize an alignment bolt. it cost me $30 per bushing for the shop to pull the rear control arms and replace the bushings. Then it cost another $79.99 for an alignment.
Try to remove the arms yourself and have a friend shuttle you to a machine shop to press out the old bushings. The new PowerFlex bushings are easy to install by hand compared to Mugen or Spoon that have to be pressed in. My understanding is the PowerFlex compliance bushing will also have to be pressed in as it's got a metal sleeve just like the Mugen and Spoon bushings.
Good luck with your installation!
Thanks to Mike Chang at Evasive Motorsports for stocking the parts for this group buy. Thanks to Carrie LeBarre from PowerFlex USA or agreeing to this discount. Thanks to AquilaEagle for his write up that helped me do my own installation and DIY.


 02-02-2012, 08:51 AM
#58
Former Sponsor


The parts are as follows:
Front Arm Rear Compliance Bushing
PFF25-203 x2
$184.99
Stainless Steel Caster Adjustment Kit
PFF25-203G x2
$207.99
Few items are back ordered but will be going out shortly.

 02-05-2012, 01:16 PM
#60
Registered User
Thread Starter
Join Date: May 2010
Location: Melbourne, FL
Posts: 150
Likes: 0
Received 0 Likes
on
0 Posts
For those wanting to order ball joint boot replacements, here's what I used and it fit. Order 2 sets, one for the front wheels and one for the rear. Each set has two top ball joint boots and two bottom ball joint boots.
http://www.energysuspensionparts.com...?prod=16.13101
Get some automotive grease from autozone/advance auto parts to replace the boot grease.
http://www.energysuspensionparts.com...?prod=16.13101
Get some automotive grease from autozone/advance auto parts to replace the boot grease.