
Upstate MOTORCYCLE CHAT thread
 05-10-2011, 04:52 AM
#21

Originally Posted by Conedodger' timestamp='1305030669' post='20558171
Edited my post. Total cycle wasn't the shop I was thinking about. Never heard of Total Cycle. It is in walking distance of my brother's house though.
I'm not comfortable enough with motorcycle maintenance to remove and install the wheels, so I will have to take the bike over and drop it off


The front is a little more complicated, but not difficult. The fender, front axle, and a brake caliper have to come off. The hardest part is blocking up the front without dropping the bike on it's side. I put the bike on the center stand. Remove the rear. Lift the front using a bottle jack under the motor. After removing the front wheel, I put the axle back through the forks and lower the bike so that the axle is resting on a jack stand.
 05-10-2011, 05:38 AM
#22
Registered User

Thread Starter
Join Date: Feb 2001
Location: West Henrietta UPSTATE NY
Posts: 58,680
Likes: 0
Received 1 Like
on
1 Post
The rear wheel is easier than the S2000! It only has 4 lug nuts. Even uses the same size socket as the S.
The front is a little more complicated, but not difficult. The fender, front axle, and a brake caliper have to come off. The hardest part is blocking up the front without dropping the bike on it's side. I put the bike on the center stand. Remove the rear. Lift the front using a bottle jack under the motor. After removing the front wheel, I put the axle back through the forks and lower the bike so that the axle is resting on a jack stand.
The front is a little more complicated, but not difficult. The fender, front axle, and a brake caliper have to come off. The hardest part is blocking up the front without dropping the bike on it's side. I put the bike on the center stand. Remove the rear. Lift the front using a bottle jack under the motor. After removing the front wheel, I put the axle back through the forks and lower the bike so that the axle is resting on a jack stand.
05-10-2011, 05:42 AM
#23
Registered User
Thread Starter
Join Date: Feb 2001
Location: West Henrietta UPSTATE NY
Posts: 58,680
Likes: 0
Received 1 Like
on
1 Post
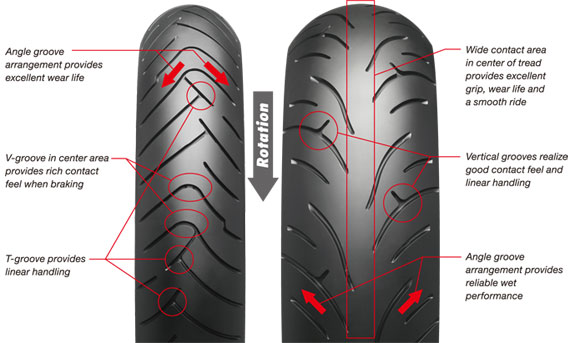
Here is more of the Battlax detail on the -023
The bike now has an older series of Battlax, something like an -02
 05-10-2011, 05:51 AM
#24
Originally Posted by Conedodger' timestamp='1305031942' post='20558232
The rear wheel is easier than the S2000! It only has 4 lug nuts. Even uses the same size socket as the S.
The front is a little more complicated, but not difficult. The fender, front axle, and a brake caliper have to come off. The hardest part is blocking up the front without dropping the bike on it's side. I put the bike on the center stand. Remove the rear. Lift the front using a bottle jack under the motor. After removing the front wheel, I put the axle back through the forks and lower the bike so that the axle is resting on a jack stand.
The front is a little more complicated, but not difficult. The fender, front axle, and a brake caliper have to come off. The hardest part is blocking up the front without dropping the bike on it's side. I put the bike on the center stand. Remove the rear. Lift the front using a bottle jack under the motor. After removing the front wheel, I put the axle back through the forks and lower the bike so that the axle is resting on a jack stand.
05-10-2011, 05:55 AM
#25
Registered User
Thread Starter
Join Date: Feb 2001
Location: West Henrietta UPSTATE NY
Posts: 58,680
Likes: 0
Received 1 Like
on
1 Post
Just found them for less - www.rockymountainatvmc.com
BT-023
$105.99 - 120/70-17
$134.99 - 180/55-17
BT-023
$105.99 - 120/70-17
$134.99 - 180/55-17
05-10-2011, 05:59 AM
#26
Registered User
Thread Starter
Join Date: Feb 2001
Location: West Henrietta UPSTATE NY
Posts: 58,680
Likes: 0
Received 1 Like
on
1 Post
Serious???
Really???
Oh man, this would thrill the crap out of me!!!
Here is my thinking
I think I will order the rubber - 1
Talk to the Henrietta shop and the W. Bloomfied shop and see who gives me the best feeling - 2
Receive tires - 3
Rearrange garage to put the trailer outside for a couple weeks giving me room to have the bike stored without wheels - 4
Work out a date with you, after work or a weekend, totally up to you - 5
05-10-2011, 06:08 AM
#27
Originally Posted by Conedodger' timestamp='1305035469' post='20558423
Let me know when.
Really???
Oh man, this would thrill the crap out of me!!!
Here is my thinking
I think I will order the rubber - 1
Talk to the Henrietta shop and the W. Bloomfied shop and see who gives me the best feeling - 2
Receive tires - 3
Rearrange garage to put the trailer outside for a couple weeks giving me room to have the bike stored without wheels - 4
Work out a date with you, after work or a weekend, totally up to you - 5
05-10-2011, 06:21 AM
#29
Registered User
Thread Starter
Join Date: Feb 2001
Location: West Henrietta UPSTATE NY
Posts: 58,680
Likes: 0
Received 1 Like
on
1 Post
They may not be able to match that price, that's just crazy low, but if they can get close...
105.99 + 134.99 = $240.98 no tax, free shipping
MSRP is $436.90 for the pair, that's a huge difference of $195.92
105.99 + 134.99 = $240.98 no tax, free shipping
MSRP is $436.90 for the pair, that's a huge difference of $195.92
05-10-2011, 06:23 AM
#30
Copied from VFRD:
Unless you have an air or electric impact wrench (or a buddy to hold the brake pedal down while you stand on the lug nut wrench) it's a good idea to loosen (just loosen -not remove) the 4 lugnuts with the bike on the side-stand before putting it up on the C-stand and the jack.
To remove the rear wheel you'll have to loosen the muffler (Not necessary on 6th Gen) at the double-bolt (loosen them both) coupling right behind the centerstand and under the bike and remove the hanger bolt that goes to the passenger peg. It should just swing away (turning the muffler counter-clockwise (yes, this is counter-intuitive but it goes down and then away from the the wheel.
Then all you need to do is remove the 4 lug nuts and the rear wheel comes right off like a car wheel. Honda Civic? Probably uses the same hub...
Reverse is exactly opposite. While you have the back off take look at how much pads you have left on the rear brake. It's hard to see it without a good mechanic's mirror so it's a good time to check.
The front is a bit trickier.
Remove the axle nut on the right side and then loosen the pinch bolts holding the axle. Put something like a screwdriver through the little hole and twist a bit. The axle should spin and come out slightly.
Before you pull it all the way out it is time to remove the Right-side caliper. It's easier to remove the Right side as the Left side has that stupid linked brakes BS on it but you can remove either one. If you remove the linked brakes bracket be careful not to lose the bushing inside.
The Caliper comes off by removing the two long bolts (12mm head if I remember right) that go through it to the fender. Be VERY careful NOT to pull the brake lever (or the brake pedal either for that matter as the stupid things are linked in the gen5 on) while the caliper is off or you'll push the caliper piston right OUT and leak oil all over hell.
Pull the rest of the axle out paying careful attention to which side is left and right and which spacer goes where.
Installation is slightly different on the Front Wheel than just reverse. After making sure you have the wheel on the right way and the right spacers on the right side slide the axle in. Tighten the axle end bolt. Install the caliper (the factory says you are supposed to replace these bolts every time you take them out. Honda wants something like $20 each for them. If you think that is as BS as me then don't pay $40 to make a $tealer rich just to take off your own damn wheel -give them a gander. If the threads are not deformed and they don't look warped then don't worry about it)
After you have the wheel and brakes back together then push the bike off the centerstand (assuming you have the rear wheel done, naturally) and pump the front suspension with your front brake pulled. This helps center and align the lower fork tubes. Put the bike back on the centerstand. Get on your knees and eyeball the rotors to check that they are centered going through the rotor hanger brackets and calipers and not rubbing. If they are off it is easy to see with the naked eye. If they are OK then tighten up your pinch bolts and torque everything to factory specs with your torque wrench.
All done.