When you click on links to various merchants on this site and make a purchase, this can result in this site earning a commission. Affiliate programs and affiliations include, but are not limited to, the eBay Partner Network.
I’m in Upstate for a few days - and ran to Lincoln Pond yesterday. Surprised at how much snow remained. But otherwise quite muddy, and will be for at least a week or two. We obviously didn’t quite finish closing up, as the summer furniture was still out.
On the race car, I managed to get it up on jack stands and drain the oil in the transmission. If I can get my whole carcass under the car. I should be able to remove the transmission and drive shaft fairly quickly. I’m thinking that I want to lift the rear transmission mount by at least 1/8th of an inch. Last time I raised it 1/4 of an inch with good results for the arm that moves the clutch at the other end.
Over the past few days, I pulled the transmission and driveshaft and mostly installed the close ratio transmission and its alternate driveshaft (flanged both ends). My prior attempt to install this transmission in March 2021 had been a failure. The transmission would shift fine when engine was not running, but would grind the gears when engine was running. I got frustrated and installed the original transmission with stock gears due to time constraints.
At this stage, however, the transmission housing has been modified as necessary for fit, the car’s transmission cross member mount has been raised 1/4 inch and I prefitted the transmission to the engine and they can be mated without too much difficulty - at least out of the car!.
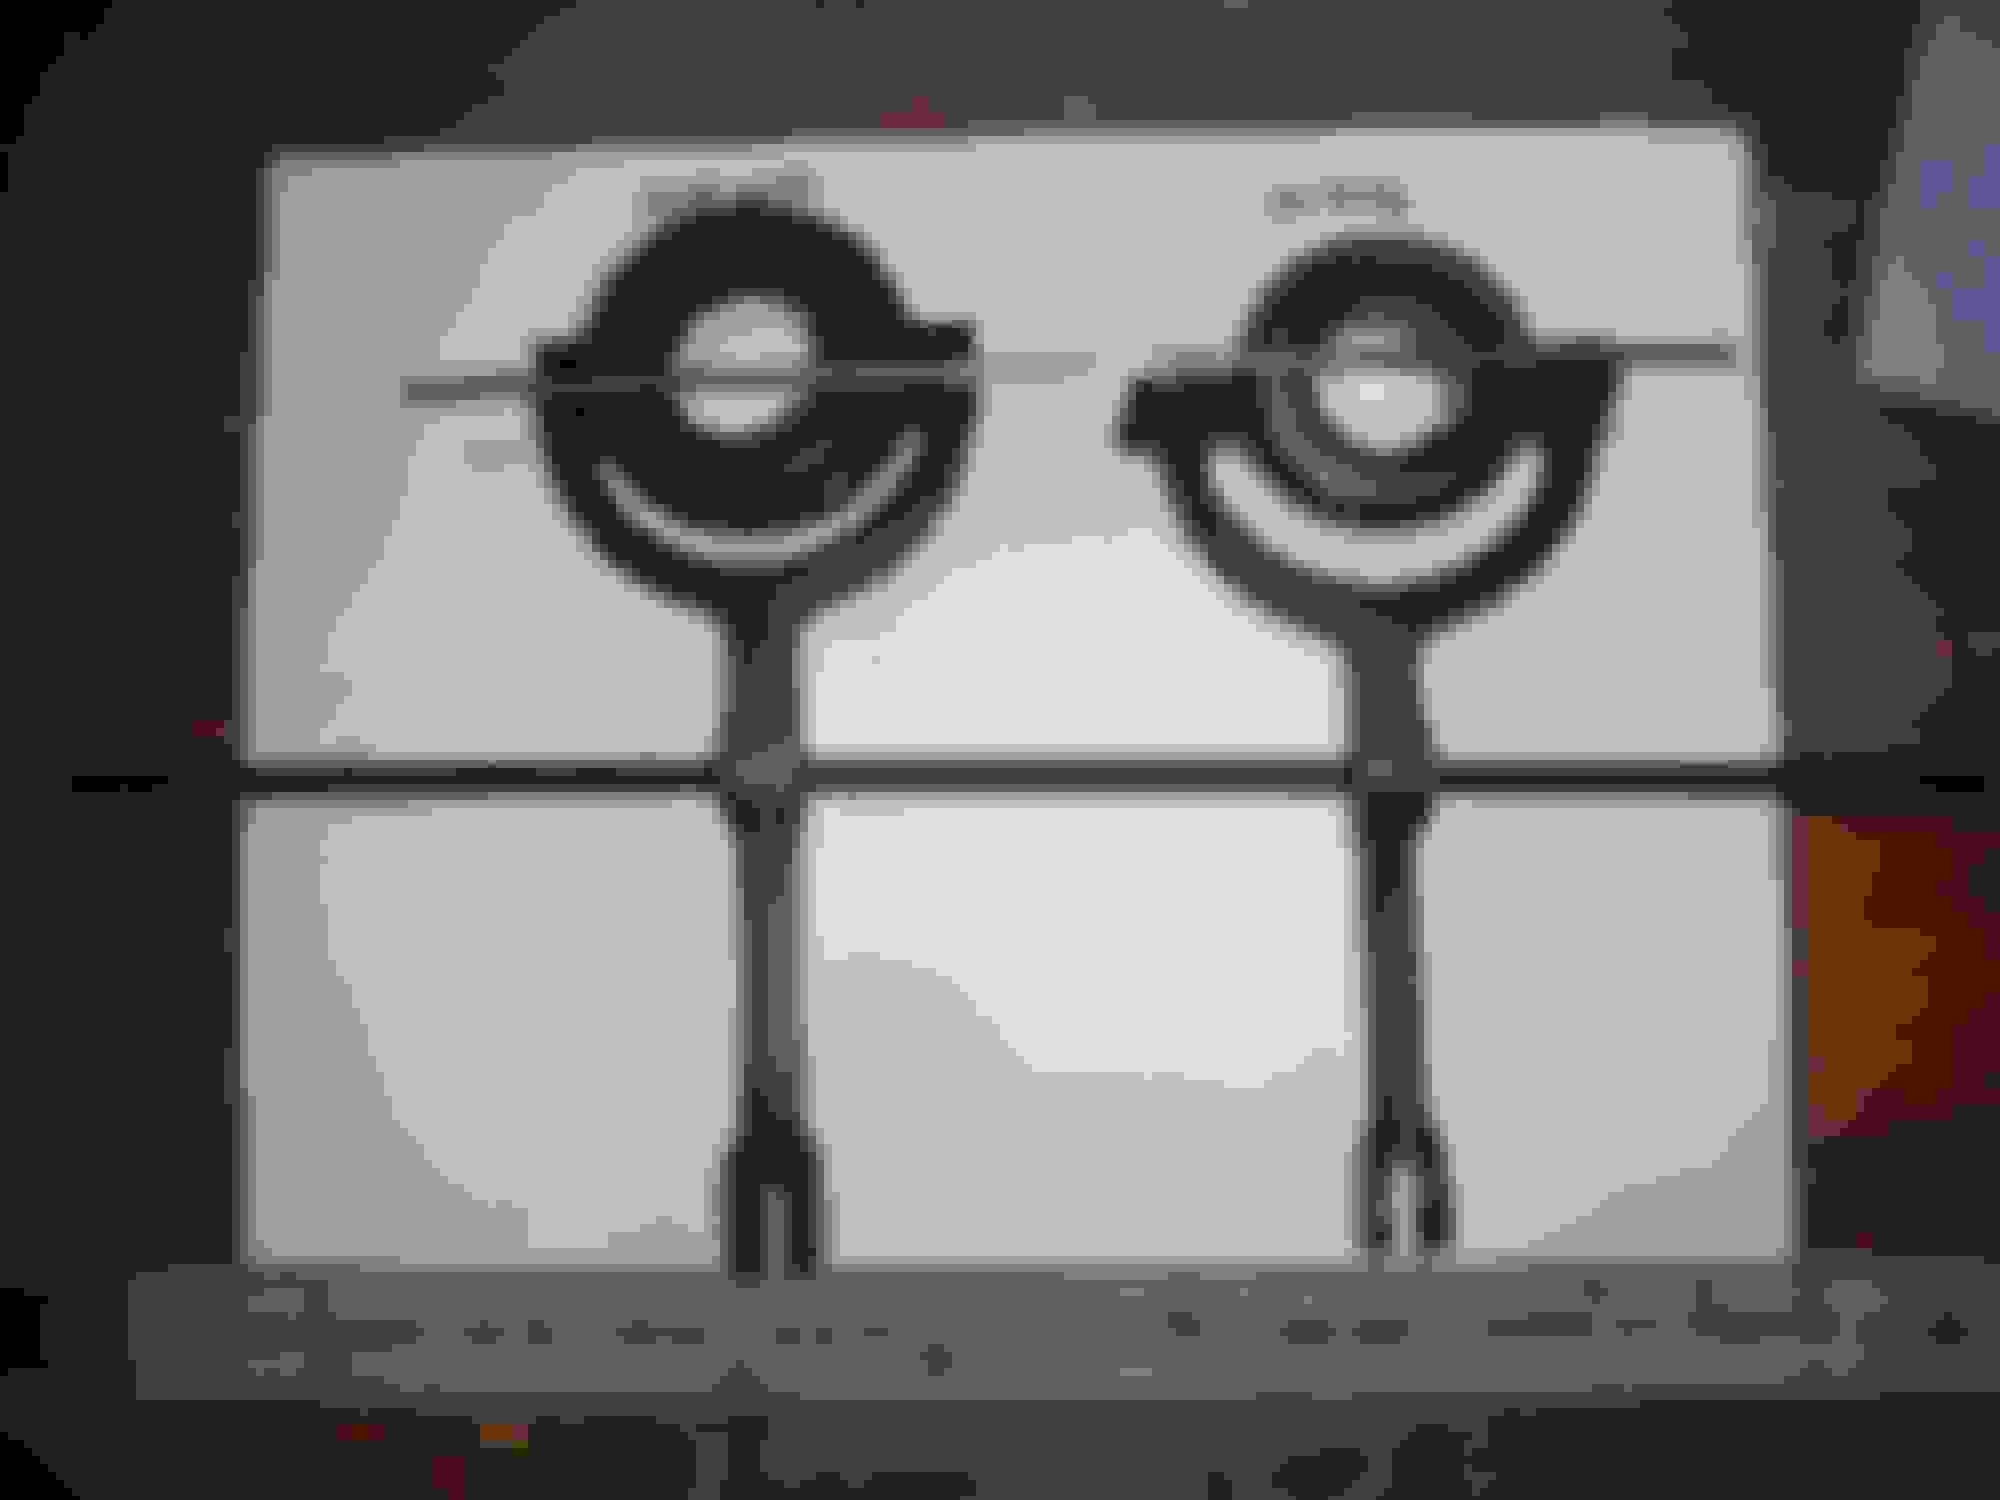
I double checked the throw out fork to verify that I would be using the appropriate fork. The transmission came with MGB throw out fork 22 H 1056. Research indicates this is from a 4 syncro MGB gearbox. I pulled and installed MGB throw out fork 22 B 56 from the stock transmission (modified to accept an MGB clutch and pressure plate with the front plate from an early MGB 3 syncro transmission). This should give me a little better clearance at the cross member. As indicated in the photos, fork 22 H 1056 is larger and the bearing is higher than with fork 22 B 56.
I went out last night and dropped the engine into the car. I tried very hard to get the engine to slide cleanly onto the transmission's first motion shaft without forcing it. I hope I was successful.
The last time I tried to use this transmission, I could not get it to work. With the engine running, the gears would grind horribly. And it was not my hydraulics. It may have had to do with the transmission fork, but it may also have been my forcing the two units together.
And then, of course, I hope the transmission itself is good and is an improvement to the car. I got a few bolts in to connect the bell housing to the back plate, and the engine mounts are a bit misaligned, perhaps 1/8" too far forward. But there it sits for now. It was getting cold and late.
Today, I am going to see my Mentor - the guy who got me started with this madness. At age 80 he is prepping a Renault 4 CV (CV stands for chevaux-vapeur - as in horse power. It is probably rated at 40 horse power as the #4 stands for the car's tax status. In any event, he wants to repower the car with a Renault Dauphine engine and transmission. I promised to help him lift the body off of the car so he can pull those works out from underneath. Nothing betther than when two old fools get together!
On Thursday night, I installed all of the transmission bell housing bolts and engine mount bolts, having the usual difficulty aligning the engine mount bolt holes to the frame member. Installation of the clutch slave cylinder, however, brought my work to a screeching halt when the 3/8 x 24 bolts that I pulled from the stock transmission for the slave cylinder would not thread. Laying on my back with the transmission 6” above my nose didn’t help! After trying multiple 5/16 and metric options that didn’t work, I thought I would have to rethread the holes in the transmission – not a fun prospect with the cross member and frame blocking access. Fortunately, I quit for the night and came to the MG Experience boards where I found the following counsel:
“As a general rule for British cars, threads going into aluminum are coarse thread, threads going into steel are fine thread. All are SAE, no metric. The bolts for the clutch slave cylinder go into the aluminum gearbox case, so they're 3/8 coarse, which is 3/8-16. Normally the upper starter motor bolt threads into the aluminum bell housing, hence 3/8 coarse. … ”
With the correct coarse threaded bolts, I was able to attach the slave cylinder. But I lost a lot of time trying to install the pin for the pushrod to throw out fork. Because of limited clearance, I like to run the pin upward and clip it at the top. After multiple failed attempts, I ran the pin from the top and clipped it at the bottom. Go-Pro video shows adequate frame/cross member clearance when clutch engaged.
Reassembled, bench tested and installed the high torque starter. Because of the proximity of the solenoid to starter electrical connection to the engine block, I covered that connection with Liquid Tape. I also installed a battery terminal type insulator on the primary connection from the starter switch. Test fitted the distributor and the arrangement seems to work.
Installed the exhaust manifold and exhaust.
Today, Sunday, I made slow progress. Alternator in, fan in, oil filter and oil lines hooked up, EGT probes installed . Had some difficulty in that I a stripped a manifold nut. Had some additional difficulty with the carburetors and had to fashion two parts, but under control. I spend a lot of time looking for stuff - spare parts, tools! Finding that spare manifold nut took about a hour!
I suppose the technical name of what I've been using is a R-clip or R shaped cotter pin. One prong is straight and is inserted into the hole, and the second prong is R shaped and wraps around the outside of the outside of the pin. I've used really tiny ones on the carburetor linkage.
This is a video of current function using MGB 3 synchro fork 22 B 56. I raised the tail crossmember by 1/4"
This is video of prior function - that didn't work! The fork seemed to ride up on the frame as evidenced by the motion of the transmission (and engine) as clutch is engaged. This might have been when using clutch fork 22 H 1056 from a 4 synchro MGB transmission.


 03-25-2023, 07:37 AM