
viNz86 Project Wide Black C_ _ _ PAGE 28 [Magazine article, Life + more]


 08-06-2011, 10:44 AM
#202
Registered User
Thread Starter
**Checking in on August 6, 2011 (Long Boring Read)**
For anyone looking at the wheel specs with the overfenders, I believe I re-posted the specs on Page 8
Hi All! Sorry for the lack of updates, this will be a checking in / pre-post for an upcoming feature!?!? Feature!?!? Yup! I saw the photos and I'm really happy with them as this was my first ever professional photoshoot and also the first time someone has asked me for a list of modifications. It will also give you a sneak peak of the direction of my plans so I don't have to reiterate anything.
It takes me awhile to save up for parts so this will be more of an informative post with the new additions.
First, I just want to say thanks to Cam, Sam@Forgeweb and GoTuning.
So I'm trying to work on my "checklist" and I finally got to 'check' an item off. I picked up a pair of Bride seats with matching pair of Bride Rails. So the stitching of the seats were red and I decided to redo the interior to match.
I used these supplies, but I would suggest a proper sewing machine and T-135 nylon thread instead.

Here are some progress shots.

And the shiftboot before I made it "flush" with the shift knob.

It took me 3 hours for each door panel, and 5 hours for the shift boot and center console (stitching all the way to the back).
**Here is the informative part of the post where research helps, do things right the first time!**
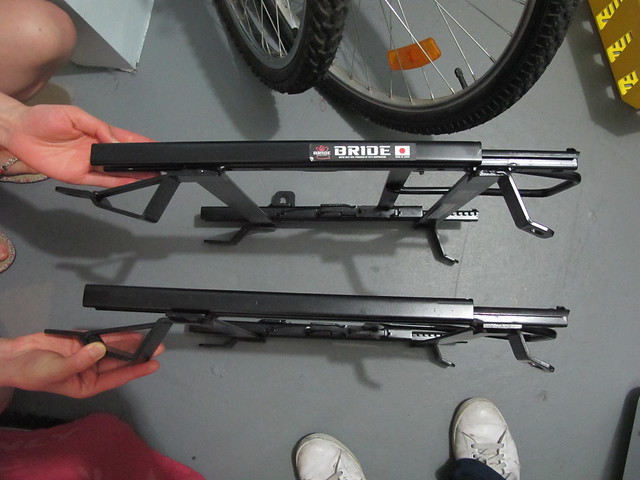
So I had the seats ready to be placed in the car mounted with the rails. The driver side seat rail is the same for 00-09 s2ks! However, the passenger floor plan is different for 06+ as most of us know. I thought I could get some custom work done to the rail, but it seemed like too much work. The seat may not sit properly either so I didn't want to take a chance.
Here is the comparison (I hope this helps someone wanting to put a passenger seat rail into 06+):
Top: ap2 seat rail (special order), bottom: ap1 seat rail:
Part Numbers, AP1 Seat Rail:
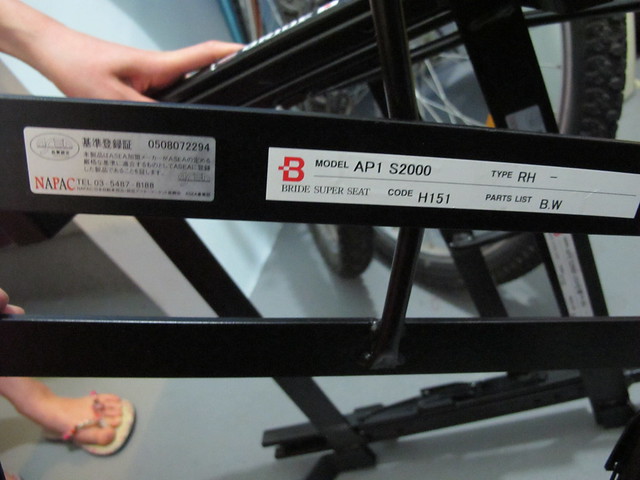
Part Numbers, AP2 Seat Rail (Thanks Sam):

If you guys were to get custom work done, this is what you need to do (ap1 passenger seat rail fitment on 06+ floorplan):


The ap2 seat rail fits perfectly:


Finally, here are the seats installed. I might change the inner cushions to the Bride Black Gradation when they wear out. Fitment is great, doesn't hit the doors or center console and the compartments are fully useable


For the driver side, make sure you remove the sensor from the stock seats, I believe it's a torx T30 screw. I haven't figured out the passenger side rail sensor yet, I will work on that soon.
Thanks for looking and have a good weekend, I will check in soon with the upcoming stuff I don't want to spoil
Questions, comments, concerns....let me know.
Vince
For anyone looking at the wheel specs with the overfenders, I believe I re-posted the specs on Page 8
Hi All! Sorry for the lack of updates, this will be a checking in / pre-post for an upcoming feature!?!? Feature!?!? Yup! I saw the photos and I'm really happy with them as this was my first ever professional photoshoot and also the first time someone has asked me for a list of modifications. It will also give you a sneak peak of the direction of my plans so I don't have to reiterate anything.
It takes me awhile to save up for parts so this will be more of an informative post with the new additions.
First, I just want to say thanks to Cam, Sam@Forgeweb and GoTuning.
So I'm trying to work on my "checklist" and I finally got to 'check' an item off. I picked up a pair of Bride seats with matching pair of Bride Rails. So the stitching of the seats were red and I decided to redo the interior to match.
I used these supplies, but I would suggest a proper sewing machine and T-135 nylon thread instead.
Here are some progress shots.
And the shiftboot before I made it "flush" with the shift knob.
It took me 3 hours for each door panel, and 5 hours for the shift boot and center console (stitching all the way to the back).
**Here is the informative part of the post where research helps, do things right the first time!**
So I had the seats ready to be placed in the car mounted with the rails. The driver side seat rail is the same for 00-09 s2ks! However, the passenger floor plan is different for 06+ as most of us know. I thought I could get some custom work done to the rail, but it seemed like too much work. The seat may not sit properly either so I didn't want to take a chance.
Here is the comparison (I hope this helps someone wanting to put a passenger seat rail into 06+):
Top: ap2 seat rail (special order), bottom: ap1 seat rail:
Part Numbers, AP1 Seat Rail:
Part Numbers, AP2 Seat Rail (Thanks Sam):
If you guys were to get custom work done, this is what you need to do (ap1 passenger seat rail fitment on 06+ floorplan):
The ap2 seat rail fits perfectly:
Finally, here are the seats installed. I might change the inner cushions to the Bride Black Gradation when they wear out. Fitment is great, doesn't hit the doors or center console and the compartments are fully useable
For the driver side, make sure you remove the sensor from the stock seats, I believe it's a torx T30 screw. I haven't figured out the passenger side rail sensor yet, I will work on that soon.
Thanks for looking and have a good weekend, I will check in soon with the upcoming stuff I don't want to spoil
Questions, comments, concerns....let me know.
Vince


 08-25-2011, 08:37 AM
#207
Registered User
Thread Starter
**Hi All, Just a couple teaser shots! August 25, 2011**
@clarkster, the spacers are on for everything. I haven't had time to lap this year, different clutch going in Sept so right now it's just a daily/wkend car.
Canibeat feature hasn't been uploaded yet, but I'm excited to see how it goes.
Last weekend I was helping a friend (Canibeat photographer) for some fashion shoot thing. The model wasn't ready for 3.5 hours after we setup, so we ended up parking lot pimping and was lucky to sneak in some shots. I only have two shots for now, but I am going to miss this setup after I change stuff around.


Photo credits to Sam McCargar
http://www.flickr.com/photos/sammccargar/

@clarkster, the spacers are on for everything. I haven't had time to lap this year, different clutch going in Sept so right now it's just a daily/wkend car.
Canibeat feature hasn't been uploaded yet, but I'm excited to see how it goes.
Last weekend I was helping a friend (Canibeat photographer) for some fashion shoot thing. The model wasn't ready for 3.5 hours after we setup, so we ended up parking lot pimping and was lucky to sneak in some shots. I only have two shots for now, but I am going to miss this setup after I change stuff around.
Photo credits to Sam McCargar
http://www.flickr.com/photos/sammccargar/


