
Chris_Lum's Mugen build


 03-11-2016, 11:08 AM
#1144
Originally Posted by Trustd_1' timestamp='1457570054' post='23903929
thanks for the kind offer to press the bushings out of my arms, but i live in NorCal. was thinking of getting a spare set, but didn't know they were so expensive and leery about buying used ones.
how do you like the Mugen bushings so far? considering those, the Spoons, or even urethane Powerflexes.
03-11-2016, 12:03 PM
#1145

Thread Starter
 car felt good...in the short time it was up and running haha
Originally Posted by Chris_Lum' timestamp='1457586912' post='23904134
[quote name='Trustd_1' timestamp='1457570054' post='23903929']
thanks for the kind offer to press the bushings out of my arms, but i live in NorCal. was thinking of getting a spare set, but didn't know they were so expensive and leery about buying used ones.
how do you like the Mugen bushings so far? considering those, the Spoons, or even urethane Powerflexes.
[/quote]
The bushings feel good, but haven't driven on them much since my shocks are being rebuilt. I don't think you can go wrong with either Mugen or Spoon. I'd highly recommend buying all new alignment hardware also. I don't know the entire history of my car, but I purchased it with only 9K miles from a guy in Seal Beach. I don't live near the beach and the car has always been garaged since then so, as someone else pointed out, i'm surprised at how rusty the alignment bolts got... from just rain water getting trapped I suppose. I'd assume frozen alignment bolts will happen to everyone eventually.
When looking the alignment up in the Helms, I was surprised to see that Honda recommends replacing the locking nuts anytime they're loosened as well (so every alignment). Not only that, but West End told me that out of all the hardware, the cam plates should be the items to be changed, not necessarily the nuts. So that pretty much covers all the hardware if you have frozen bolts to boot lol If/when you do the bushings, i'd suggest getting all of that (which consists of cam plates, bolts, cam-bolts and nuts). That way you can start out fresh as if the car came off the factory floor.
03-11-2016, 12:49 PM
#1146
If you got a group of 10 people together, the prices from a machine shop to waterjet cut that shouldn't be too bad at all, it doesn't look all that complex.
03-21-2016, 08:40 AM
#1147
Thread Starter
Since the car's been down due to suspension overhaul, I decided I might as well clean up the side mounts and paint them. I just threw on some spray paint for now. Didn't want to waste time and money getting them anodized since I will be redesigning them at a later time. Took some detailed pictures so you guys can see why I did what I did on these. I wish I could get them to sit a bit lower, but at the moment, I'm not sure if that's possible.

Painted:

One of the issues that I had and didn't foresee when first designing these side mounts was making room for the stock seat slider locks (the hinged prongs that lock your seat rail into place). OEM style seat lock units are pretty bulky compared to aftermarket style like Bride, Recaro, and BC. Below you can see that the seat slider lock is only being held on by 1 bolt and it looks like a hole needs to be drilled. This is because the slider lock is supposed to sit back further and line up with the 2 holes on the right side of the image. But due to the curvature of the seat bottom, I had to move the slider lock more towards the front of the seat making me need to drill a new hole that doesn't exist on the OEM seat brackets.

You can see the new bolt holding the slider lock in place (third bolt from the left).

Other side of the side mount, utilizing the new hole to hold the slider lock in place.

You can see here that due to curvature of seat bottom, slider lock can't be mounted further back.


Because I had to mount the slider lock forward by about 2 to 2.5", the adjustment handle stuck out too far. I ran it like this for a while but i kept stepping on it when getting into the car and it looked damn stupid sticking out so far so when I disassembled my the rails for paint, i decided to modify the handle. It was a pretty simple task, just taking an angle grinder and cutting off a section. Then I threw it in my vice and bent another 45° to retain the OEM shape.

The OEM slider locks utilize a wire/rod between the two rails to actuate the hinged locks. The OEM wire/rod was either too short or too long (I can't remember which) after the custom setup so I had to make my own. At first i used safety wire but it didn't look that great because safety wire looked all twisted and mangled. I remembered that I had some tiny steel rod used for my model cars that ended up working out perfectly. This rod needs to be the right strength. Not too weak that it’ll snap after repeated use but not too stiff that it would be too hard to bend at the ends.


Here are some final pictures of it all painted and assembled.

Ground clearance:

When I talked about wanting the seat to go lower, there are many issues due to utilizing the OEM rails. The seat slider locks block a lot of the front of the seat from going lower and towards the back where the seat butt dips down, you can kind of see here that the seat would actually start to hit the slider mechanism. Since the slider is riveted to the seat brackets, I don’t see anyway around this issue. Keen eyes would notice that I also left a bolt out towards the rear of the seat. this was unavoidable because there's no room between the seat and the side mount for a bolt head. That's another thing I didn't take into consideration when initially designing these and something i will leave out of the final version so there aren't any extra, empty holes like that.
I’m thinking the only way to get the seat lower at this point is to have the sliders sit wider. But the seat sits pretty much as low as it can go, similar to how it sat with the Buddy Club rails. There’s a small gap below the seat but I’m happy with it for how solidly mounted it feels now.

Shot showing that the adjustment handle doesn’t stick out much now. Similar to OEM:


Painted:
One of the issues that I had and didn't foresee when first designing these side mounts was making room for the stock seat slider locks (the hinged prongs that lock your seat rail into place). OEM style seat lock units are pretty bulky compared to aftermarket style like Bride, Recaro, and BC. Below you can see that the seat slider lock is only being held on by 1 bolt and it looks like a hole needs to be drilled. This is because the slider lock is supposed to sit back further and line up with the 2 holes on the right side of the image. But due to the curvature of the seat bottom, I had to move the slider lock more towards the front of the seat making me need to drill a new hole that doesn't exist on the OEM seat brackets.
You can see the new bolt holding the slider lock in place (third bolt from the left).
Other side of the side mount, utilizing the new hole to hold the slider lock in place.
You can see here that due to curvature of seat bottom, slider lock can't be mounted further back.
Because I had to mount the slider lock forward by about 2 to 2.5", the adjustment handle stuck out too far. I ran it like this for a while but i kept stepping on it when getting into the car and it looked damn stupid sticking out so far so when I disassembled my the rails for paint, i decided to modify the handle. It was a pretty simple task, just taking an angle grinder and cutting off a section. Then I threw it in my vice and bent another 45° to retain the OEM shape.
The OEM slider locks utilize a wire/rod between the two rails to actuate the hinged locks. The OEM wire/rod was either too short or too long (I can't remember which) after the custom setup so I had to make my own. At first i used safety wire but it didn't look that great because safety wire looked all twisted and mangled. I remembered that I had some tiny steel rod used for my model cars that ended up working out perfectly. This rod needs to be the right strength. Not too weak that it’ll snap after repeated use but not too stiff that it would be too hard to bend at the ends.
Here are some final pictures of it all painted and assembled.
Ground clearance:
When I talked about wanting the seat to go lower, there are many issues due to utilizing the OEM rails. The seat slider locks block a lot of the front of the seat from going lower and towards the back where the seat butt dips down, you can kind of see here that the seat would actually start to hit the slider mechanism. Since the slider is riveted to the seat brackets, I don’t see anyway around this issue. Keen eyes would notice that I also left a bolt out towards the rear of the seat. this was unavoidable because there's no room between the seat and the side mount for a bolt head. That's another thing I didn't take into consideration when initially designing these and something i will leave out of the final version so there aren't any extra, empty holes like that.
I’m thinking the only way to get the seat lower at this point is to have the sliders sit wider. But the seat sits pretty much as low as it can go, similar to how it sat with the Buddy Club rails. There’s a small gap below the seat but I’m happy with it for how solidly mounted it feels now.
Shot showing that the adjustment handle doesn’t stick out much now. Similar to OEM:
03-21-2016, 11:45 AM
#1148
How did you ensure that the seat and side mount are the correct width that you don't need any adjustment where the side mount meets the rail in order for each rail to line up with the OEM location? Looks like the side mount is fixed in a permanent position to the rail, and can't imagine that the combo results in an exact line up with the mount locations on the floor. (may have missed this part)
03-21-2016, 12:52 PM
#1149
Thread Starter
How did you ensure that the seat and side mount are the correct width that you don't need any adjustment where the side mount meets the rail in order for each rail to line up with the OEM location? Looks like the side mount is fixed in a permanent position to the rail, and can't imagine that the combo results in an exact line up with the mount locations on the floor. (may have missed this part)
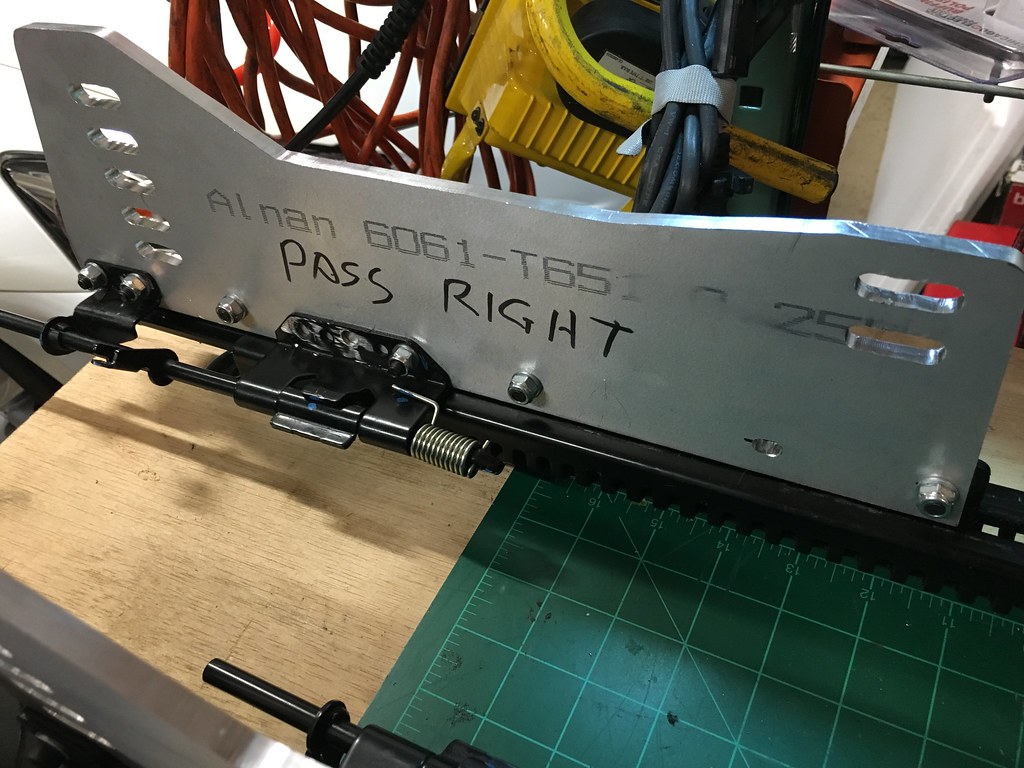
I ran the idea by my fabricator and he recommend thicker aluminum (the original thickness would have been fine for steel he said, but I would be safer using thicker if I wanted to use aluminum). So we used a thicker aluminum sheet and when all mounted up, the bolt holes to the car didn't line up...which made me panic a bit.
With another stroke of luck though, I was simply able to get creative with the side mounts and make it work without having to use any washers or spacers. Instead of mounting both side mounts on the inside of both OEM rails (or both on the outsides), I had to bias them to one side, so I mounted each side mount on the left side of the OEM rails for the Driver side, effectively biasing the seat away from the middle of the car by a few MM. I actually like this way better because I can even bias it the other direction and mount both side mounts on the right side of the OEM rails and bias the seat towards the middle of the car if I wanted. So there's some inadvertently built in customizability now...obviously it's not a lot, but a few MM may help me or someone else someday. The pole position clears the door panel and glovebox biased either way, but it rubs less against the center tranny tunnel biased outwards so that's the way I went.
