In-Car Video Setup
 I’ve been trying to get the right pieces together for a flexible and
(relatively) affordable in-car video camera set up, and I think the
camera I got today finishes it off.
The cheapest way to do in-car video, of course, is to make a
home-made camera mount and slap on a $25 VHS camcorder that you picked
up at a garage sale. When the car shakes the old camcorder apart, you
take a Sunday morning and go find another garage sale. Simple and cheap.
In my case, I want to be able to put one camera on the front
bumper, or the rear wing (or pointed at the suspension, even), and one
camera in the cockpit, showing the steering wheel and my feet as I
drive. So, I ideally need two bullet cameras, a way to combine the two
for a picture-in-picture effect, and a way to record the combined image
that makes it easy to get it to the primary place I view it, my
computer.
RECORDER
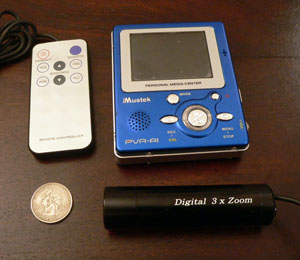
The Mustek PVR-A1 is a no-moving-parts solution that records MPEG-4
encoded video files to a SD memory card and is about the size of an
iPod. It also has a screen, so you can see that your cameras are
working correctly, and also review your laps right there at the track.
It also has a rechargeable battery for when it’s out of the car, so you
can show other people your laps and exciting off-track excursions. (As
a bonus, you can listen to MP3’s on it and look at pictures of your
wife and kids.)
A $50 SD card holds 3.5 hours of video, and goes right into a $5 reader
for the laptop, which means no cables, encoding, or other nonsense when
you want to get the videos into the computer.
It’s the bargain of the package, too, at about $95 through Amazon.com.
PICTURE-IN-PICTURE
The View-2.com box by RCD Video
allows you to combine two incoming video streams into one image. You
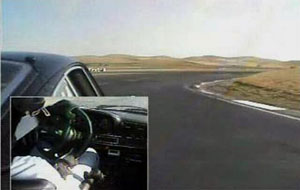
can have an inset box, like you see above. You can change the size and
location of the box in the frame, and you can also do half-split frames
(horizontal or vertical) if you want to do a front-rear setup. It’s
$289, because it’s not really a consumer item. It’s available here.
It’s not cheap, but I think there’s a real value to being able to see
what you’re doing (in addition to what the car is doing) in a lap video.
CAMERAS
I found a cheap source for Sony 1/3-inch CCD HAD bullet cameras, and
there’s an annoying problem with them that finally pushed me to buy a
more expensive model. Many bullet cameras seem to be engineered for
low-light photography, which makes them ‘bleach out’ too readily in
bright light use — like when you’re driving at the track. I’ve finally
concluded that the cheap cameras are fine for the cockpit-based camera
(since there’s less light in the car), so this one is a good choice for that.
But I just found a better solution for the main camera. It’s a 530-line
high-resolution camera with a 1/3-inch latest-generation SuperHAD
(whatever that means) Sony sensor. Out of the box, it is less prone to
the ‘bleaching’ effect, and it’s capable of high enough resolution so
that you could record to DV tapes and have a DVD-like image. But what
it also has that’s unusual is a wired remote control that you can
attach to it which allows you to digitally zoom in or out, and pan or
tilt on the digitally zoomed image. That’s cool, but it’s not important
to lap videos. But it also allows you to manually adjust the camera’s
iris up or down in steps to compensate for a too-bright sky (or a
too-dark day, or anything else, I guess). I believe the iris still
responds automatically to incoming light level changes, at this point,
but the steps allow you to change the range that it’s opening or
closing the iris within. When you power the camera off, it reverts to
its normal settings.
It’s $209 for this camera,
and another $25 for the remote control. But the manual control the
remote gives you is unique among the bullet cameras I’ve seen, and it
holds the settings even after you unplug the remote. This retailer also
includes all the stuff the other guys typically nickel and dime you
for. You get an AC adapter, a 25-foot video and power cable, a 12V
battery adapter, the RCA cables to connect it to a digital recorder or
VCR, and a BNC-RCA adapter. I also got an extra lens for $20. It came
with a wide-angle 3.6mm lens. I also got a 2.9-mm one that’s even
wider. I can switch them pretty easily without compromising the
camera’s weatherproof-ness.
 The company that sells it is in St. Louis, and they sell it for $209
even though it lists on their site for $229. They’re kind of new to
e-commerce, and promise a simpler on-line ordering system in the next
couple of weeks. But I ordered it on Sunday, and it shipped Monday by
FedEx for only $8, with no sales tax. I was very impressed with their
follow-up and service. They emailed me to let me know about the $20
price cut, for example.
Here’s a 4-meg video clip
that shows the camera opening and closing its iris. I tried to find the
most difficult thing to photograph. It was getting dark outside, and it
was dark in the house. I pointed the camera at the setting sun to get
the most ‘bleached’ effect I could manage. (As a side note, my video
editing software is still butchering the image that’s recorded, but I’m
working on fixing that.)
MICROPHONE
You also need an $8 microphone.
It’s probably something you can get at Radio Shack, as well. It’s
worthwhile to make the trip to Radio Shack to put together some 12V
power lines from the cigarette lighter or other source with plugs for
the cameras and the recorder.
RESULTS
I’ve been socked in with work stuff, and I’m out of town this
weekend, but I’m hoping to do some test videos next week that I’ll try
to post. After that, I want to finish educating myself in overlaying
DL-1 data logger data onto the videos, which will show speed, rpms,
lateral g’s, and other data on the clip.
